ZERTRAN ZT-V0571B
ZERTRAN 9-Inch Car Stereo User Manual
Model: ZT-V0571B for Mitsubishi Outlander (2005-2012)
1. Introduction
This manual provides detailed instructions for the installation, operation, and maintenance of your ZERTRAN 9-inch Car Stereo. This unit features Carplay, Android Auto, GPS Navigation, FM Radio, Bluetooth, WiFi, and steering wheel control compatibility. Please read this manual thoroughly before installation and use to ensure proper function and safety.
2. Safety Information
- Ensure the vehicle's engine is off and the parking brake is engaged before beginning installation.
- Disconnect the vehicle's battery negative terminal before installation to prevent electrical shorts.
- Consult a professional installer if you are unsure about any part of the installation process.
- Do not operate the unit in a way that distracts you from driving. Always prioritize road safety.
- Avoid exposing the unit to extreme temperatures, direct sunlight for prolonged periods, or excessive moisture.
3. Package Contents
Verify that all items listed below are included in your package:

This image displays the main 9-inch Android car unit along with its accessories, including the power cable, specific cable plug, camera input cable, two USB cables (4-pin and 6-pin), GPS antenna, RCA wire harness, AHD reverse camera, external microphone, and plastic crowbar tools for installation.
- 1 x ZERTRAN 9-inch Main Android Car Unit
- 1 x GPS Antenna
- 1 x Power Cable
- 2 x USB Ports/Cables
- 1 x RCA Cable Extension
- 1 x RCA Connector for Rearview Camera
- 1 x AHD Reverse Camera (Gift)
- 1 x External Microphone (Gift)
- 1 x Set of Installation Crowbar Tools (Gift)
4. Installation
4.1 Pre-Installation Check
Before proceeding with installation, it is crucial to identify your vehicle's original radio configuration, especially regarding the audio system. Some Mitsubishi Outlander models (2005-2012) may come with a factory-installed amplifier, often indicated by a 'Rockford' logo on the original radio unit.

This image illustrates the difference between a standard original radio and one equipped with a 'Rockford Fosgate' amplifier. If your original radio has the 'Rockford' logo, an additional Canbus decoder is necessary for sound functionality. If no 'Rockford' logo is present, direct installation is typically possible.
Important: If your original car radio has a 'Rockford' logo, indicating an amplifier, you will need to purchase an extra Canbus decoder. Failure to do so may result in no sound from the new head unit. Please contact the seller for assistance if your car is equipped with the original car amplifier.
4.2 General Installation Steps (Plug & Play)
The ZERTRAN car stereo is designed for plug-and-play installation. Basic DIY ability is recommended for self-installation.
- Disconnect Battery: Disconnect the negative terminal of your car battery.
- Remove Original Unit: Carefully remove the original car stereo unit and trim panels using the provided crowbar tools.
- Connect Wiring: Connect the new unit's power cable, GPS antenna, USB cables, and other necessary wiring to the corresponding ports. Ensure all connections are secure. If applicable, connect the Canbus decoder.
- Test Connections: Before fully reassembling, temporarily reconnect the battery and power on the unit to ensure basic functions (power, sound, display) are working.
- Install Reverse Camera (Optional): If installing the reverse camera, route the camera cable to the rear of the vehicle and connect it to the RCA connector for the rearview camera.
- Secure New Unit: Mount the ZERTRAN car stereo into the dashboard opening.
- Reassemble: Reattach all trim panels and secure them properly.
- Reconnect Battery: Reconnect the negative terminal of your car battery.

This image demonstrates the visual transformation of the car's dashboard, showing the original radio unit before installation and the sleek integration of the ZERTRAN 9-inch car stereo after installation.
5. Initial Setup
Upon first power-on, the unit may guide you through an initial setup process. This typically includes:
- Language Selection: Choose your preferred operating language.
- Time and Date: Set the correct time zone, date, and time.
- Wi-Fi Connection: Connect to an available Wi-Fi network for internet access, updates, and app downloads.
- GPS Calibration: Ensure the GPS antenna is properly positioned for optimal signal reception.
- Steering Wheel Control Learning: Configure your steering wheel buttons to control the stereo functions (see Section 6.5).
6. Operating Instructions
6.1 CarPlay & Android Auto
Seamlessly integrate your iOS or Android smartphone with the car stereo for navigation, music, calls, and more. Connect your phone via USB or wirelessly (if supported by your phone and unit).

This image demonstrates the Carplay and Android Auto functionalities, showing how both iOS and Android devices can integrate with the car stereo to display phone applications and features on the larger screen.
- CarPlay (for iOS devices): Connect your iPhone via USB. The CarPlay interface will automatically launch on the stereo screen.
- Android Auto (for Android devices): Connect your Android phone via USB. The Android Auto interface will automatically launch.
- Voice Assistant: Use voice commands (Siri for CarPlay, Google Assistant for Android Auto) to control functions without diverting attention from the road.
6.2 GPS Navigation
The unit supports various navigation applications. Ensure the GPS antenna is connected and has a clear view of the sky for accurate positioning.
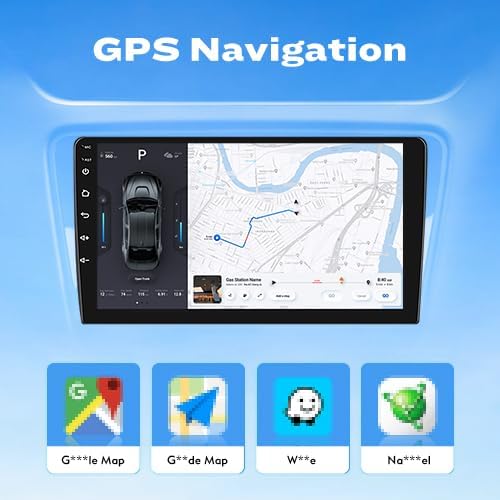
This image highlights the GPS navigation capabilities of the unit, displaying a map interface on the screen. It also shows icons for popular navigation applications such as Google Maps, iGO, Waze, and Navitel, indicating broad compatibility.

This image further illustrates the unit's support for a wide range of navigation applications, including Google Maps, iGO, Navitel, Waze, Sygic, and G*ode Map, allowing users to choose their preferred mapping service.
- Accessing Navigation: Tap the 'Navigation' icon on the home screen or use a voice command.
- Map Updates: Connect to Wi-Fi to download map updates for your preferred navigation app.
6.3 FM Radio
Tune into your favorite FM radio stations.
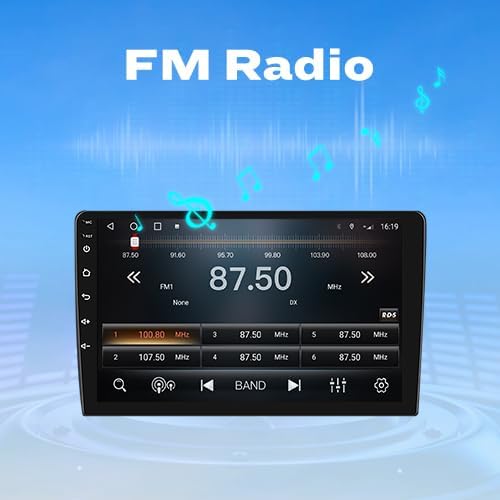
This image displays the FM radio interface on the car stereo, showing the current frequency (87.50 MHz), tuning controls, and preset station buttons for easy access to your favorite radio channels.
- Auto Scan: Use the auto-scan function to find and save available stations.
- Manual Tuning: Manually adjust the frequency to specific stations.
- Presets: Save your favorite stations to preset buttons for quick access.
6.4 Bluetooth Function (BT)
Connect your smartphone via Bluetooth for hands-free calling and audio streaming.

This image illustrates the Bluetooth functionality, showcasing the car stereo's interface for making calls with a dial pad and contact display, as well as a smartphone wirelessly streaming music to the unit via Bluetooth.
- Pairing: Enable Bluetooth on your phone and search for the car stereo (usually named 'CarBT' or similar). Select it to pair.
- Hands-Free Calling: Make and receive calls directly from the stereo screen.
- Audio Streaming: Play music from your phone through the car's speakers.
6.5 Steering Wheel Control
Configure your vehicle's steering wheel buttons to control the car stereo functions.
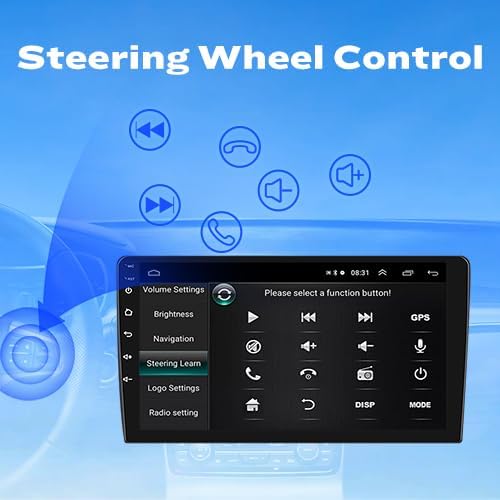
This image displays the 'Steering Learn' menu within the car stereo's settings, where users can program their steering wheel buttons to control functions such as volume adjustment, track skipping, and call management, enhancing driving convenience.
- Access Settings: Go to 'Settings' and find the 'Steering Learn' or 'Steering Wheel Control' option.
- Program Buttons: Follow the on-screen instructions to assign functions to each steering wheel button.
6.6 Car Reverser Camera (Optional)
If installed, the rearview camera display will automatically activate when the vehicle is shifted into reverse.

This image demonstrates the car reverser camera functionality, showing the car stereo screen displaying the live feed from the rearview camera with parking guidelines, aiding in safe maneuvering. An external camera unit is also depicted.
- Automatic Display: The camera view appears automatically when reverse gear is engaged.
- Parking Guidelines: Dynamic or static guidelines may be displayed to assist with parking.
6.7 Dual Screen Display
The unit supports displaying two applications simultaneously on the screen, enhancing multitasking.
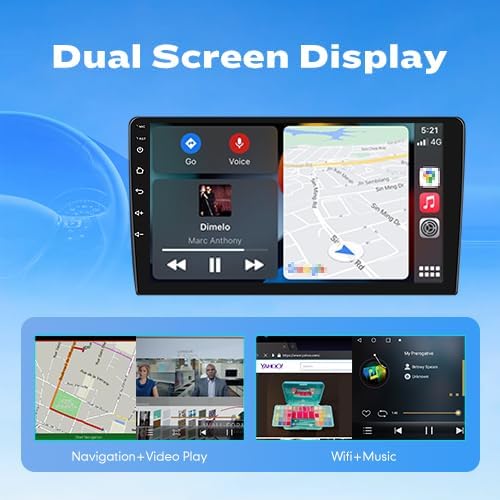
This image illustrates the dual screen display feature, showing the car stereo screen divided to run two applications concurrently, such as navigation alongside video playback, or Wi-Fi browsing with music, providing enhanced multitasking capabilities.
- Split Screen Mode: Access this feature through the unit's interface to run two apps side-by-side, for example, navigation and music.
7. Maintenance
- Cleaning the Screen: Use a soft, lint-free cloth to gently wipe the touchscreen. For stubborn smudges, slightly dampen the cloth with water or a screen-safe cleaner. Avoid harsh chemicals.
- Software Updates: Periodically check for software updates via the unit's settings menu when connected to Wi-Fi. Updates can improve performance and add new features.
- General Care: Keep the unit free from dust and debris. Ensure proper ventilation around the unit to prevent overheating.
8. Troubleshooting
| Problem | Possible Cause | Solution |
|---|---|---|
| No power/Unit does not turn on | Loose power connection; Blown fuse; Incorrect wiring. | Check power cable connections. Inspect vehicle's fuse box and the unit's inline fuse. Verify wiring against installation diagram. |
| No sound | Volume too low; Mute activated; Incorrect speaker wiring; Missing Canbus decoder for amplified systems. | Increase volume. Check mute setting. Verify speaker connections. If your car has a 'Rockford' amplifier, ensure a Canbus decoder is installed. |
| GPS signal lost or inaccurate | GPS antenna obstructed or improperly placed; Antenna not connected. | Ensure GPS antenna has a clear view of the sky. Check antenna connection to the unit. |
| Bluetooth not connecting | Bluetooth not enabled on phone or unit; Incorrect pairing process. | Ensure Bluetooth is active on both devices. Delete previous pairings and re-attempt pairing. |
| Touchscreen unresponsive | Temporary software glitch; Screen dirty. | Restart the unit. Clean the screen. If issue persists, perform a factory reset (note: this will erase settings). |
If you encounter issues not listed here or if the suggested solutions do not resolve the problem, please contact ZERTRAN customer support for further assistance.
9. Specifications
| Feature | Detail |
|---|---|
| Model Number | ZT-V0571B |
| Display Size | 9 Inches |
| Operating System | Android |
| Resolution | 1920 x 1080 |
| Connectivity Technology | Bluetooth, Cellular, Wi-Fi |
| Special Features | Bluetooth, Touchscreen, CarPlay, Android Auto, GPS Navigation, DSP, Steering Wheel Control |
| Audio Output Mode | Speaker, Stereo |
| Map Type | Road |
| Parcel Dimensions | 33 x 19 x 11 cm |
| Item Weight | 1.9 kg |
10. Warranty and Support
ZERTRAN products are designed for reliability and performance. For warranty information, please refer to the documentation included with your purchase or contact the seller directly. If you require technical support, have questions about installation, or need assistance with troubleshooting, please reach out to ZERTRAN customer service. Provide your product model number (ZT-V0571B) and purchase details for efficient service.