1. Introduction
Thank you for choosing the Eujgoov BSIDE A1X Intelligent Smart Multimeter. This device is designed for precise and safe electrical measurements, offering a wide range of functions including voltage, capacitance, resistance, and diode testing. Its auto-ranging capability and clear digital display make it easy to use for both professionals and DIY enthusiasts. Please read this manual thoroughly before operation to ensure proper use and to maximize the lifespan of your multimeter.

Figure 1: Eujgoov BSIDE A1X Digital Multimeter and accessories.
2. Product Overview
2.1 Components and Controls
Familiarize yourself with the various parts of your BSIDE A1X Multimeter:

Figure 2: Labeled components of the BSIDE A1X Multimeter.
- Non-Contact Voltage Sensing Area: Located at the top, used for detecting AC voltage without direct contact.
- Flashlight: Integrated light for illuminating dark work areas.
- Display Screen: Large digital display showing measurement readings, mode indicators, and battery status.
- Function Mode Switching Button: Cycles through different measurement modes.
- Capacitive Mode Button: Dedicated button for capacitance measurements.
- Diode Mode Button: Dedicated button for diode testing.
- Flashlight and Backlight Button: Activates/deactivates the flashlight and display backlight.
- Switch Button: Power on/off button.
- Black Probe Socket (COM): Common input terminal for the black test lead.
- Red Probe Socket (INPUT): Input terminal for the red test lead for most measurements.
2.2 Key Features
- Smart Auto-Ranging: Automatically identifies and measures voltage, resistance, continuity, and frequency.
- Versatile Testing: Capable of testing AC/DC voltage, capacitance, resistance, diode, and continuity.
- Non-Contact Voltage (NCV) Detection: Safely detects AC voltage without direct contact.
- Live/Neutral Wire Check: Distinguishes between live and neutral wires by comparing signal strength.
- Large Digital Display: 1,999 counts digital display for clear and accurate readings.
- Built-in Flashlight & Backlight: Enhances visibility in low-light conditions.
- Rechargeable Li-ion Battery: Integrated 400mAh battery for convenient and long-lasting use.
- Compact and Portable: Lightweight design for easy carrying and use in various environments.
- Durable Construction: ABS casing provides electrical insulation and protection against drops.
3. Setup
3.1 Initial Charging
Before first use, it is recommended to fully charge the built-in lithium-ion battery. Use the provided USB cable to connect the multimeter to a standard USB power source (e.g., computer USB port, USB wall adapter). The charging indicator will show the charging status.
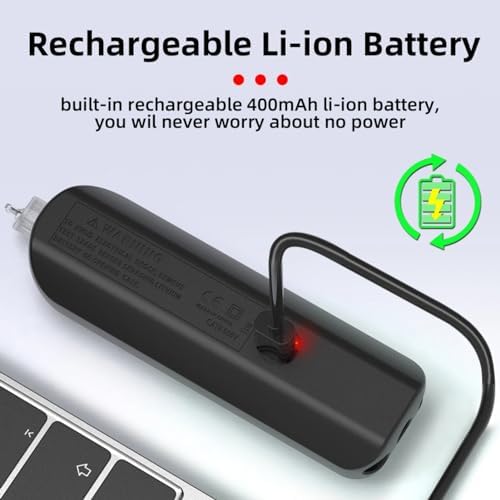
Figure 3: Charging the multimeter via USB cable.
3.2 Connecting Test Leads
For most measurements, connect the black test lead to the COM (Common) input terminal and the red test lead to the INPUT terminal. Ensure the connections are secure before taking any measurements.
4. Operating Instructions
The BSIDE A1X features intelligent auto-ranging, simplifying most measurements. Press the power button to turn on the device. It will typically start in auto mode.
4.1 Auto Mode Operation
In auto mode, the multimeter automatically detects the type of measurement (voltage, resistance, continuity) and selects the appropriate range. Simply connect the test leads to the circuit or component you wish to measure.
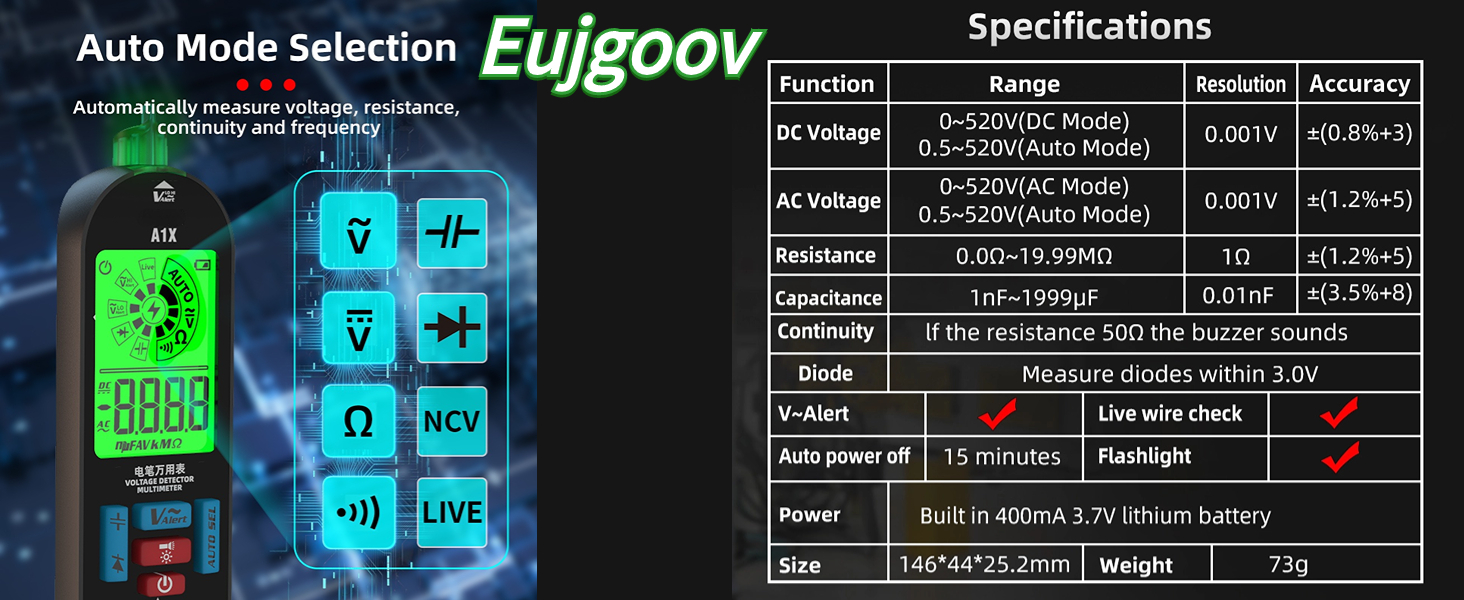
Figure 4: Auto Mode Selection and supported measurement types.
4.2 Specific Measurement Functions
While in auto mode, you can press the function mode switching button to cycle through specific measurement types if needed, or use dedicated buttons for Capacitance and Diode testing.

Figure 5: Various measurement applications of the multimeter.
- Voltage Measurement (AC/DC): Connect the test leads in parallel to the circuit. The multimeter will automatically detect AC or DC voltage.
- Resistance Measurement: Ensure the circuit is de-energized. Connect the test leads across the component to measure its resistance.
- Continuity Test: Used to check if a circuit is open or closed. A buzzer will sound if continuity is detected (resistance below 50Ω).
- Capacitance Measurement: Important: Discharge capacitors before measuring to avoid damage to the meter. Connect the test leads across the capacitor.
- Diode Test: Connect the test leads across the diode. The display will show the forward voltage drop.
4.3 Non-Contact Voltage (NCV) Detection
To use the NCV function, hold the top of the multimeter near the conductor. The device will indicate the presence of AC voltage through visual and audible alerts. This is useful for quickly checking for live wires without direct contact.

Figure 6: Non-contact voltage detection in action.
4.4 Live/Neutral Wire Check
The multimeter can help distinguish between live and neutral wires. By comparing the strength of the detected voltage signal, the wire with the stronger signal is identified as the live wire.

Figure 7: Live/Neutral Wire Check functionality.
4.5 Official Product Video
Video 1: Demonstration of the BSIDE A1X Intelligent Digital Multimeter's auto-ranging and various measurement capabilities.
5. Maintenance
- Cleaning: Use a soft, damp cloth to clean the exterior of the multimeter. Do not use abrasive cleaners or solvents.
- Storage: Store the multimeter in a cool, dry place away from direct sunlight and extreme temperatures.
- Battery Care: Recharge the battery regularly, even if the device is not frequently used, to maintain battery health. Avoid fully discharging the battery for extended periods.
- Probe Inspection: Periodically inspect the test leads and probes for any signs of damage, such as frayed wires or cracked insulation. Replace damaged leads immediately.
6. Troubleshooting
| Problem | Possible Cause | Solution |
|---|---|---|
| Multimeter does not power on. | Low or depleted battery. | Charge the multimeter using the provided USB cable. |
| Inaccurate readings. | Incorrect mode selected; damaged test leads; external interference. | Ensure correct mode is selected (or use auto mode). Check test leads for damage. Move away from strong electromagnetic fields. |
| No display or dim display. | Battery low; backlight off. | Charge the battery. Press the flashlight/backlight button to activate backlight. |
| Continuity buzzer not working. | Circuit resistance too high; continuity mode not selected. | Ensure resistance is below 50Ω for buzzer activation. Select continuity mode if not in auto. |
7. Specifications

Figure 8: Multimeter in various application scenarios.
| Feature | Detail |
|---|---|
| Brand | Eujgoov |
| Model | BSIDE A1X (Eujgoovdumb74wi8p) |
| Power Source | Battery Powered (Built-in 400mAh 3.7V Lithium Battery) |
| Color | Black |
| Item Weight | 0.18 Kilograms (6.4 ounces) |
| Measurement Type | Multimeter (Auto Ranging) |
| DC Voltage Range | 0~520V (DC Mode), 0.5~520V (Auto Mode) |
| AC Voltage Range | 0~520V (AC Mode), 0.5~520V (Auto Mode) |
| Resistance Range | 0.00~19.99MΩ |
| Capacitance Range | 1nF~1999µF |
| Diode Measurement | Measures diodes within 3.0V |
| Continuity | Buzzer sounds if resistance is below 50Ω |
| Auto Power Off | 15 minutes of inactivity |
| Display Counts | 1,999 counts |
| Dimensions (L x W x H) | 14.6 x 4.4 x 2.52 cm (5.7 x 1.7 x 0.9 inches) |
| Country of Origin | China |
8. Warranty and Support
For information regarding warranty coverage and customer support, please refer to the product packaging or contact the seller directly. Keep your purchase receipt as proof of purchase.
For technical assistance or inquiries, please reach out to Eujgoov customer service through the platform where you purchased the product.