Introduction
This manual provides detailed instructions for the setup, operation, and maintenance of your KONGTEN Nicetymeter 0366 WIFI Weather Station. This device is designed to provide accurate local weather data, including temperature, humidity, wind speed, wind direction, and precipitation, directly to your base station and online weather services.
Package Contents
Please verify that all items listed below are included in your package:
- Base Station (Display Console) with Stand
- 6-in-1 Outdoor Multi-Sensor
- Mounting Material for Outdoor Sensor
- User Manual (this document)
- 1 x LR41 Battery (pre-installed or included for specific components)
Product Overview
The KONGTEN Nicetymeter 0366 Weather Station consists of two main components: the indoor display base station and the outdoor 6-in-1 multi-sensor.
Outdoor Multi-Sensor
This unit wirelessly transmits environmental data to the base station. It integrates multiple sensors:
- Rain Funnel: Collects and measures precipitation.
- Solar Panel: Powers the sensor and charges internal batteries.
- Wind Vane: Determines wind direction.
- High-Speed Anemometer (Wind Cups): Measures wind speed.
- Thermo-Hygrometer Radiation Shield: Houses temperature and humidity sensors, protecting them from direct sunlight.
- Level Indicator: Assists in proper horizontal mounting.
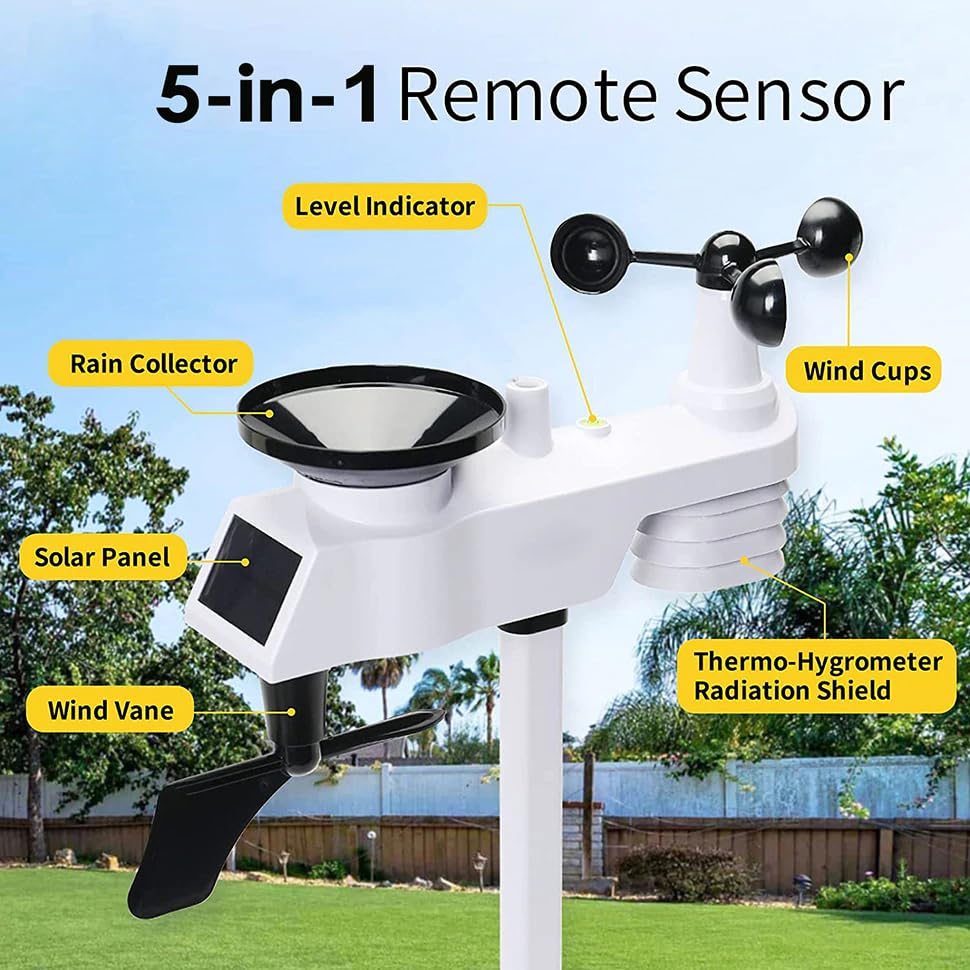
Figure 1: Labeled components of the 6-in-1 Outdoor Multi-Sensor. This image shows the rain collector, solar panel, wind vane, level indicator, wind cups, and the thermo-hygrometer radiation shield, highlighting each part's function.
Base Station (Display Console)
The base station receives data from the outdoor sensor and displays it on a clear color screen. It also connects to your home Wi-Fi network to upload data to online weather services.
Setup
1. Outdoor Multi-Sensor Assembly and Placement
- Assemble the Sensor: Attach the wind cups, wind vane, and mounting pole to the main sensor body according to the diagrams in the included quick start guide. Ensure all parts are securely fastened.
- Choose a Location: Select an outdoor location that is open and unobstructed to ensure accurate readings for wind, rain, and sunlight.
- Avoid placing near large buildings, trees, or other structures that could block wind or rain.
- Ensure the solar panel receives adequate direct sunlight throughout the day.
- The sensor should be mounted at a height that allows for accurate wind measurement, typically 2-3 meters (6-10 feet) above ground level, if possible.
- Mount the Sensor: Use the provided mounting hardware to securely attach the sensor to a pole or suitable surface. Use the integrated level indicator to ensure the sensor is perfectly horizontal for accurate rain and wind measurements.
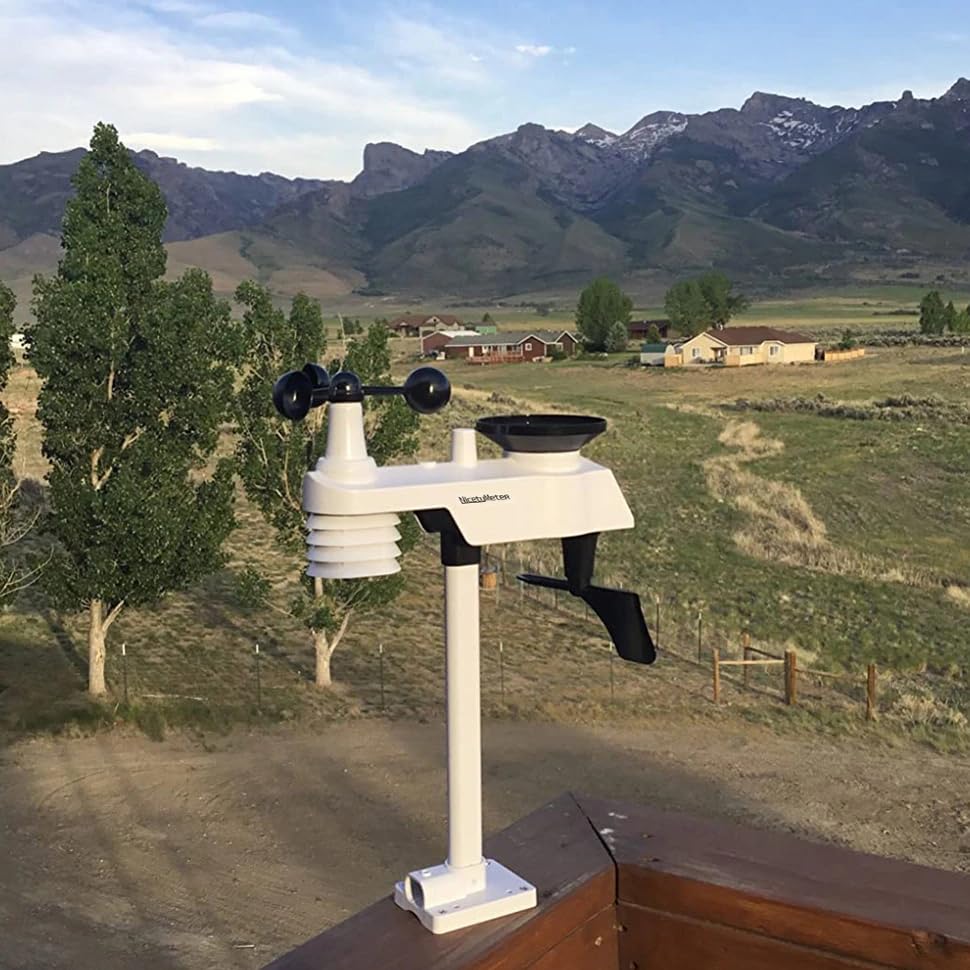
Figure 2: Example of the KONGTEN Nicetymeter 0366 outdoor sensor mounted in an open environment, demonstrating a suitable placement for optimal data collection.
2. Base Station Power and Placement
- Power On: Connect the base station to a power outlet using the provided USB cable and adapter. The display will illuminate.
- Place the Base Station: Position the base station indoors, within the wireless reception range of the outdoor sensor. The display can be placed on a table in any room.
3. Initial Synchronization and Wi-Fi Setup
- Sensor Connection: The base station will automatically attempt to connect with the outdoor multi-sensor. This may take a few minutes. Ensure both units are powered on and within range.
- Wi-Fi Configuration: Follow the on-screen prompts or refer to the quick start guide for instructions on connecting your base station to your home Wi-Fi network. This typically involves using a mobile app or a web interface.
- Online Weather Services: Once connected to Wi-Fi, you can configure the station to upload data to Weather Underground and Weathercloud.
- Download the respective apps (available on Google Play & App Store) or visit their websites.
- Create an account and register your weather station using the device ID provided on your base station or in the quick start guide.
- Follow the instructions within the app/website to link your station and begin data transmission.

Figure 3: Examples of the Weather Underground and Weathercloud platforms, illustrating how weather data from your station can be displayed and shared online.
Operating Instructions
Display Navigation
The base station features a clear color display that organizes information into distinct areas. Use the buttons on the base station (typically located on the front or side) to navigate through different display modes, view historical data, or adjust settings.
- Main Screen: Displays current indoor and outdoor temperature, humidity, wind speed, wind direction, and precipitation.
- Forecast Icons: Provides a graphical weather forecast based on barometric pressure trends.
- Historical Data: Access daily, weekly, or monthly records for various parameters.
- Alarms: Set customizable alerts for temperature, wind, or other conditions.
Data Interpretation
Familiarize yourself with the icons and numerical values on the display. The manual will detail specific symbols for weather trends, moon phases, and other indicators. For detailed explanations of each data point, refer to the specific sections in the quick start guide.
Maintenance
Outdoor Sensor Cleaning
Regular cleaning of the outdoor sensor ensures accurate readings. Perform these checks periodically, especially after heavy rain or strong winds:
- Rain Funnel: Clear any debris (leaves, insects) from the rain collector to prevent blockages.
- Wind Cups & Vane: Ensure they spin freely. Remove any obstructions.
- Solar Panel: Wipe the solar panel with a soft, damp cloth to remove dirt and dust, ensuring optimal charging.
- Thermo-Hygrometer Shield: Check for any insect nests or debris that might impede airflow.
Battery Replacement
The outdoor sensor is primarily solar-powered but may contain backup batteries (e.g., LR41) for continuous operation during low light conditions. The base station typically uses AC power via USB. If the outdoor sensor's battery indicator shows low power, replace the batteries as follows:
- Locate the battery compartment on the outdoor sensor (refer to the quick start guide for exact location).
- Open the compartment and replace the old batteries with new ones of the specified type (e.g., LR41).
- Close the compartment securely, ensuring the seal is intact to maintain weather resistance.
Troubleshooting
- No Display on Base Station:
- Ensure the USB power cable is securely connected to the base station and a working power outlet.
- Check if the power adapter is functioning correctly.
- Outdoor Sensor Data Not Displaying:
- Verify the outdoor sensor is powered on and its batteries are not depleted.
- Ensure the outdoor sensor and base station are within wireless range (typically up to 100 meters in open air).
- Check for any strong interference sources (e.g., thick walls, large metal objects, other wireless devices) between the sensor and base station.
- Try resetting both the outdoor sensor and the base station (refer to the quick start guide for reset procedures).
- Inaccurate Readings:
- Temperature/Humidity: Ensure the outdoor sensor is not in direct sunlight (the radiation shield should protect it) or near heat sources/vents.
- Wind: Check that the wind cups and vane are spinning freely and are not obstructed. Ensure the sensor is mounted in an open area.
- Rain: Clear any debris from the rain funnel. Ensure the sensor is level.
- Wi-Fi Connection Issues:
- Confirm your Wi-Fi network is active and the password is correct.
- Ensure the base station is within range of your Wi-Fi router.
- Restart your Wi-Fi router and the weather station.
- Check your router settings for any MAC address filtering or other security features that might block new devices.
Specifications
| Parameter | Value |
|---|---|
| Model Number | 0366 (Rk-WS-0366 RF) |
| Brand | KONGTEN |
| Manufacturer | NicetyMeter |
| Connectivity Technology | Wi-Fi, RF (433MHz for sensor), USB (for base station power/data) |
| Power Source | Battery Powered (Outdoor Sensor), USB Powered (Base Station) |
| Outdoor Sensor Batteries | 1 x LR41 (included) |
| Material | Acrylonitrile Butadiene Styrene (ABS) |
| Product Dimensions | 20 x 15 x 10 cm |
| Product Weight | 700 g |
| Upper Temperature Rating | 50 Degrees Celsius |
| Wireless Transmission Frequency | 433MHz (Outdoor Sensor to Base Station) |
Warranty and Support
For warranty information and technical support, please refer to the documentation included with your purchase or contact the manufacturer, NicetyMeter, directly. Keep your purchase receipt as proof of purchase for any warranty claims.
For further assistance, you may also visit the official websites for Weather Underground and Weathercloud for community support and resources related to data integration.