1. Introduction
Thank you for choosing the GREEN PARTY 20x40FT Heavy Duty Party Tent. This manual provides essential information for the safe and efficient assembly, operation, maintenance, and storage of your tent. Please read all instructions carefully before beginning assembly and retain this manual for future reference.
2. Safety Warnings
- NOT FIREPROOF: This party tent is NOT FIREPROOF. Keep away from all fire sources, open flames, and heat-generating equipment.
- SEVERE WEATHER: Do not use this tent in severe weather conditions such as snowstorms, heavy rain, or strong winds. Heavy snow on the roof can cause damage and make the structure unsafe. In such conditions, it is crucial to take down the PE cover to prevent damage or being blown away.
- ASSEMBLY: While assembly is designed to be straightforward, it is recommended to have an assistant. Ensure the frame remains steady during assembly.
- STABILITY: Always ensure the tent is properly anchored using the provided pegs and ropes, especially in windy conditions.
- LOCATION: Choose a flat, level surface for assembly and placement. Avoid placing near sharp objects or uneven terrain that could compromise stability or damage the tent material.
3. Package Contents
Your GREEN PARTY 20x40FT Party Tent comes in multiple packages. Please verify all components are present before beginning assembly. Refer to the included parts list for detailed identification.
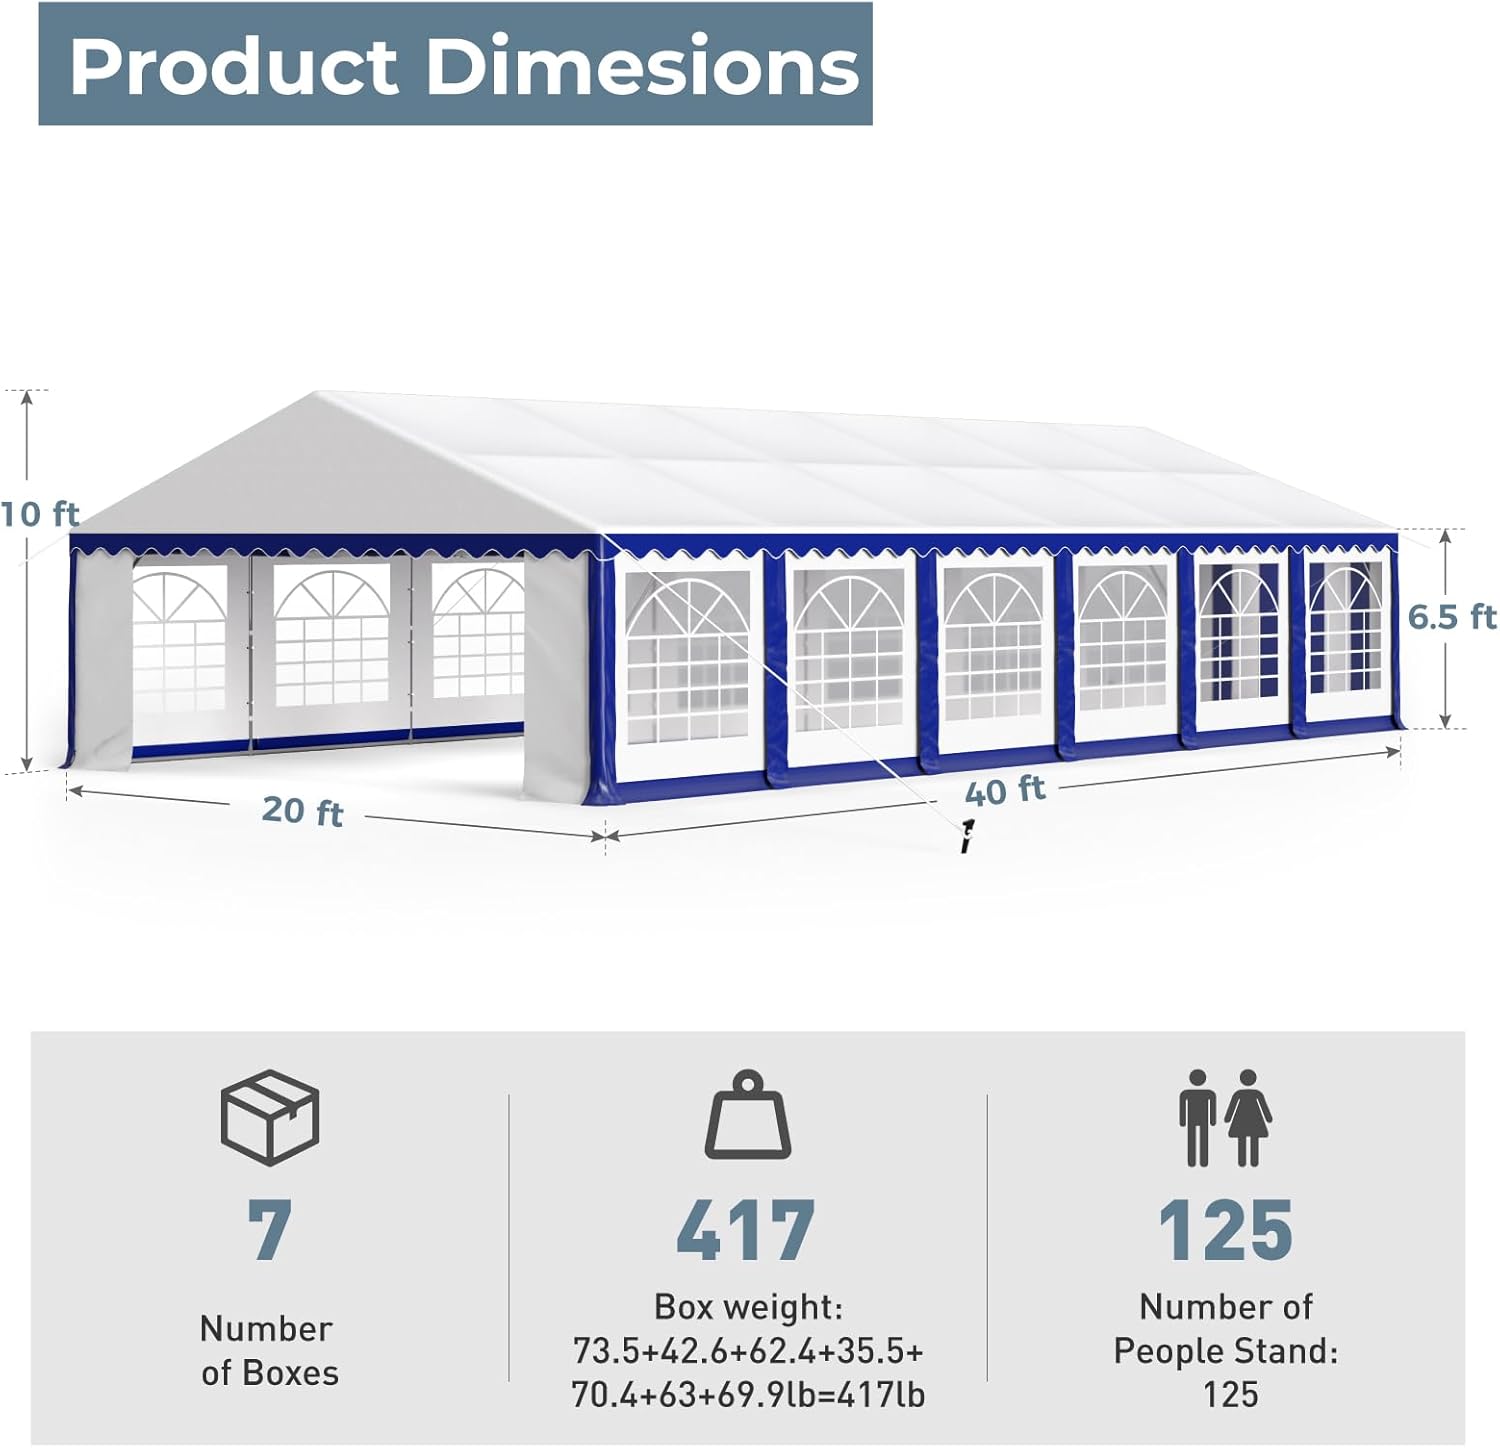
Figure 3.1: Product Dimensions and Package Information
- Heavy-duty galvanized steel frame poles (various lengths and connectors)
- Triple-layer 180g HDPE fabric roof cover
- 12 removable sidewalls with arched windows
- 2 zippered end walls for entry/exit
- 7 premium extra-durable white carry bags for storage
- Ground pegs, ropes, elastic ropes, and other anchoring accessories
- Instruction manual
4. Assembly Instructions
Follow these step-by-step instructions for proper assembly. No additional tools are required beyond what is provided or commonly available.
4.1. Frame Assembly
- Unpack Components: Lay out all frame components on a flat, clear area. Identify each piece using the labels and the parts list in the manual.
- Assemble Roof Structure: Begin by connecting the roof poles and connectors as per the diagram. Ensure all connections are secure. The frame features 1.5-inch diameter and 1.2-mm thick poles for stability.
- Attach Roof Cover: Carefully drape the main roof cover over the assembled roof frame. Secure it using the elastic ball straps through the eyelets and around the frame poles.
- Install Legs: Attach the leg poles to one side of the roof frame. Each leg has a solid base plate for stability.
- Raise the Frame: With assistance, carefully lift the assembled frame and attach the remaining leg poles. Ensure all legs are firmly in place.

Figure 4.1: Key Frame Components and Connections
4.2. Sidewall and End Wall Installation
- Attach Sidewalls: Secure the removable sidewalls to the frame using the provided bungee cords and Velcro straps. The sidewalls feature clear arched windows.
- Install End Walls: Attach the zippered end walls to the front and back of the tent. These can be rolled up and secured to create open entrances or zipped down for full enclosure.
- Anchor the Tent: Use the provided ground pegs and ropes to firmly anchor each leg and the tent corners to the ground. This is crucial for stability, especially in varying weather conditions.

Figure 4.2: Tent Configuration Options
4.3. Assembly Video Guides
For a visual guide on the assembly process, please refer to the following official product videos:
Video 4.3.1: GREEN PARTY 20x40FT Party Tent Heavy Duty (6+6 Side Walls) - Official assembly guide for the exact product model.
Video 4.3.2: GREEN PARTY 16x32FT Party Tent Heavy Duty - General assembly steps, applicable to various sizes.
Video 4.3.3: GREEN PARTY Commercial Outdoor Wedding Party Tents Canopy - Demonstrates general setup and features.
5. Operating the Tent
The GREEN PARTY tent offers versatile configurations to suit your needs:
- Removable Sidewalls: All 12 sidewalls are removable. You can attach all of them for full enclosure, some for partial coverage, or none for an open canopy.
- Zippered End Walls: The two end walls feature zippers, allowing them to be rolled up and secured to create wide entrances or zipped down for complete closure.
- Weather Adaptation: The tent is designed to adapt to all seasons. Use sidewalls for protection from sun, wind, and light rain. Remove them for open-air events.

Figure 5.1: Example of Tent Setup for an Event
Video 5.2: GREEN PARTY Outdoor Heavy Duty Canopy Tent Scene Display - Shows the tent in various event settings.
6. Maintenance and Storage
- Cleaning: Clean the tent fabric with mild soap and water. Avoid harsh chemicals or abrasive cleaners that could damage the material.
- Drying: Ensure all fabric components are completely dry before storing to prevent mold and mildew.
- Storage: Disassemble the tent and store all components in the provided 7 carry bags. Store in a cool, dry place away from direct sunlight and extreme temperatures.
- Frame Care: The galvanized metal coating on the steel frame provides excellent resistance to rust and corrosion. Periodically inspect the frame for any signs of wear or damage.
7. Troubleshooting
- Tent Instability: Ensure all frame connections are secure and the tent is properly anchored with all pegs and ropes. Check for level ground.
- Water Leakage: Verify the roof cover is correctly installed and taut. Ensure all bungee cords are properly secured. The 180g HDPE fabric is 100% waterproof.
- Difficulty Assembling: Refer to the step-by-step instructions and video guides. Ensure correct parts are used for each step (parts are labeled). Having an assistant can greatly ease the process.
- Damaged Parts: If any parts are damaged or missing upon arrival, contact customer service immediately for replacements.
8. Specifications
| Attribute | Detail |
|---|---|
| Brand | GREEN PARTY |
| Model | 20x40 FT (6+6 Side Walls) |
| Material | Heavy Duty Alloy Steel, Metal, Polyethylene (HDPE) |
| Frame Material | Alloy Steel, Iron, Metal (Galvanized) |
| Item Weight | 417 Pounds |
| Product Dimensions | 240 x 480 x 120 inches (20x40x10 FT) |
| Floor Area | 800 Square Feet |
| Water Resistance Level | Waterproof |
| UV Protection | Yes (Blocks 99% of harmful UV rays) |
| Assembly Required | Yes |
| Recommended Uses | Camping, Outdoor Activities, Parties, Weddings, Events, Carports |
9. Warranty and Customer Support
Your GREEN PARTY tent comes with comprehensive support:
- Warranty: Enjoy 1 year of protection for canopy frames and covers.
- Lifetime Replacement: A lifetime replacement is offered for connectors, pegs, ropes, elastic ropes, and more.
- Customer Service: If you encounter any issues with your party tent, our dedicated customer service team is available to provide professional technical support and the best possible solution.