Logilink WC0065
User Manual: LogiLink Trail Camera WC0065
Model: WC0065
Brand: LogiLink
Introduction
Welcome to the user manual for your LogiLink Trail Camera. This camera is designed for capturing high-quality photos and videos of wildlife, monitoring your property, or for general outdoor surveillance. Its robust design and advanced features make it suitable for various outdoor environments.

The LogiLink Trail Camera WC0065 features a durable camouflage casing, designed to blend seamlessly into outdoor environments for discreet monitoring.
Key Features
- Full HD 1080p Video Resolution
- Up to 16 Megapixel Photo Resolution
- 90° Wide-Angle Infrared (IR) Detection Zone
- 0.8 Second Fast Trigger Speed
- Night Vision with 15m Range
- Motion and Heat Detection (PIR Sensor)
- IP66 Waterproof Rating
- Integrated 2" Color LCD Screen
- Supports microSD/microSDHC cards up to 32GB

This diagram highlights the camera's core features, including IR LEDs for night vision, high-quality 16MP images and 1080p videos, and a 90-degree PIR sensor with a range of up to 15 meters.
Package Contents
Please check the package to ensure all items are present:
- 1 x LogiLink Trail Camera (WC0065)
- 1 x Fastening Strap
- 1 x USB Cable
- 1 x User Manual
Camera Overview
Familiarize yourself with the different parts of your trail camera.
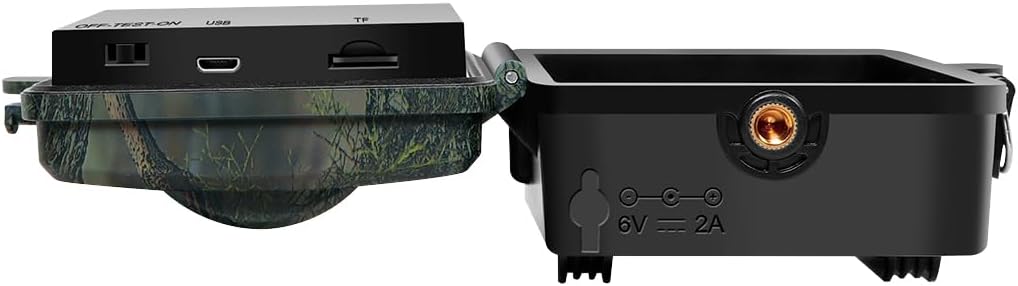
This image illustrates the various ports and components on the camera's bottom section, including the Micro USB port, microSD card slot, DC power port (6V/2A), and the 1/4" screw hole for mounting.
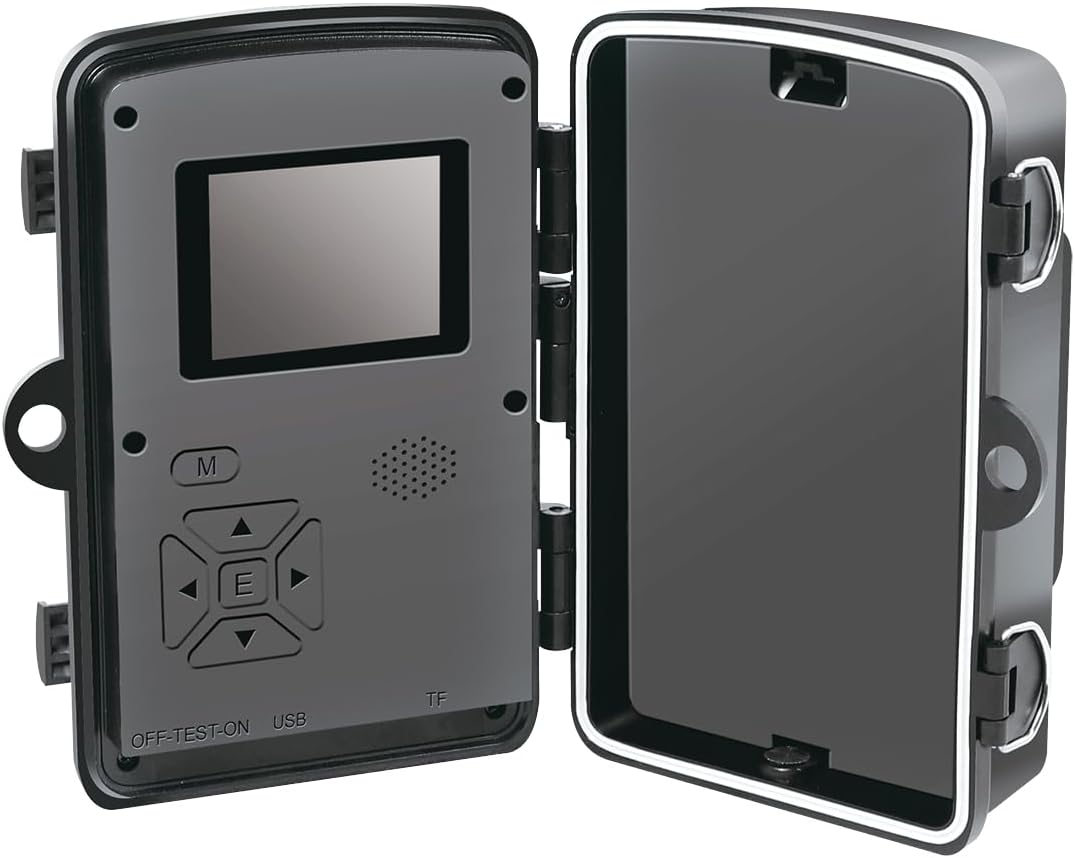
The internal view of the camera reveals the 2-inch color LCD screen and the control buttons for navigation and settings adjustment.
Setup
- Insert Batteries: The camera requires batteries (not included). Open the battery compartment and insert the required number of AA batteries, ensuring correct polarity.
- Insert MicroSD Card: Open the camera housing. Locate the microSD card slot and insert a microSD or microSDHC card (up to 32GB) with the contacts facing down.
- Power On: Slide the power switch to the "ON" position. The LCD screen will light up.
- Initial Settings:
- Set Date and Time: Navigate through the menu using the control buttons to set the correct date and time.
- Format SD Card: It is recommended to format the microSD card before first use to ensure compatibility and optimal performance.
- Mounting: Use the included fastening strap to secure the camera to a tree or pole. Ensure the camera is stable and pointed towards the desired monitoring area. The 1/4" screw hole allows for tripod or other mounting options.

The camera is designed for outdoor use and is IP66 waterproof, making it suitable for various weather conditions. It can be securely mounted to a tree using the provided strap.
Operating Instructions
- Mode Selection: The camera typically has different modes: Photo, Video, and Photo+Video. Select your desired mode via the menu.
- PIR Sensor: The Passive Infrared (PIR) sensor detects motion and heat within its 90° wide-angle detection zone, triggering the camera to record.
- Night Vision: The camera automatically switches to night vision mode in low-light conditions, utilizing infrared LEDs to capture clear images and videos up to 15 meters.
- Reviewing Footage: To review captured photos and videos, switch the camera to "TEST" mode or connect it to a computer using the USB cable.
- Connecting to PC: Connect the camera to your computer via the USB cable. The camera will appear as a removable disk, allowing you to access and transfer files.

This image highlights the camera's capabilities, including HD 1080p video recording with sound, automatic day and night mode switching, photo burst functionality, and the effective 90-degree PIR sensor.

The camera boasts a fast 0.8-second trigger speed, ensuring that quick movements, like those of a deer, are captured effectively.
Maintenance
- Cleaning: Use a soft, dry cloth to clean the camera lens and body. Do not use abrasive cleaners or solvents.
- Battery Replacement: Replace batteries when the low battery indicator appears on the screen. Always use fresh batteries of the same type.
- SD Card Management: Regularly transfer files from the microSD card to your computer and format the card to maintain optimal performance and prevent data corruption.
- Storage: When not in use for extended periods, remove batteries and store the camera in a cool, dry place.
Troubleshooting
- Camera not turning on
- Check battery polarity.
- Ensure batteries are fully charged or replace them.
- Verify the power switch is in the "ON" position.
- Poor image/video quality
- Clean the camera lens.
- Ensure the camera is within the effective range of the subject.
- Check lighting conditions; night vision performance depends on ambient IR.
- Camera not detecting motion
- Ensure the PIR sensor is not obstructed.
- Adjust camera placement to optimize detection angle.
- Check sensitivity settings in the camera menu.
- SD card error
- Reformat the SD card using the camera's menu.
- Try a different, compatible microSD card.
- Ensure the card is inserted correctly.
Technical Specifications
| Feature | Specification |
|---|---|
| Model | WC0065 |
| Brand | LogiLink |
| Photo Resolution | Up to 16 Megapixels |
| Video Resolution | 1080p (1920x1080 @ 30fps), 720p, 480p |
| Trigger Speed | 0.8 seconds |
| PIR Detection Angle | 90 degrees |
| Night Vision Range | 15 meters |
| Display | 2" Color LCD |
| Storage | MicroSD/MicroSDHC up to 32GB |
| Power | 6 Watts (External DC 6V/2A supported) |
| Dimensions (L x W x H) | 13.6 x 9.8 x 6.5 cm |
| Weight | 255 grams |
| Waterproof Rating | IP66 |
| Material | Plastic |
| Connectivity | Micro USB |
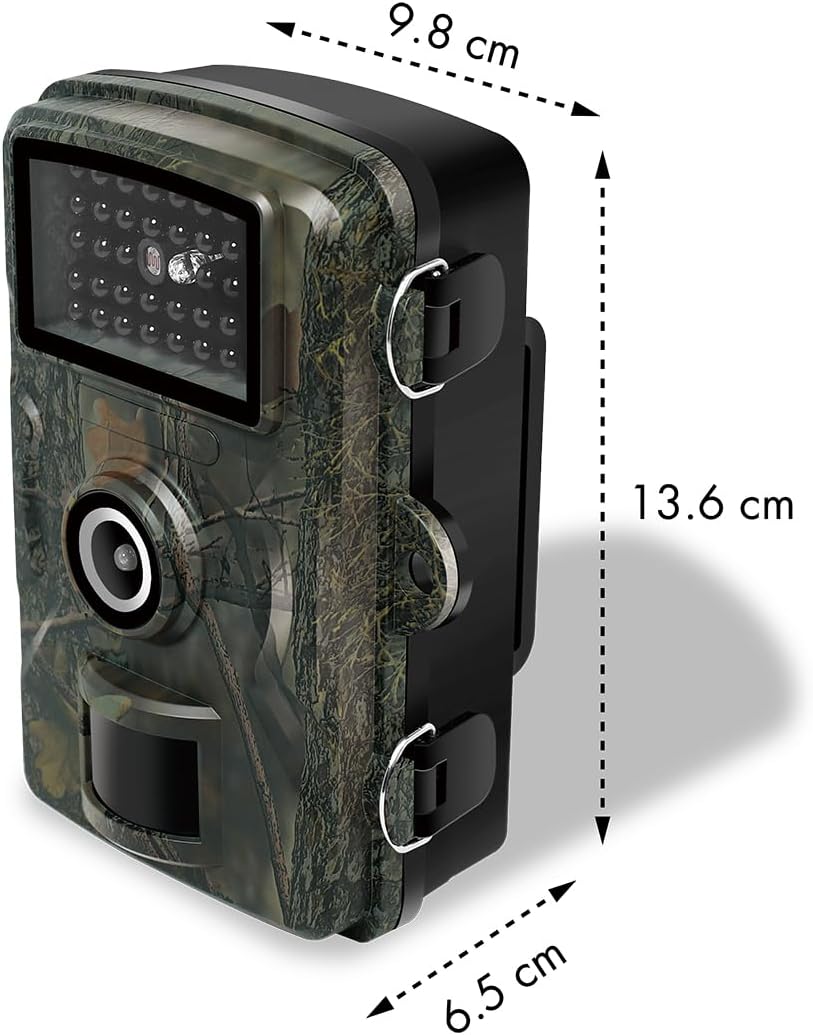
The physical dimensions of the camera are 13.6 cm in length, 9.8 cm in width, and 6.5 cm in height, making it a compact device for outdoor deployment.
Warranty and Support
This product comes with a 1-year availability of spare parts. For technical support or warranty claims, please contact your retailer or the manufacturer, 2direct GmbH.
For further assistance, please visit the official LogiLink website or refer to the contact information provided with your purchase.
Ask a question about this manual
Ask about setup, troubleshooting, compatibility, parts, safety, or missing instructions. Manuals+ will review the question and use this page’s manual context to help answer it.