1. Introduction
Thank you for purchasing the NITORI Gaming Chair GM706. This chair is designed to provide comfort and support for extended periods of gaming or work. Its stylish black and blue design integrates well into various interiors. This manual provides essential information for the safe assembly, operation, and maintenance of your new chair. Please read it thoroughly before use and retain it for future reference.
Note: This product is intended for general household use and is not designed for commercial applications.
2. Safety Information
- Always follow the assembly instructions carefully. Incorrect assembly can lead to instability and injury.
- Ensure all screws and bolts are securely tightened before using the chair. Periodically check and re-tighten as necessary.
- Do not stand on the chair or use it as a step stool.
- Avoid placing heavy objects on the chair's backrest or armrests.
- Keep children and pets away from the chair during assembly. Small parts can be a choking hazard.
- Do not expose the chair to direct sunlight for prolonged periods or place it near heat sources, as this may cause material degradation.
- Use the chair on a flat, stable surface to prevent tipping.
3. Package Contents
Before beginning assembly, please verify that all parts are present and undamaged. If any parts are missing or damaged, please contact customer support.
- Backrest
- Seat Cushion
- Armrests (Left & Right)
- Base (Star Base)
- Casters (5 pieces)
- Gas Lift Cylinder
- Gas Lift Cover
- Mechanism Plate
- Headrest Cushion
- Lumbar Support Cushion
- Assembly Hardware (screws, washers, Allen key)
4. Setup and Assembly
Estimated assembly time: 30 minutes. It is recommended to assemble the chair with two people for easier handling.
- Attach Casters to Base: Insert the five casters into the holes at the end of each leg of the star base until they click securely into place.
- Install Gas Lift: Place the gas lift cylinder into the center hole of the star base. Cover it with the gas lift cover.
- Attach Mechanism Plate to Seat: Secure the mechanism plate to the underside of the seat cushion using the provided screws. Ensure the front of the mechanism plate aligns with the front of the seat.
- Attach Armrests: Fasten the armrests to the sides of the seat cushion using the designated screws. Do not overtighten initially.
- Connect Backrest to Seat: Attach the backrest to the seat cushion and armrests using the remaining screws. Once all screws are in place, tighten them firmly.
- Place Assembled Seat onto Gas Lift: Carefully place the assembled seat and backrest onto the gas lift cylinder, ensuring it is centered and stable.
- Attach Cushions: Secure the headrest and lumbar support cushions to the backrest using their elastic straps. Adjust their positions for optimal comfort.
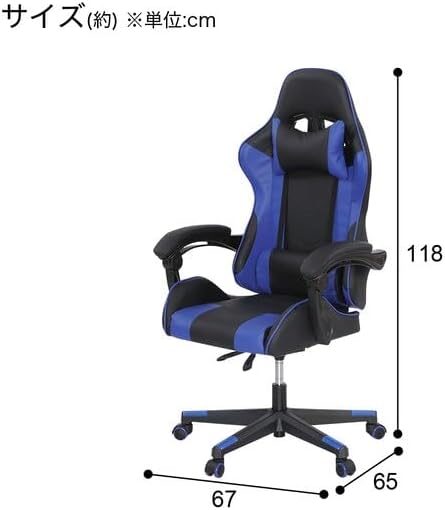
Image 1: Overall view of the NITORI Gaming Chair GM706 with key dimensions (Width 67cm, Depth 65cm, Height 118cm).
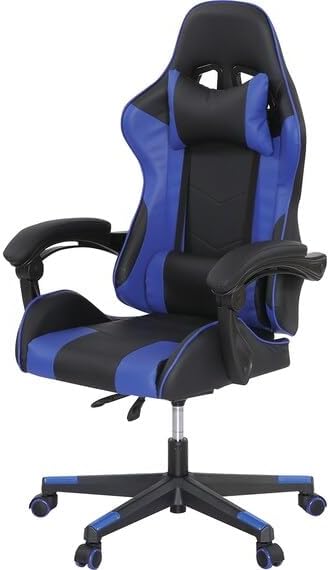
Image 2: Frontal view of the assembled NITORI Gaming Chair GM706, showcasing its black and blue design.

Image 3: Rear view of the NITORI Gaming Chair GM706, showing the backrest structure and cushion straps.
5. Operating Instructions
5.1. Seat Height Adjustment
To adjust the seat height, locate the lever on the right side under the seat (often marked "LIFT").
- To raise the seat: While seated, lift the lever and slightly lift your weight off the seat. The seat will rise. Release the lever at the desired height.
- To lower the seat: While seated, lift the lever and apply your full weight to the seat. The seat will lower. Release the lever at the desired height.
5.2. Backrest Recline Adjustment
The backrest can be reclined for various postures. Locate the lever on the left side under the seat (often marked "LOCK" or with a recline icon).
- To recline: Pull the recline lever upwards. Lean back to the desired angle. Release the lever to lock the backrest in position.
- To return to upright position: Pull the recline lever upwards and lean forward slightly. The backrest will return to its upright position. Release the lever to lock.

Image 4: Side view illustrating the various recline positions of the chair's backrest.
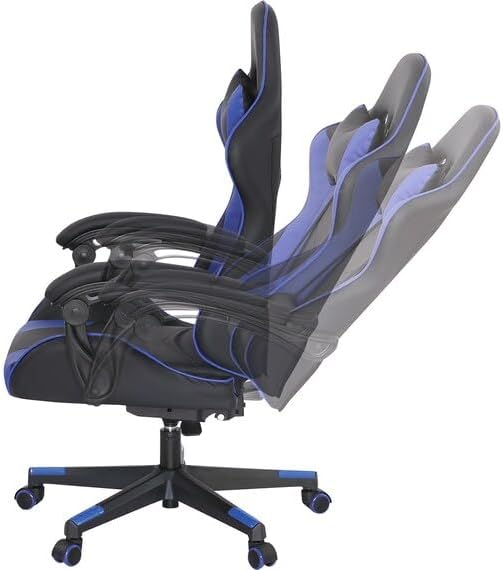
Image 5: Angled view demonstrating the range of motion for the backrest recline function.
5.3. Headrest and Lumbar Support Cushions
The chair includes adjustable headrest and lumbar support cushions for enhanced ergonomic comfort. These cushions are attached with elastic straps and can be moved up or down to suit your preference.

Image 6: Close-up view of the adjustable headrest cushion.

Image 7: View showing both the headrest and lumbar support cushions in place.
5.4. Swivel and Caster Movement
The chair features a 360-degree swivel function and smooth-rolling casters for easy movement around your workspace.

Image 8: Detail of the control levers located beneath the seat for height and recline adjustments.

Image 9: Close-up of a caster wheel, designed for smooth mobility.
6. Maintenance
Proper care will extend the life and appearance of your NITORI Gaming Chair GM706.
- Cleaning the Synthetic Leather: Wipe the surface with a soft, damp cloth. For stubborn stains, use a mild soap solution and then wipe clean with a dry cloth. Avoid harsh chemicals, abrasive cleaners, or solvents, as these can damage the material.
- Frame and Base: Clean the metal and plastic parts with a damp cloth.
- Casters: Periodically check casters for hair or debris that may hinder smooth movement. Clean as needed.
- Hardware: Regularly check all screws and bolts to ensure they remain tight. Re-tighten if any looseness is detected.
7. Troubleshooting
If you encounter issues with your chair, refer to the following common problems and solutions:
- Chair does not adjust height:
- Ensure the height adjustment lever is fully engaged when attempting to raise or lower the seat.
- Check if the gas lift cylinder is properly seated in the base and mechanism.
- Backrest does not recline or lock:
- Verify that the recline lever is functioning correctly and not obstructed.
- Ensure no foreign objects are preventing the backrest mechanism from moving freely.
- Chair feels wobbly or unstable:
- Check all assembly screws and bolts, especially those connecting the seat, backrest, and armrests, and tighten them securely.
- Ensure the casters are fully inserted into the base.
- Casters do not roll smoothly:
- Inspect casters for accumulated dirt, hair, or debris and remove them.
- Ensure casters are properly installed and not damaged.
If these solutions do not resolve the issue, please contact NITORI customer support.
8. Specifications
| Model Number | GM706 |
| Brand | NITORI |
| Color | Black / Blue |
| Material | Synthetic Leather |
| Dimensions (W x D x H) | 67 cm x 65 cm x 118 cm |
| Weight | Approx. 17 kg |
| Assembly Required | Yes (Approx. 30 minutes) |
| Recommended Use | Gaming, Home Office |
| Special Features | Cushioned, Head Support, Lumbar Support |
9. Warranty and Support
The NITORI Gaming Chair GM706 comes with a 1-year warranty from the date of purchase, covering manufacturing defects. Please retain your proof of purchase for warranty claims.
For technical assistance, missing parts, or warranty inquiries, please contact NITORI customer support. Refer to the contact information provided with your purchase or visit the official NITORI website for support details.
NITORI Official Website: www.nitori-net.jp