1. Introduction
The Linsoal GS528A is a battery-powered 2-in-1 detector designed to provide early warning of both smoke and carbon monoxide (CO) hazards in your home. This device combines photoelectric smoke sensing technology with an electrochemical carbon monoxide sensor to offer comprehensive protection. It features an audible alarm, a visual light indicator, and an LCD screen for displaying CO levels.

Image 1.1: Two Linsoal GS528A Smoke and Carbon Monoxide Detectors. These devices are round, white, and feature an LCD screen displaying '568 PPM', along with 'POWER' and 'ALARM' indicators.
2. Safety Information
For optimal safety, it is crucial to understand the risks associated with smoke and carbon monoxide and to properly install and maintain your detector. This device is intended to alert you to the presence of smoke and carbon monoxide; it is not a substitute for proper fire safety practices or professional carbon monoxide monitoring.
2.1 Important Safety Guidelines
- Regular Testing: Test your detector weekly to ensure it is functioning correctly.
- Battery Maintenance: Replace batteries promptly when the low battery warning sounds.
- Placement: Install detectors on every level of your home, inside each bedroom, and in hallways.
- Annual Inspections: Arrange for annual inspections of all fuel-burning appliances in your home by a qualified professional.
- Emergency Plan: Develop and practice a fire escape plan with all household members.
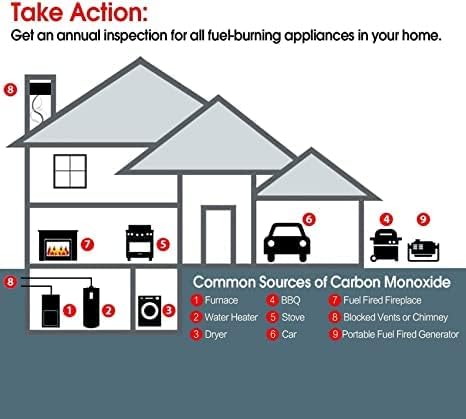
Image 2.1: Diagram illustrating common sources of carbon monoxide within a household, including furnaces, water heaters, dryers, stoves, BBQs, cars, fuel-fired fireplaces, blocked vents, and portable fuel generators. It emphasizes the need for annual inspections of fuel-burning appliances.

Image 2.2: A house diagram indicating recommended placement for smoke and carbon monoxide alarms. It suggests installing both smoke and CO alarms on every level and in every bedroom, along with fire extinguishers on every level, plus kitchen and garage.
3. Product Overview
Familiarize yourself with the components of your Linsoal GS528A detector to ensure proper installation and operation.
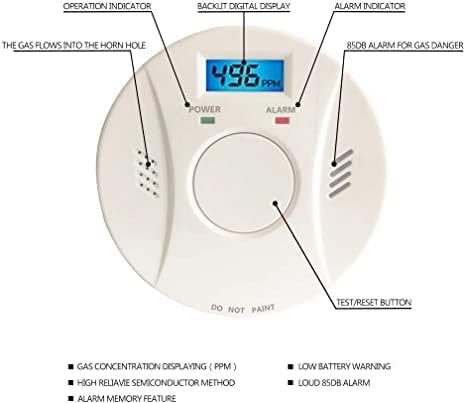
Image 3.1: Labeled diagram of the Linsoal GS528A detector. Key components include the operation indicator, backlit digital display, alarm indicator, 85dB alarm for gas danger, gas flow horn hole, and the Test/Reset button. It also highlights features like gas concentration display (PPM), high-reliability semiconductor method, low battery warning, loud 85dB alarm, and alarm memory feature.
3.1 Key Components
- Backlit Digital Display: Shows carbon monoxide levels in PPM (Parts Per Million).
- Power Indicator (Green LED): Illuminates when the device is powered on and functioning normally.
- Alarm Indicator (Red LED): Flashes during an alarm event.
- Test/Reset Button: Used to test the alarm function and silence false alarms.
- Horn Hole: Where the alarm sound is emitted.
4. Setup and Installation
The Linsoal GS528A detector is designed for quick and easy installation without the need for rewiring.
4.1 Battery Installation
- Remove the mounting bracket from the back of the detector by twisting it counter-clockwise.
- Open the battery compartment.
- Insert three (3) AAA batteries, ensuring correct polarity (+/-). The device requires 3 AAA batteries, which are included.
- Close the battery compartment securely.
- The detector will emit a short beep and the power indicator will light up, indicating it is powered on.
4.2 Mounting the Detector
Choose a suitable location for mounting, following the safety guidelines in Section 2.2. Avoid painting the detector.
- Using the mounting bracket as a template, mark the positions for the screw holes on the wall or ceiling.
- Drill holes at the marked positions.
- Insert the anchor plugs into the drilled holes.
- Attach the mounting bracket to the wall or ceiling using the provided screws.
- Align the detector with the mounting bracket and twist it clockwise until it locks securely into place.
- Perform a test of the detector after installation (refer to Section 5.2).

Image 4.1: A Linsoal GS528A detector mounted on a light grey wall in a modern kitchen setting. The detector is round and white, blending with the wall color.
5. Operating Instructions
5.1 Power-Up and Normal Operation
Once batteries are installed, the detector will power on automatically. In normal operation, the green POWER indicator will flash periodically, and the LCD screen will display '0 PPM' or the current ambient CO level if any is detected.
5.2 Test/Reset Button
Press and hold the Test/Reset button to test the alarm. The detector will emit a series of loud beeps, and the red ALARM indicator will flash. This confirms the alarm and electronics are working. Release the button to stop the test. In case of a false alarm, pressing this button will silence the alarm for a short period.
5.3 Alarm Indications
The detector provides both audible and visual warnings for smoke and carbon monoxide.
- Smoke Alarm: A loud, intermittent siren will sound, and the red ALARM indicator will flash rapidly.
- Carbon Monoxide Alarm: A loud, distinct pattern of beeps will sound (e.g., four quick beeps followed by a pause), and the red ALARM indicator will flash. The LCD screen will display the detected CO concentration in PPM.
- Low Battery Warning: The detector will chirp periodically, and the LCD screen may display a 'Lb' or battery icon. Replace batteries immediately.

Image 5.1: An icon depicting sound waves, symbolizing the audible alarm function of the detector.
6. Maintenance
Regular maintenance ensures the continued reliability and effectiveness of your detector.
6.1 Regular Testing
Test your detector at least once a week by pressing the Test/Reset button. This verifies the alarm's circuitry, horn, and battery are functioning.
6.2 Battery Replacement
When the detector emits a low battery chirp (typically once every 30-60 seconds) or displays a low battery indicator on the LCD, replace all three AAA batteries immediately. Use only recommended alkaline batteries.
- Twist the detector counter-clockwise to remove it from the mounting bracket.
- Open the battery compartment.
- Remove the old batteries and dispose of them according to local regulations.
- Insert three new AAA batteries, observing correct polarity.
- Close the battery compartment.
- Reattach the detector to the mounting bracket by twisting clockwise.
- Test the detector after battery replacement.

Image 6.1: An icon depicting two batteries with a lightning bolt, indicating the battery power source and the need for battery maintenance.
6.3 Cleaning
Clean your detector at least once a month. Gently vacuum the detector's cover and vents with a soft brush attachment to remove dust and debris. Do not use cleaning solvents or spray directly onto the detector, as this can damage the sensors.
7. Troubleshooting
If your detector is not functioning as expected, refer to the following table for common issues and solutions.
| Problem | Possible Cause | Solution |
|---|---|---|
| Detector chirps periodically (e.g., every 30-60 seconds) | Low battery. | Replace all three AAA batteries immediately (refer to Section 6.2). |
| Alarm sounds without visible smoke or CO source. | Dust or debris in the sensor chamber; high humidity; cooking fumes; aerosol sprays. | Press the Test/Reset button to silence. Clean the detector (refer to Section 6.3). Ensure proper ventilation. Relocate if false alarms persist due to environmental factors. |
| Detector does not respond when Test/Reset button is pressed. | No power; dead batteries; faulty unit. | Check battery installation and replace batteries. If still unresponsive, the unit may be faulty and requires replacement. |
| LCD screen is blank or unreadable. | Low battery; unit malfunction. | Replace batteries. If the issue persists, contact customer support. |
8. Specifications
- Model: GS528A
- Sensor Type: Photoelectric (Smoke) & Electrochemical (Carbon Monoxide)
- Power Source: 3 x AAA Batteries (included)
- Alarm Volume: 85 dB
- Product Dimensions: 5"D x 4"W x 5"H (approximate)
- Operating Humidity: 95% to 100%
- Operating Temperature: Refer to product packaging for specific range.
- Material: ABS
- Color: White
9. Warranty and Support
For warranty information or technical support, please refer to the documentation included with your purchase or contact Linsoal customer service. Keep your purchase receipt as proof of purchase.