Introduction
This manual provides essential information for the safe and effective operation, setup, and maintenance of your RILAND MIG200T Multi-Process Welding Machine. Please read this manual thoroughly before operating the machine and keep it for future reference.

Figure 1: RILAND MIG200T Multi-Process Welding Machine with included accessories.
Safety Information
Always prioritize safety when operating welding equipment. Failure to follow safety guidelines can result in serious injury or death.
- Personal Protective Equipment (PPE): Always wear appropriate welding helmet, gloves, protective clothing, and safety footwear.
- Ventilation: Ensure adequate ventilation to avoid inhaling welding fumes.
- Electrical Safety: Verify power connections are secure and the machine is properly grounded. Do not operate in wet conditions. The machine features Over-heating protection, Over-current protection, Over-loading protection, and built-in VRD for user safety.
- Fire Hazards: Keep flammable materials away from the welding area. Have a fire extinguisher readily available.
- Arc Rays: Protect eyes and skin from arc rays, which can cause burns and eye damage.
- Gas Cylinders: Secure gas cylinders to prevent them from falling. Ensure proper gas type for the welding process.

Figure 2: Overview of RILAND MIG200T's safety features including VRD, overheating, overload auto shut down, and IP21 water rating.
Setup
Unpacking and Inspection
Carefully remove all components from the packaging. Inspect the machine and accessories for any signs of damage during transit. The package includes: 1*MIG200T Welder, 1*MIG Torch, 1*Earth Clamp, 1*Drive Roller, 1*Tubing, 1*Cleaning Brush, 1*50A/250V Power Cord. Note that the TIG Torch and spool gun are not included.
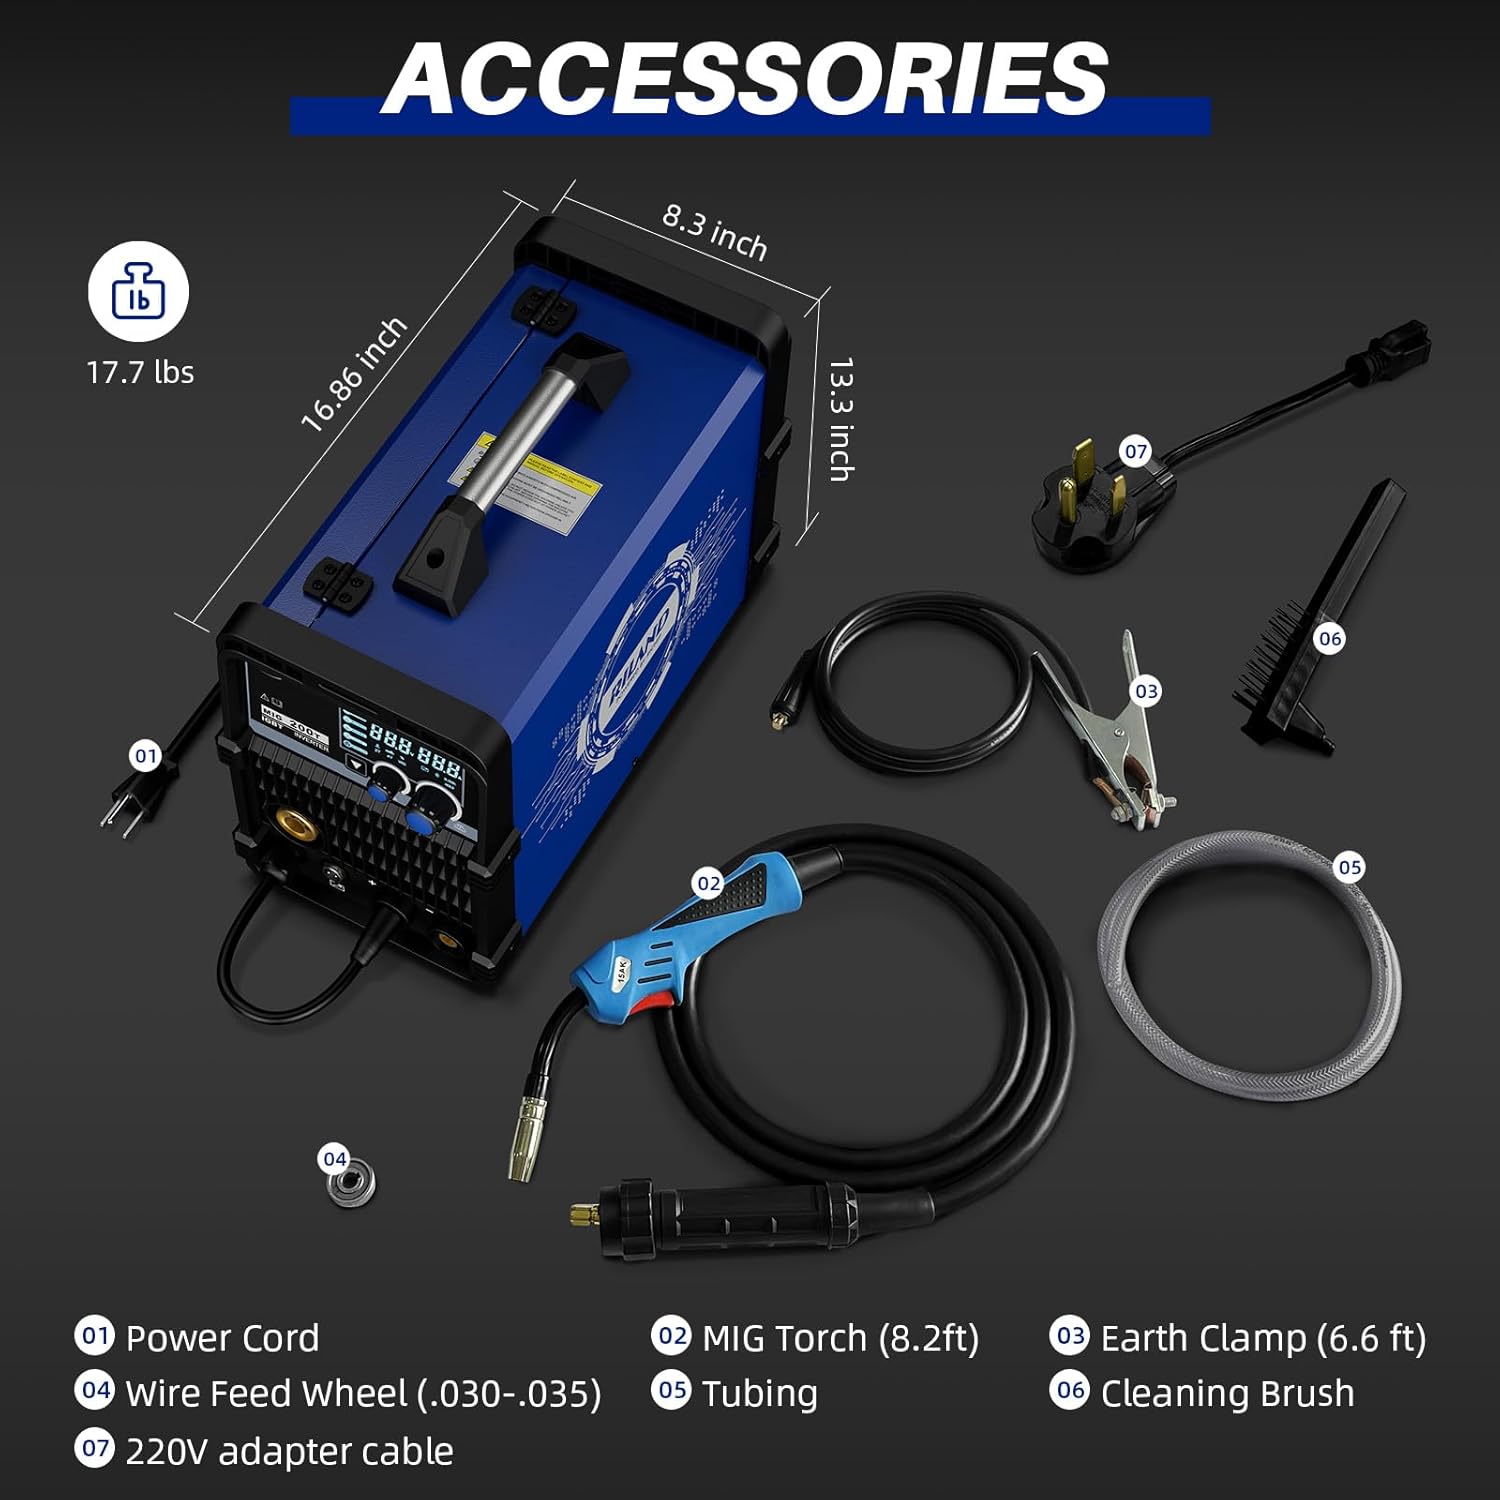
Figure 3: Included accessories for the RILAND MIG200T, showing the MIG torch, earth clamp, drive roller, tubing, cleaning brush, and power cord.
Power Connection
Connect the provided 50A/250V power cord to a suitable power outlet. The machine supports both 110V and 200V input.
Wire Spool Installation (MIG/Flux Core)
- Open the side panel of the welder to access the wire feed mechanism.
- Install the wire spool onto the spindle. Ensure the wire unwinds from the bottom of the spool.
- Tighten the retaining nut just enough to prevent the spool from unraveling, but not so tight as to impede smooth feeding.
- Feed the welding wire through the guide tube and into the drive roller mechanism.
- Ensure the correct drive roller is installed for your wire diameter (.030”/.040” carbon steel wire, .030”/.040” flux cored wire, or .040” aluminum wire).
- Close the drive roller tension arm and adjust the tension. The tension should be just tight enough to feed the wire through the torch, but loose enough to allow the wire to slip if the torch tip becomes blocked, preventing a "bird's nest" of wire.
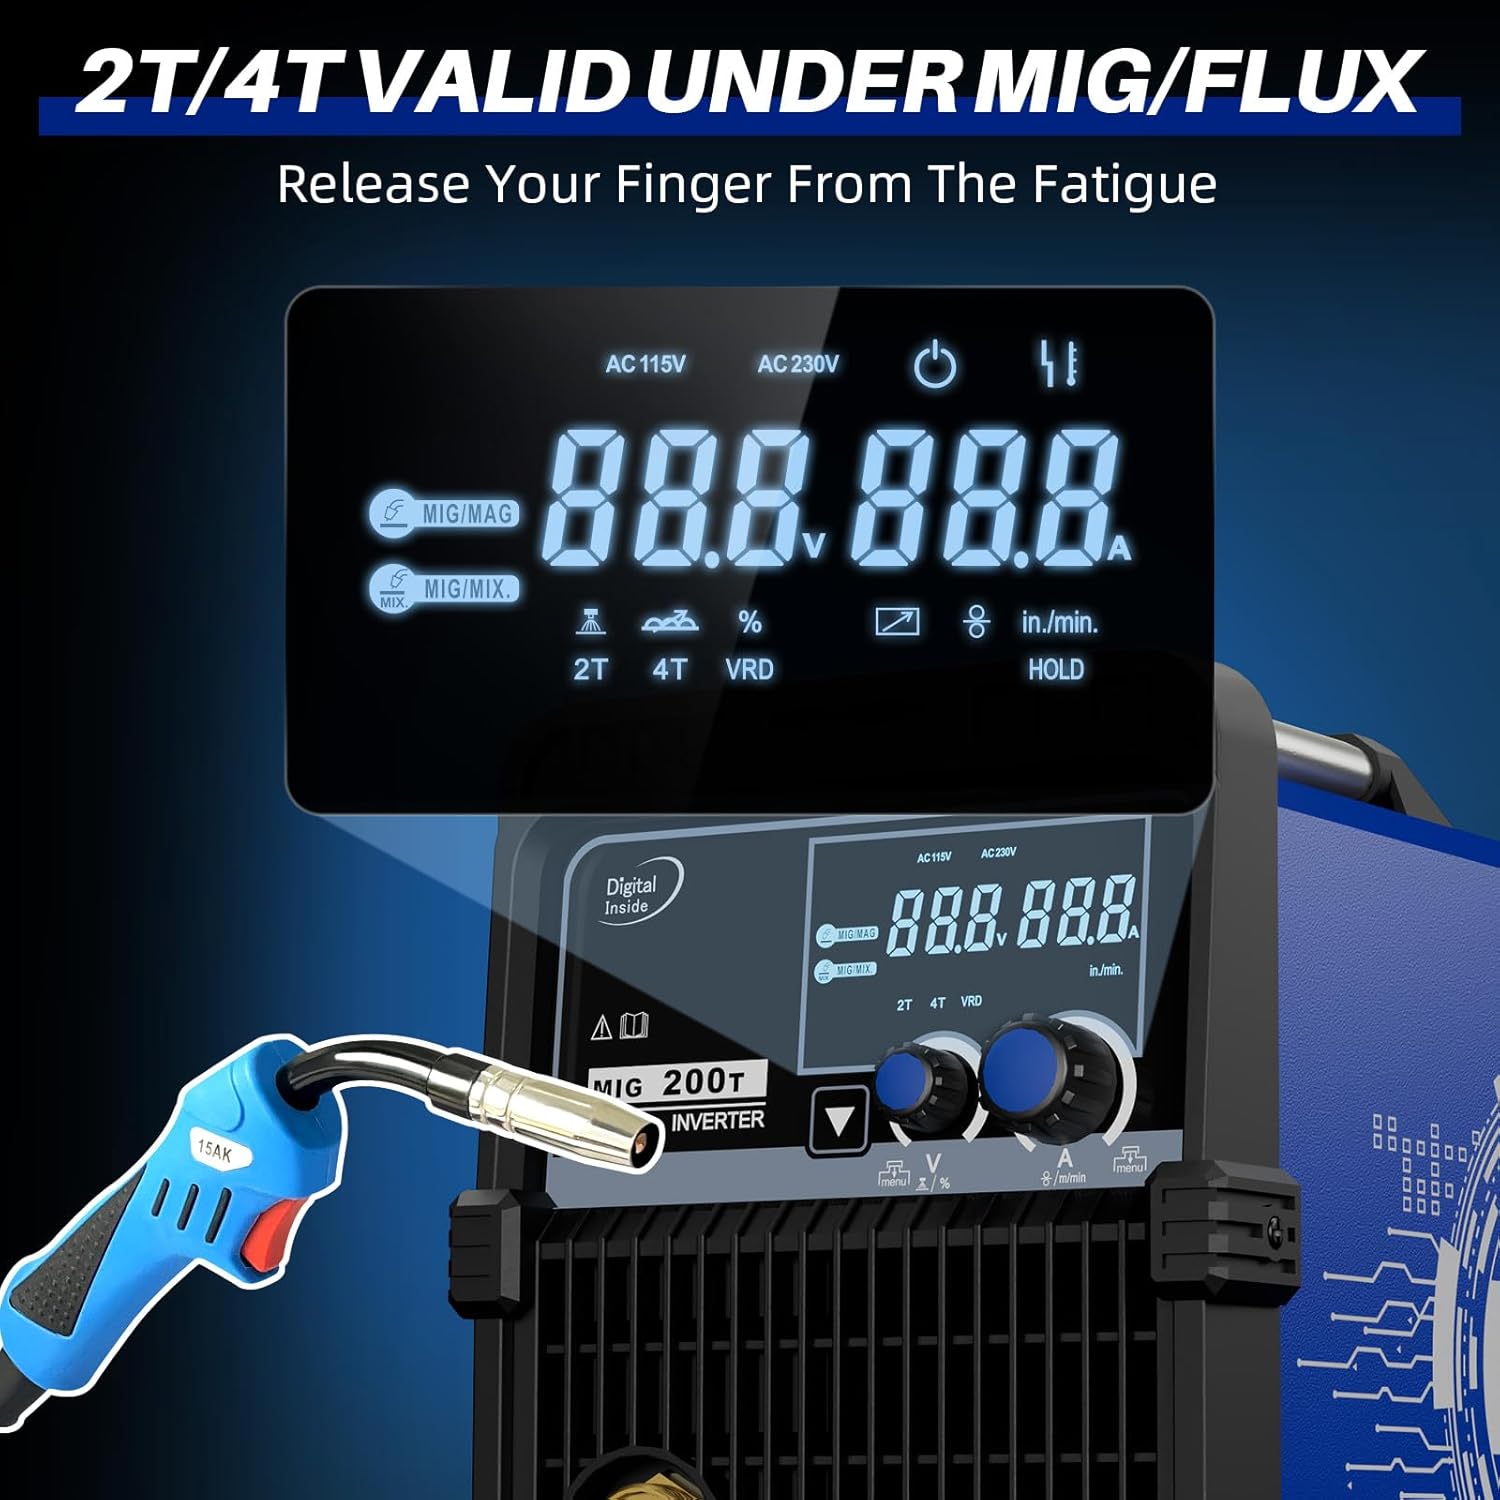
Figure 4: The auto wire feeding mechanism of the RILAND MIG200T, showing compatibility with various wire types and diameters.
Gas Connection (Gas MIG)
For Gas MIG welding, connect your gas cylinder (e.g., 75/25 Argon/CO2 mix) to the gas inlet on the rear of the machine using the provided tubing. Set the gas flow rate to 15-20 cubic feet per minute (CFM) while pulling the torch trigger to ensure accurate measurement.
Operation
User Interface and Process Selection
The RILAND MIG200T features a large, easy-to-read segment display. Select your desired welding process using the control panel. The machine supports 6-in-1 functions: Gas MIG, Gasless Flux Core MIG (FCAW), Stick/MMA, Spot welding, Lift TIG, and optional spool gun connection (spool gun not included).

Figure 5: The synergic control display of the RILAND MIG200T, showing automatic parameter matching for various welding modes.
Thanks to RICHIP technology, the machine offers true Synergic Control, automatically setting parameters once a process is selected. You primarily adjust the temperature (amperage/voltage) as needed.
Welding Modes and Applications
- Gas MIG (GMAW): Ideal for clean welds on various metals.
- Gasless Flux Core MIG (FCAW): Suitable for outdoor use or when gas is not practical.
- Stick/MMA: Compatible with 1/16" to 1/8" electrodes (E6013 & E7018), perfect for carbon steel plate over 1.5mm.
- Lift TIG: Capable of welding carbon steel and 1-4mm stainless steel plate (TIG torch not included).
- Spot Welding: Features 2T/4T trigger modes for precise spot welds.
- Spool Gun Welding: For aluminum welding (spool gun not included).

Figure 6: Visual representation of the RILAND MIG200T's six welding processes.
The MIG200T can weld a variety of materials including cast iron, mild steel, sheet metal, alloy steel, stainless steel, and aluminum.

Figure 7: Examples of materials that can be welded with the RILAND MIG200T.
Advanced Adjustments (MIG Mix Mode)
In MIG Mix mode, the smaller button allows selection between 2T (two-touch) and 4T (four-touch) trigger modes. 2T is a simple on/off operation. A long press on the button activates 4T mode, which allows for continuous welding without holding the trigger, and then a second press to stop. Short presses on this button also allow for fine adjustments to arc length and inductance (wetness of the weld pool), though these typically do not require frequent modification due to the synergic control.

Figure 8: The display showing 2T/4T trigger modes, allowing the user to release their finger from fatigue during longer welds.
Maintenance
Regular maintenance ensures the longevity and optimal performance of your welding machine.
- Cleaning: Keep the machine clean and free from dust and debris. Use a dry cloth or compressed air.
- Wire Feed System: Periodically check the drive rollers for wear and ensure they are clean. Replace worn contact tips on the MIG torch.
- Cooling System: Ensure the cooling fan is unobstructed and functioning correctly. The machine features smart fan control for efficient heat dissipation and reduced failure rates.
- Cables and Connections: Inspect all cables and connections for damage or loose fittings before each use.
Troubleshooting
This section provides solutions to common issues you might encounter.
| Problem | Possible Cause | Solution |
|---|---|---|
| No Arc / Poor Arc Start | Improper grounding, incorrect settings, worn contact tip, wire feed issue. | Check earth clamp connection. Verify welding parameters. Replace contact tip. Inspect wire feed system for blockages or incorrect tension. |
| Wire Bird's Nesting | Incorrect drive roller tension, worn liner, wrong wire size for tip. | Adjust drive roller tension (should slip if tip is blocked). Inspect and replace torch liner if worn. Ensure contact tip matches wire diameter. |
| Excessive Spatter | Incorrect voltage/wire speed, insufficient gas flow (MIG), dirty workpiece. | Adjust voltage and wire speed (synergic control helps, but fine-tune if needed). Check gas flow and ensure proper shielding. Clean workpiece thoroughly. |
| Machine Overheating | Exceeding duty cycle, blocked fan vents. | Allow machine to cool down. Ensure proper ventilation and clear any obstructions from fan vents. |
| Weld is too hot / Blowing through material | Temperature setting too high for material thickness. | Reduce the temperature setting on the machine. |
| Weld is too cold / Poor penetration | Temperature setting too low for material thickness. | Increase the temperature setting on the machine. |
Specifications
- Model Number: MIG 200T
- Manufacturer: Riland
- Item Weight: 25.2 pounds
- Package Dimensions: 20.5 x 15 x 11.5 inches
- Color: 6-in-1 Mig200t (Blue)
- Style: 6-in-1 MIG200T
- Item Package Quantity: 1
- Batteries Required: No
- Protection Features: Over-heating protection, Over-current protection, Over-loading protection, Built-in VRD (Voltage Reduction Device).
- Water Rating: IP21 Protection Standard
- Display: Large Segment Display for accurate data.
- Control: Intelligent Synergic Control (RICHIP technology) for automatic parameter identification and adjustment.
- Additional Functions: Adaptive control, Burn-back adjustment, 2T/4T trigger modes.
For detailed electrical specifications and duty cycle information, please refer to the label on the machine itself.
Warranty & Support
The RILAND MIG200T welding machine comes with a 2-Year Warranty. RILAND also offers a 30-Day Money Back Guarantee.
For any inquiries, technical assistance, or warranty claims, please contact RILAND customer service. They provide 24/7 customer service to ensure a good welding experience.
Manufacturer: Riland
For more information or to visit the RILAND store, please refer to the official RILAND website or authorized distributors.


