1. Introduction
Thank you for choosing the JOMISE A1 Mini Dash Camera. This manual provides essential information for the proper installation, operation, and maintenance of your device. Please read it thoroughly before use to ensure optimal performance and safety.

Image 1.1: The JOMISE A1 Mini Dash Camera, shown mounted discreetly near a car's rearview mirror, highlighting its compact design and Wi-Fi app control capabilities.
2. Product Overview
Key Features:
- 1080P Full HD Recording: Captures clear video at 1920x1080 resolution.
- 170° Ultra-Wide Angle Lens: Provides extensive road coverage.
- Built-in Wi-Fi: Allows control and footage review via a dedicated mobile app.
- G-Sensor: Automatically detects collisions and locks video footage.
- Loop Recording: Overwrites oldest footage to ensure continuous recording.
- Night Vision: Enhanced low-light recording with Sony Starvis sensor.
- Parking Monitor: Provides 24-hour surveillance (requires optional hardwire kit).
- Compact Design: Lightweight and discreet installation.

Image 2.1: Illustration of the dash camera's 1080P HD recording capability and 170-degree wide-angle view, capturing a clear road scene.

Image 2.2: The compact cylindrical design of the JOMISE A1 Mini Dash Camera, highlighting its 360-degree rotation capability for flexible recording angles.
3. Setup
3.1 Package Contents:
- JOMISE A1 Mini Dash Camera
- Car Charger
- 32GB Micro SD Card
- Electrostatic Stickers
- User Manual
3.2 Installation:
- Prepare the Windshield: Clean the area on your windshield where you intend to mount the dash camera. Ensure it is free of dust and grease.
- Apply Electrostatic Sticker: Place an electrostatic sticker on the cleaned area of the windshield. This protects your windshield and allows for easier removal.
- Mount the Camera: Attach the dash camera to the electrostatic sticker using its adhesive mount. Position it to ensure a clear view of the road without obstructing your driving vision.
- Insert Micro SD Card: Gently insert the provided 32GB Micro SD card into the camera's card slot until it clicks into place.
- Connect Power: Route the power cable neatly along the windshield and dashboard. Connect the car charger to your vehicle's 12V power outlet (cigarette lighter socket) and the other end to the dash camera.
- Adjust Angle: Adjust the camera's lens to capture the desired field of view. The camera supports 360-degree rotation for optimal positioning.
3.3 Wi-Fi App Connection:
- Download the App: Search for the dedicated JOMISE app on your smartphone's app store (iOS or Android) and install it.
- Power On Camera: Ensure the dash camera is powered on.
- Connect to Wi-Fi: On your smartphone, go to Wi-Fi settings and connect to the dash camera's Wi-Fi network. The network name and password can typically be found in the camera's settings or initial setup instructions.
- Open App: Launch the JOMISE app. You should now be able to view live footage, access recorded videos, and adjust camera settings directly from your phone.

Image 3.1: A smartphone screen displaying live footage from the JOMISE A1 dash camera, illustrating the Wi-Fi app control feature for easy access and management.
4. Operating Instructions
4.1 Basic Recording:
Once powered on, the JOMISE A1 dash camera will automatically begin recording in a continuous loop. The oldest files will be overwritten when the memory card is full to ensure uninterrupted recording.
4.2 G-Sensor and Emergency Lock:
The built-in G-sensor detects sudden impacts or vibrations, such as those from a collision. When triggered, the current video segment will be automatically locked and saved to a protected folder, preventing it from being overwritten by loop recording.

Image 4.1: Visual representation of the loop recording function, showing older files being overwritten, and the emergency video lock feature, securing footage during an incident.
4.3 Parking Monitor:
For 24-hour parking surveillance, an optional hardwire kit (model B0CH7Y18P5) is required. When properly installed, the parking monitor feature will activate the camera to record if it detects impacts or motion while your vehicle is parked.
4.4 Night Vision:
Equipped with a Sony Starvis sensor, the dash camera provides clear video recording in low-light conditions, enhancing visibility during nighttime driving.
4.5 WDR Technology:
The camera features Wide Dynamic Range (WDR) technology, which balances exposure in scenes with high contrast, such as entering or exiting a tunnel. This ensures that both bright and dark areas of the video are clearly visible.
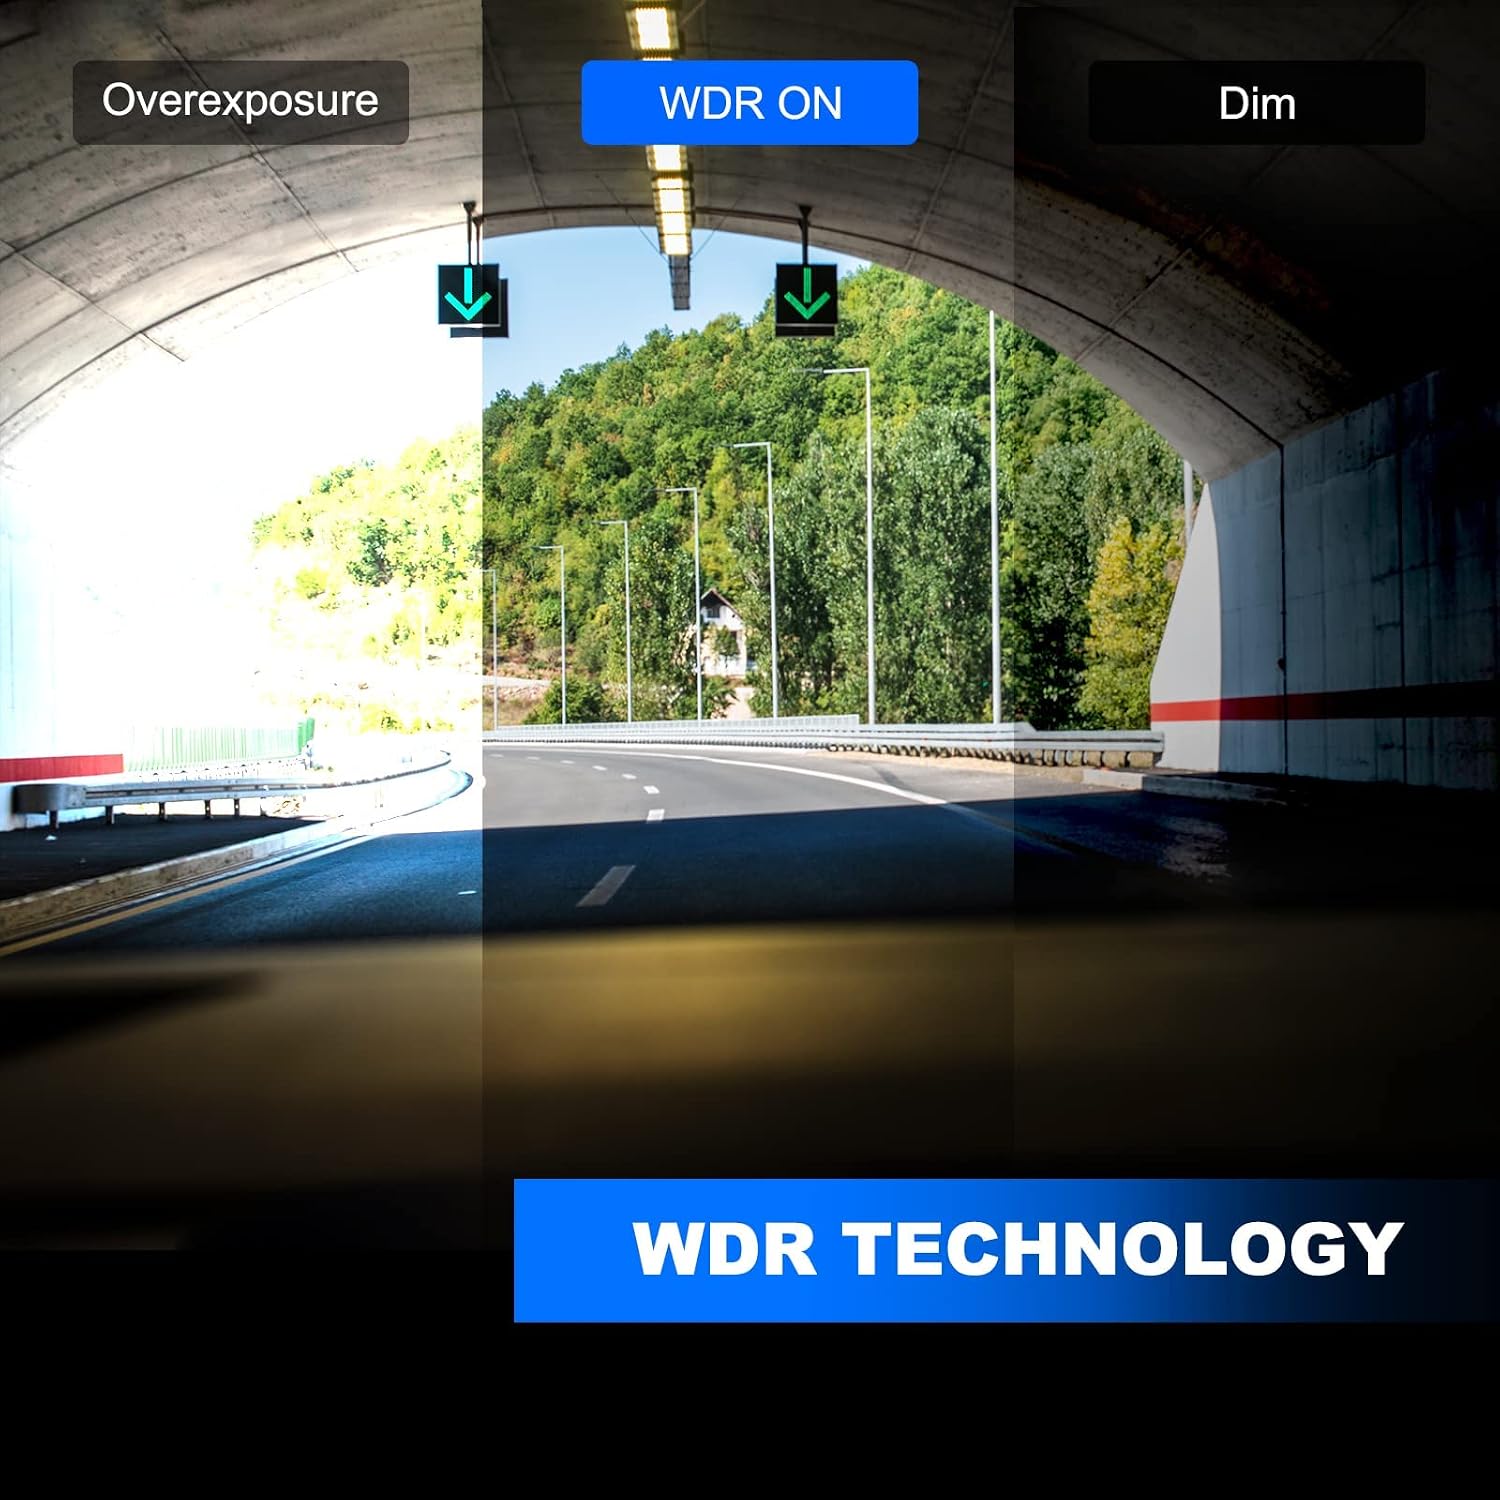
Image 4.2: Demonstration of WDR (Wide Dynamic Range) technology, showing how it improves video clarity by balancing exposure in challenging lighting conditions compared to overexposed or dim footage.
5. Maintenance
5.1 Cleaning:
- Regularly clean the camera lens with a soft, lint-free cloth to ensure clear recordings.
- Do not use abrasive cleaners or solvents on the camera body or lens.
5.2 Micro SD Card Management:
- Format the Micro SD card periodically (e.g., once a month) through the app settings to maintain optimal performance and prevent data corruption.
- Use high-quality Micro SD cards (Class 10 or higher) for reliable recording.
5.3 Environmental Considerations:
- Avoid exposing the camera to extreme temperatures or direct sunlight for prolonged periods, as this can affect its lifespan.
- Ensure the camera is securely mounted to prevent vibrations from affecting video quality.
6. Troubleshooting
Common Issues and Solutions:
- Camera not powering on:
Check the power connection to the car charger and the vehicle's 12V outlet. Ensure the vehicle's ignition is on if the outlet is not continuously powered. - Recording issues (e.g., freezing, corrupted files):
Format the Micro SD card. If the issue persists, try a different high-quality Micro SD card. Ensure the card is Class 10 or higher. - Wi-Fi connection problems:
Ensure the camera is powered on. Restart both the camera and your smartphone. Verify you are connecting to the correct Wi-Fi network and entering the correct password. - Poor video quality:
Clean the camera lens. Ensure the camera is securely mounted and not vibrating. Check app settings for resolution options. - G-sensor not triggering:
Adjust the G-sensor sensitivity in the app settings. Ensure the camera is firmly mounted.
7. Specifications
| Feature | Specification |
|---|---|
| Brand | JOMISE |
| Model Name | A1 |
| Video Capture Resolution | 1080p |
| Field of View | 170 Degrees |
| Connectivity Technology | Wi-Fi |
| Special Features | Night Vision, Parking Monitor, G-Sensor |
| Included Components | Memory Card, Car Charger |
| Mounting Type | Adhesive Mount |
| Color | Black |
| Optical Sensor Technology | CMOS |
| Flash Memory Type | Micro SD |
| Item Weight | 100 grams |
| Batteries Included | No |
8. Warranty and Support
The JOMISE A1 Dash Camera comes with a one-year warranty from the date of purchase. If you encounter any issues or require assistance with your dash camera, please do not hesitate to contact JOMISE customer service. Our support team is dedicated to providing prompt assistance and resolving any concerns you may have. Your satisfaction is our priority.
For support, please refer to the contact information provided with your product packaging or visit the official JOMISE website.


