Introduction
This manual provides detailed instructions for the installation, operation, and maintenance of your HEYMIX LIFE Single Monitor Arm, Model K100. Please read these instructions carefully before use to ensure proper setup and safe operation. This monitor arm is designed to enhance your workspace ergonomics and efficiency.
The HEYMIX LIFE Single Monitor Arm is compatible with screens ranging from 13 to 32 inches and weighing between 2 kg and 9 kg. It supports VESA mounting patterns of 75x75mm or 100x100mm.
Package Contents
Before beginning installation, verify that all components are present:
- Monitor Arm Assembly
- C-clamp Mounting Base
- Grommet Mounting Base
- VESA Plate
- Hardware Kit (screws, washers, spacers)
- Tools (Allen wrenches)
- Instruction Manual
Setup and Installation
The HEYMIX LIFE Single Monitor Arm offers two versatile installation methods: C-clamp and Grommet mount. Choose the method best suited for your desk.
1. Desk Compatibility Check
- Monitor Size: 13-32 inches
- Monitor Weight: 2-9 kg
- VESA Compatibility: 75x75mm or 100x100mm
- C-clamp Desk Thickness: 10mm - 78mm
- Grommet Mount Desk Thickness: 30mm - 80mm (requires a pre-drilled hole)

2. Choosing Your Mounting Method
Refer to the image above to determine which mounting method is appropriate for your desk. The C-clamp attaches to the edge of your desk, while the grommet mount utilizes an existing hole in your desk surface.
3. Assembly Steps
Follow the step-by-step instructions provided in the included printed manual for detailed assembly. The process typically involves:
- Attach the chosen mounting base (C-clamp or Grommet) to your desk.
- Assemble the monitor arm components.
- Attach the VESA plate to the back of your monitor.
- Mount the monitor (with VESA plate attached) onto the monitor arm.
- Adjust the gas spring tension to match your monitor's weight.

Operating the Monitor Arm
The HEYMIX LIFE Monitor Arm features a gas spring system for smooth and balanced adjustments, allowing for optimal ergonomic positioning.
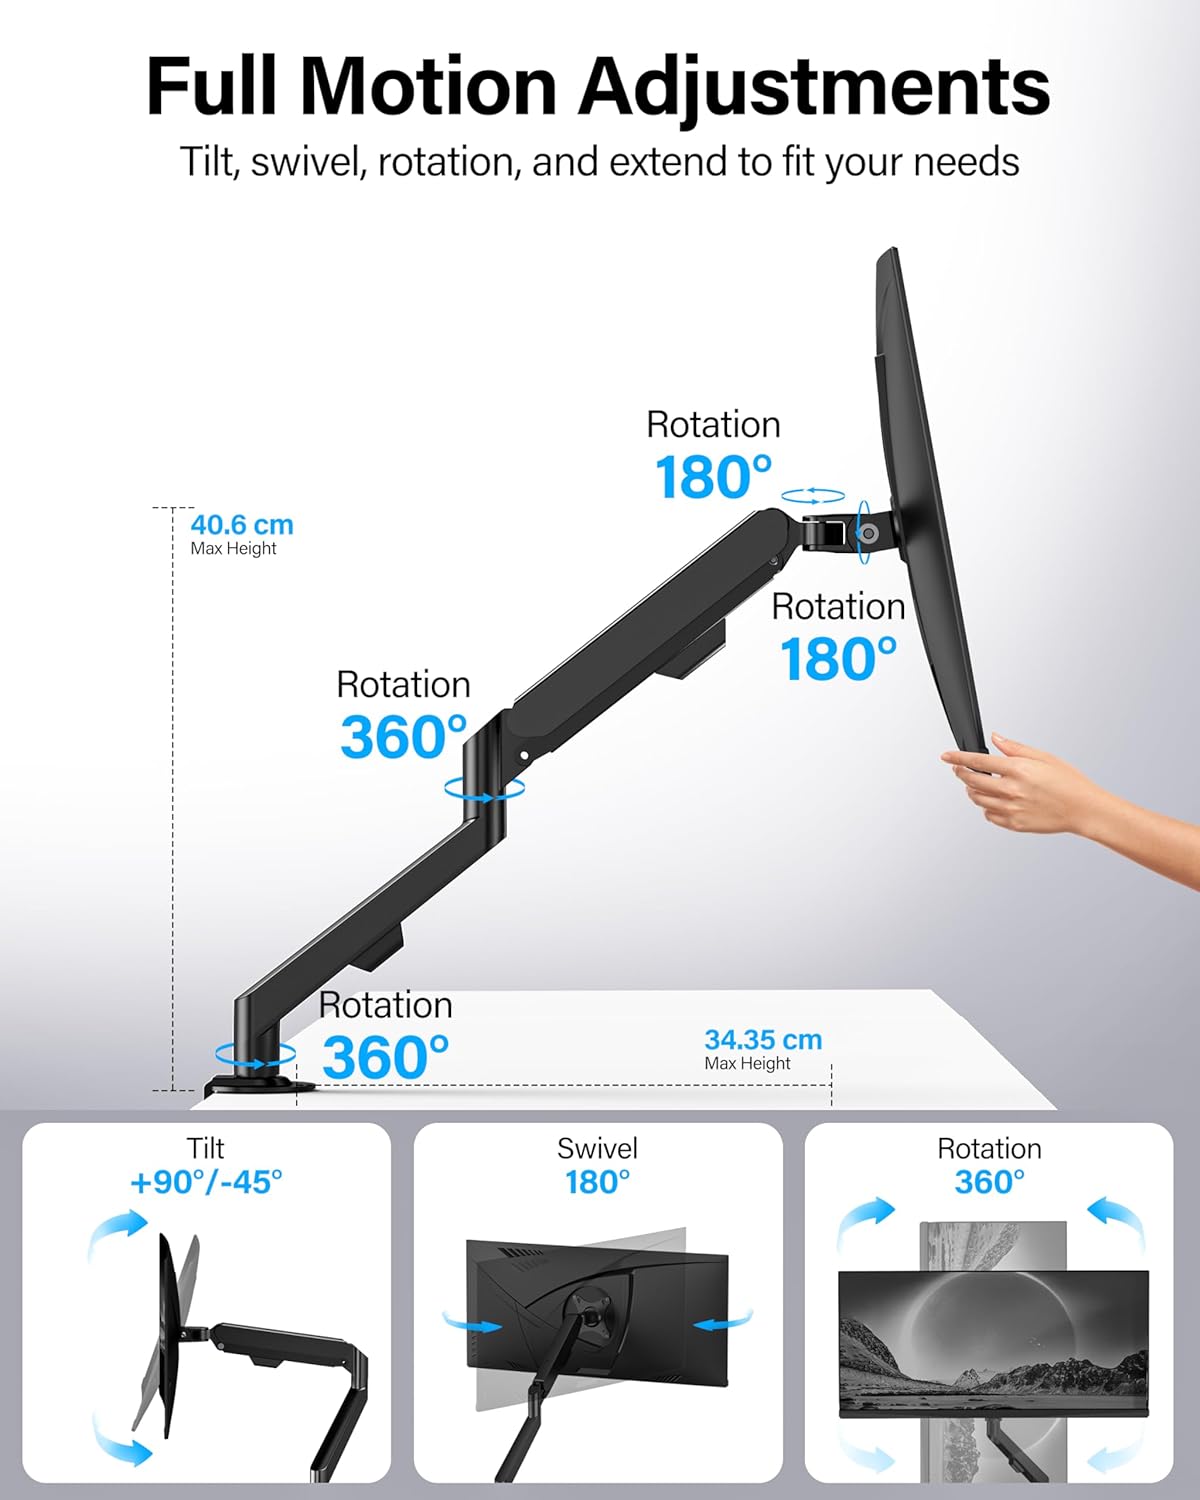
Adjustments
- Height Adjustment: The gas spring allows for effortless vertical movement of your monitor.
- Tilt: Tilt your screen from -45° to 90° to reduce glare and find your ideal viewing angle.
- Swivel: Swivel the monitor ±90° to share your screen with others or adjust for different tasks.
- Rotation: Rotate the monitor 360° to easily switch between landscape and portrait orientations.

Cable Management
The monitor arm includes concealed cable management features to keep your workspace tidy and free from cable clutter. Utilize the removable cable clamps to route and secure your monitor cables along the arm.
Maintenance
Regular maintenance ensures the longevity and optimal performance of your monitor arm.
- Cleaning: Wipe the arm with a soft, damp cloth. Avoid abrasive cleaners.
- Check Connections: Periodically check all screws and mounting points to ensure they remain tight and secure.
- Gas Spring Adjustment: If your monitor feels too loose or too stiff, adjust the gas spring tension using the provided Allen wrench. Refer to the assembly instructions for the specific adjustment point.
Troubleshooting
If you encounter issues with your HEYMIX LIFE Single Monitor Arm, refer to the following common solutions:
- Monitor Drooping or Not Holding Position: This is typically due to insufficient gas spring tension for your monitor's weight. Use the provided Allen wrench to increase the tension. Ensure all pivot points are securely tightened.
- Arm is Too Stiff to Move: The gas spring tension may be too high for your monitor's weight, or the arm may be overtightened at a pivot point. Loosen the gas spring tension slightly or check pivot point tightness.
- Instability/Wobbling: Ensure the mounting base (C-clamp or Grommet) is securely fastened to the desk and that the desk itself is stable. Verify that the VESA plate is correctly attached to both the monitor and the arm.
- Missing Parts: If any parts are missing from the package, contact customer support immediately.
Specifications
| Feature | Specification |
|---|---|
| Brand | HEYMIX LIFE |
| Model | K100 |
| Compatible Screen Size | 13 - 32 inches |
| Weight Capacity | 2 - 9 kg |
| VESA Compatibility | 75x75mm, 100x100mm |
| Movement Type | Rotate, Swivel, Tilt, Articulating |
| Tilt Range | -45° to 90° |
| Swivel Range | ±90° |
| Rotation | 360° |
| Mounting Type | Tabletop Mount (C-clamp or Grommet) |
| Material | Alloy Steel |
| Product Dimensions | 37.5 x 25 x 9.9 cm |
| Item Weight | 2.1 kg |

Warranty and Support
HEYMIX LIFE provides a 2-year Warranty covering various manufacturing defects and performance issues. If you encounter any concerns or require assistance, please contact our customer service team.
To initiate a warranty claim or for support, click "GET HELP WITH ORDER" under your order ID on the purchase platform. Our responsive customer service team aims to address your issue within 24 hours.
You may also contact us via email at: insupport@heymix.com.au