Super PDR PDR-A5
Super PDR Car Dent Repair Kit PDR-A5 Instruction Manual
Model: PDR-A5 | Brand: Super PDR
Introduction
This manual provides detailed instructions for the safe and effective use of your Super PDR Car Dent Repair Kit PDR-A5. This kit is designed for paintless dent removal on various metal surfaces, including automotive bodies, motorcycles, refrigerators, and washing machines. Please read all instructions carefully before use to ensure proper operation and to achieve optimal repair results.
Safety Information
Always prioritize safety when using the dent repair kit. Failure to follow safety guidelines may result in injury or damage to the vehicle/appliance.
- Wear appropriate personal protective equipment, such as gloves, to protect your hands.
- Ensure the work area is well-ventilated, especially when using the hot melt glue gun.
- Keep the hot melt glue gun and heated glue sticks away from flammable materials and skin to prevent burns.
- Do not use the tools on vehicles that have undergone sheet metal painting, as this may cause further damage.
- Keep all tools out of reach of children.
- Use high-concentration alcohol for glue removal in a well-ventilated area and avoid contact with eyes or skin.
What's in the Box
Your Super PDR Car Dent Repair Kit PDR-A5 includes the following components:
- 1 x Bridge Dent Puller (with 5 x glue tabs)
- 1 x Black Dent Lifter
- 1 x 2 In 1 T-bar Dent Puller
- 1 x Hot Melt Glue Gun
- 1 x Metal Tap Down Pen (with 9 heads)
- 1 x Rubber Hammer
- 1 x Suction Cup
- 17 x Blue Glue Tabs
- 10 x Glue Sticks
- 2 x Short Puller Lines
- 2 x Long Puller Lines
- 2 x Stainless Steel Grooves
- 1 x Yellow Plastic Shovels
- 1 x Product Manual
- 1 x Empty Bottle
- 1 x Rag
- 1 x Pairs of White Gloves
- 1 x Tools Bag
Note: During transportation, some parts may be scattered. Please arrange them as shown in the product details. If any parts are missing, please request a replacement or contact customer service. The manual is general and may show more accessories; the actual items depend on the kit you purchased. Please refer to the main images for exact contents.

Image: All components of the Super PDR Car Dent Repair Kit PDR-A5, including various pullers, glue gun, glue sticks, and accessories, neatly arranged.
Setup
Hot Melt Glue Gun Setup
- Prepare a glue gun stick and check the power supply.
- Insert the glue stick from the glue stick socket into the barrel of the gun.
- Plug in the power supply. The glue gun is ready to use after 1-3 minutes of preheating.
- When the glue stick is almost used up, insert a new glue stick from the end of the gun to continue using it.

Image: Visual guide for preparing and operating the hot melt glue gun, showing insertion of glue sticks and preheating.
2-in-1 T-Bar Puller Assembly
The T-bar puller can be used as a long slide hammer or detached into a short T-bar puller.
- Make sure the T-shape handle and the rod are firmly connected.
- Let the slide hammer weight and spring pass through the connecting rod.
- Twist the puller head onto the rod.
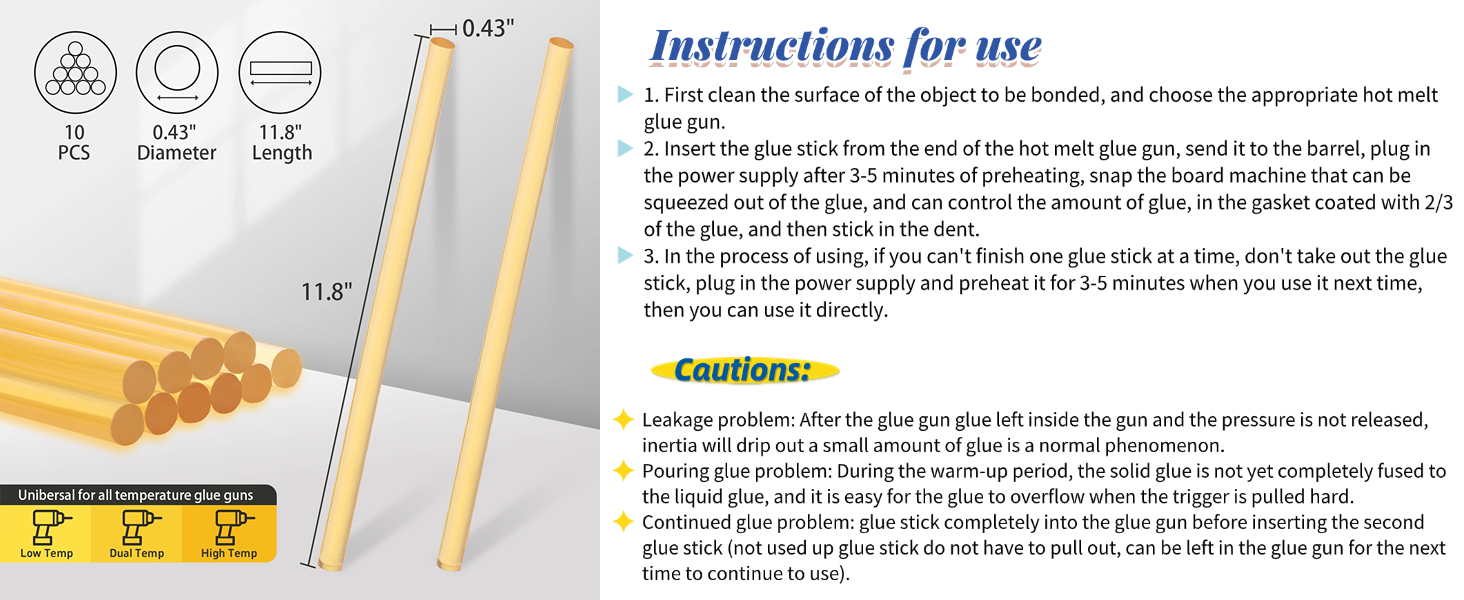
Image: Step-by-step visual instructions for assembling the T-bar puller, demonstrating how to connect components for use.
Operating Instructions
General Paintless Dent Removal Process
- Clean the surface of the object to be bonded thoroughly.
- Apply melted glue onto the chosen pull tab.
- Quickly stick the tab into the center of the dent and hold for 2-3 minutes to allow the glue to set.
- Attach the appropriate pulling tool (T-puller, Dent Lifter, or Bridge Puller) to the tab.
- Carefully pull the dent out. For the Dent Lifter, hold the handle repeatedly until the dent is removed. For the T-puller, slide the hammer weight. For the Bridge Puller, slowly turn the knob.
- Once the dent is removed, spray high-concentration alcohol to dissolve the glue.
- Use the yellow plastic shovel and rag to remove the tab and any residual glue.
Using the Lined Dent Board
The Lined Dent Board helps to accurately identify the high and low points of a dent, making the repair process more precise.
- Position the Lined Dent Board near the dented area.
- Observe the reflection of the lines on the car's surface. Distortions in the lines indicate the shape and depth of the dent.
- Use a marker to outline the dent based on the line distortions.
Video: Demonstrates the use of the Lined Dent Board to identify and mark dents on a car's surface, showing how distorted lines reveal imperfections.
Using the 2-in-1 T-Bar Puller
The 2-in-1 T-Bar Puller is effective for both large and small dents, depending on the tabs used.
- For big dents, use the pulling lines with the grooves.
- For small dents, use the individual pull tabs with the mini T-bar configuration.
- Attach the appropriate tab to the dent, then connect the T-bar puller and slide the hammer weight to pull the dent.

Image: Illustrates the versatility of the 2-in-1 T-Bar Puller, showing its use with different tabs for both large and small dents.
Video: Shows the Super PDR Car Dent Repair Kit in action, focusing on the T-bar puller and its application for dent removal.
Using the Bridge Dent Puller
The Bridge Dent Puller is ideal for middle-sized dents and offers precise control.
- Glue a suitable tab onto the dent.
- Place the Bridge Dent Puller over the tab, ensuring its feet are firmly on the car's surface around the dent.
- Slowly turn the knob to pull the tab upwards, gradually removing the dent.

Image: Details of the Bridge Dent Puller, highlighting its effort-saving pentagram nut, adjustable triangular nut, and durable metal structure for stability.
Video: A comprehensive demonstration of the Super PDR Car Dent Repair Kit, including the application of the Bridge Dent Puller and glue removal.
Using the Black Dent Lifter
The Black Dent Lifter is designed for small to medium dents (1-5 inches) and provides controlled lifting.
- Glue a suitable tab onto the dent.
- Position the Dent Lifter over the tab, ensuring its feet are stable on the car's surface.
- Slowly and repeatedly squeeze the handle to lift the dent. Do not press the handle energetically; operate slowly and many times.

Image: The Black Dent Lifter shown with a variety of pull tabs, indicating its use for dents ranging from 1 to 5 inches.

Image: Close-up views of the Black Dent Lifter, illustrating its adjustable components and how it interacts with the car's surface.
Video: Provides operating instructions for paintless dent removal tools, including the Dent Lifter, demonstrating its proper use.
Using the Rubber Hammer & Tap Down Pen
These tools are used to gently tap down any high spots that may appear during the dent removal process, ensuring a smooth finish.
- Select the appropriate head for the Metal Tap Down Pen based on the size and shape of the high spot.
- Gently tap the high spot with the Rubber Hammer and Tap Down Pen until the surface is level.

Image: The Rubber Hammer and a set of 9 Tap Down Pen heads, used for refining the repair by gently leveling high spots.
Maintenance
- Clean all tools, especially glue residue, after each use with high-concentration alcohol and the provided rag.
- Store the kit components in the provided tools bag in a dry, cool place to prevent damage and prolong their lifespan.
- Inspect tools for wear and tear before each use. Replace any damaged components to ensure safe and effective operation.
Troubleshooting
Glue Not Adhering Properly
- Cold Weather Conditions: Due to cold weather, hot melt glue may be prone to cold adhesion, resulting in poor bonding. It is recommended to use a heat gun to warm the dent area of the car before applying the glue. After applying the glue, quickly press it onto the car surface.
- Surface Preparation: Ensure the surface to be bonded is free of moisture, dust, grease, or wax. Clean the area thoroughly before applying glue.
- Optimal Temperature: For best results, perform repairs within the optimal room temperature range of 64°F - 92°F (18°C - 33°C).
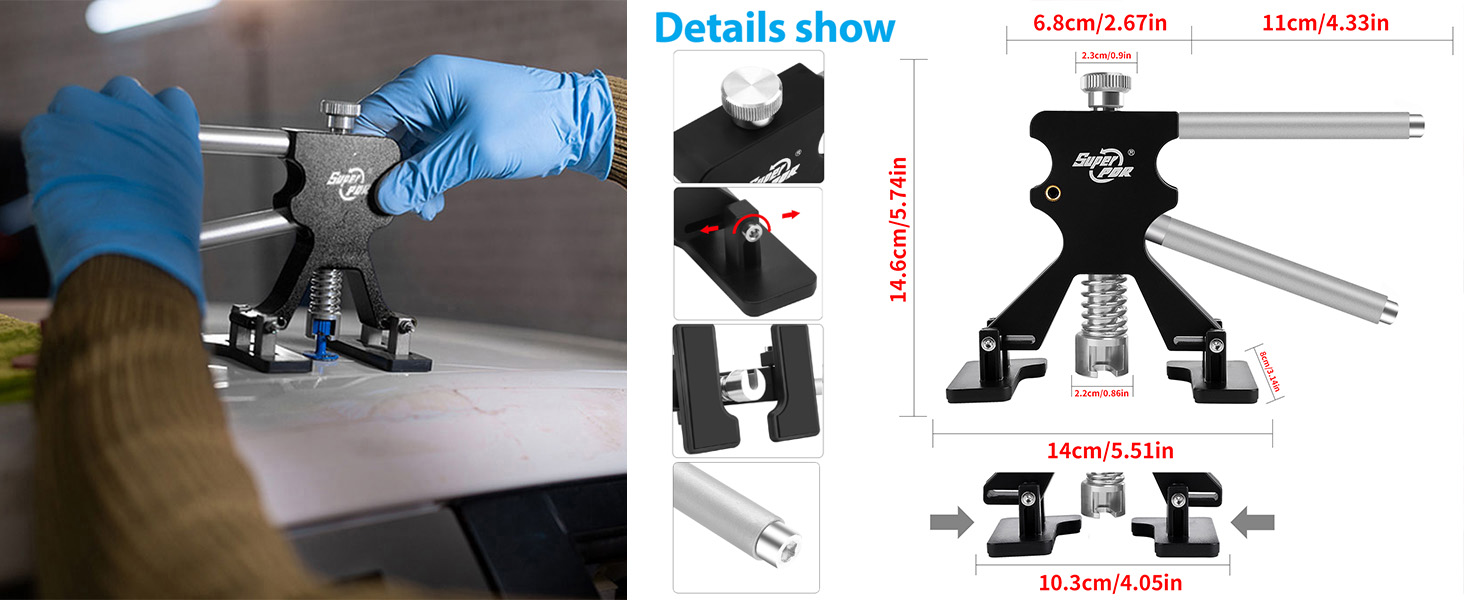
Image: Illustrates the importance of preheating the dent area to improve glue adhesion, especially in colder conditions.
Residual Glue After Removal
- Since the adhesive is a hot melt glue, it is recommended to use high-concentration alcohol to remove the adhesive, which can easily eliminate any residue.
- Spray alcohol onto the residual glue and use the yellow plastic shovel and rag to gently scrape and wipe it off.
Specifications
- Manufacturer: Super PDR
- Brand: Super PDR
- Model: MPT-YK0103
- Item Weight: 6.23 pounds
- Product Dimensions: 15.35 x 8.07 x 3.54 inches
- Item Model Number: MPT-YK0103
- Manufacturer Part Number: YK0103US
- ASIN: B0CGZVN6P2
- Date First Available: September 2, 2023
Warranty and Support
For warranty information or technical support, please refer to the contact details provided with your product packaging or visit the official Super PDR website. Keep your purchase receipt for any warranty claims.