1. Introduction
Thank you for choosing the Locksworth Digital Electronic Security Safe. This manual provides essential information for the proper setup, operation, and maintenance of your safe. Please read these instructions carefully before use and retain them for future reference to ensure optimal security and functionality.
2. Safety Information
- Do not store emergency keys inside the safe. Keep them in a secure, separate location.
- Ensure the safe is installed on a stable surface or securely mounted to a wall/floor to prevent unauthorized removal.
- Keep the keypad dry and clean. Avoid using abrasive cleaners.
- Replace batteries promptly when the low battery indicator appears to avoid being locked out.
- This safe is designed for security against theft and unauthorized access. It is not fireproof or waterproof.
3. Package Contents
Please verify that all items listed below are included in your package:
- 1 x Locksworth Digital Electronic Security Safe
- 2 x Emergency Keys
- 2 x Sets of Expansion Bolts (for mounting)
- 4 x AA Alkaline Batteries
- 4 x Floor Protectors
- 1 x User Manual

This image provides detailed product information, including the external dimensions of the safe (9.84 inches high, 13.78 inches wide, 9.84 inches deep) and internal measurements. It also lists the included accessories: two emergency keys, two sets of expansion bolts for mounting, four floor protectors, and four AA batteries.
4. Product Overview
The Locksworth Digital Electronic Security Safe is designed to protect your valuables with a combination of robust construction and advanced locking mechanisms. Key features include a digital keypad, an internal light, a removable shelf for flexible storage, and an integrated alarm system.

A detailed diagram of the Locksworth safe, labeling its key components such as the battery compartment cover, felt carpet, reset button, micro door frame, chrome-plated feet, internal light, removable shelf, and the digital keypad with dual alarm system.

This image displays the Locksworth digital security safe in pink, with its door open. The interior features a removable shelf, organizing various items such as cash, gold bars, a passport, and a handgun, demonstrating its storage capacity.

This image demonstrates the versatile storage solutions of the safe. One view shows the interior with the removable shelf installed, organizing items like books and a camera. The other view shows the interior without the shelf, accommodating larger items such as a passport, gold bars, cash, and a camera.
5. Setup
5.1 Battery Installation
- Locate the battery compartment on the inside of the safe door.
- Open the battery compartment cover.
- Insert 4 AA alkaline batteries, ensuring correct polarity (+/-).
- Close the battery compartment cover.
5.2 Initial Code Setting
The safe comes with a factory default code (usually '159'). It is highly recommended to change this code immediately after battery installation.
- With the safe door open, press the red reset button located on the inside of the door (usually near the hinge). You will hear a beep, and the indicator light on the keypad will flash.
- Within 5 seconds, enter your desired 3-8 digit personal code on the keypad.
- Press the '#' button to confirm. The safe will beep twice, indicating successful code change.
- Test the new code with the door open before closing it.
6. Operating Instructions
6.1 Opening the Safe with Digital Code
- Enter your 3-8 digit personal code on the keypad.
- Press the '#' button. The indicator light will turn green.
- Within 5 seconds, turn the knob clockwise to open the door.
6.2 Opening the Safe with Emergency Keys
In case of forgotten code or dead batteries, use the emergency keys.
- Locate the emergency keyhole, usually hidden behind the Locksworth logo plate or a small cover on the keypad.
- Insert the emergency key and turn it counter-clockwise.
- Simultaneously turn the main knob clockwise to open the door.
- Once open, replace the batteries if necessary.

This diagram illustrates the two primary methods for opening the Locksworth safe. Method A involves entering a digital password on the keypad and turning the knob. Method B shows the use of emergency keys in conjunction with the knob for manual access.
6.3 Changing the User Code
- With the safe door open, press the red reset button on the inside of the door.
- Enter your new 3-8 digit code.
- Press the '#' button to confirm.
- Test the new code with the door open before closing.
6.4 Alarm System
The safe is equipped with a dual alarm system designed to deter unauthorized access:
- Violent Vibration Alarm: If the safe detects strong vibrations or attempts to force it open, an alarm will sound.
- Incorrect Passcode Alarm: Entering the wrong passcode three consecutive times will trigger an alarm.
The alarm will sound for a set period (e.g., 60 seconds) and can be deactivated by entering the correct passcode.

This graphic illustrates the safe's dual alarm system, which activates with a sound level of 70dB. It highlights two triggers: a violent vibration alarm and an alarm for three incorrect passcode entries, enhancing security.
7. Mounting Instructions
For enhanced security, it is recommended to mount the safe to a wall or floor using the provided expansion bolts.
- Choose a suitable location for mounting.
- Open the safe door and locate the pre-drilled mounting holes on the back or bottom of the safe.
- Mark the drilling points on the wall or floor through the pre-drilled holes.
- Drill holes at the marked points using an appropriate drill bit for your wall/floor material.
- Align the safe with the drilled holes and insert the expansion bolts.
- Tighten the bolts securely to fix the safe in place.
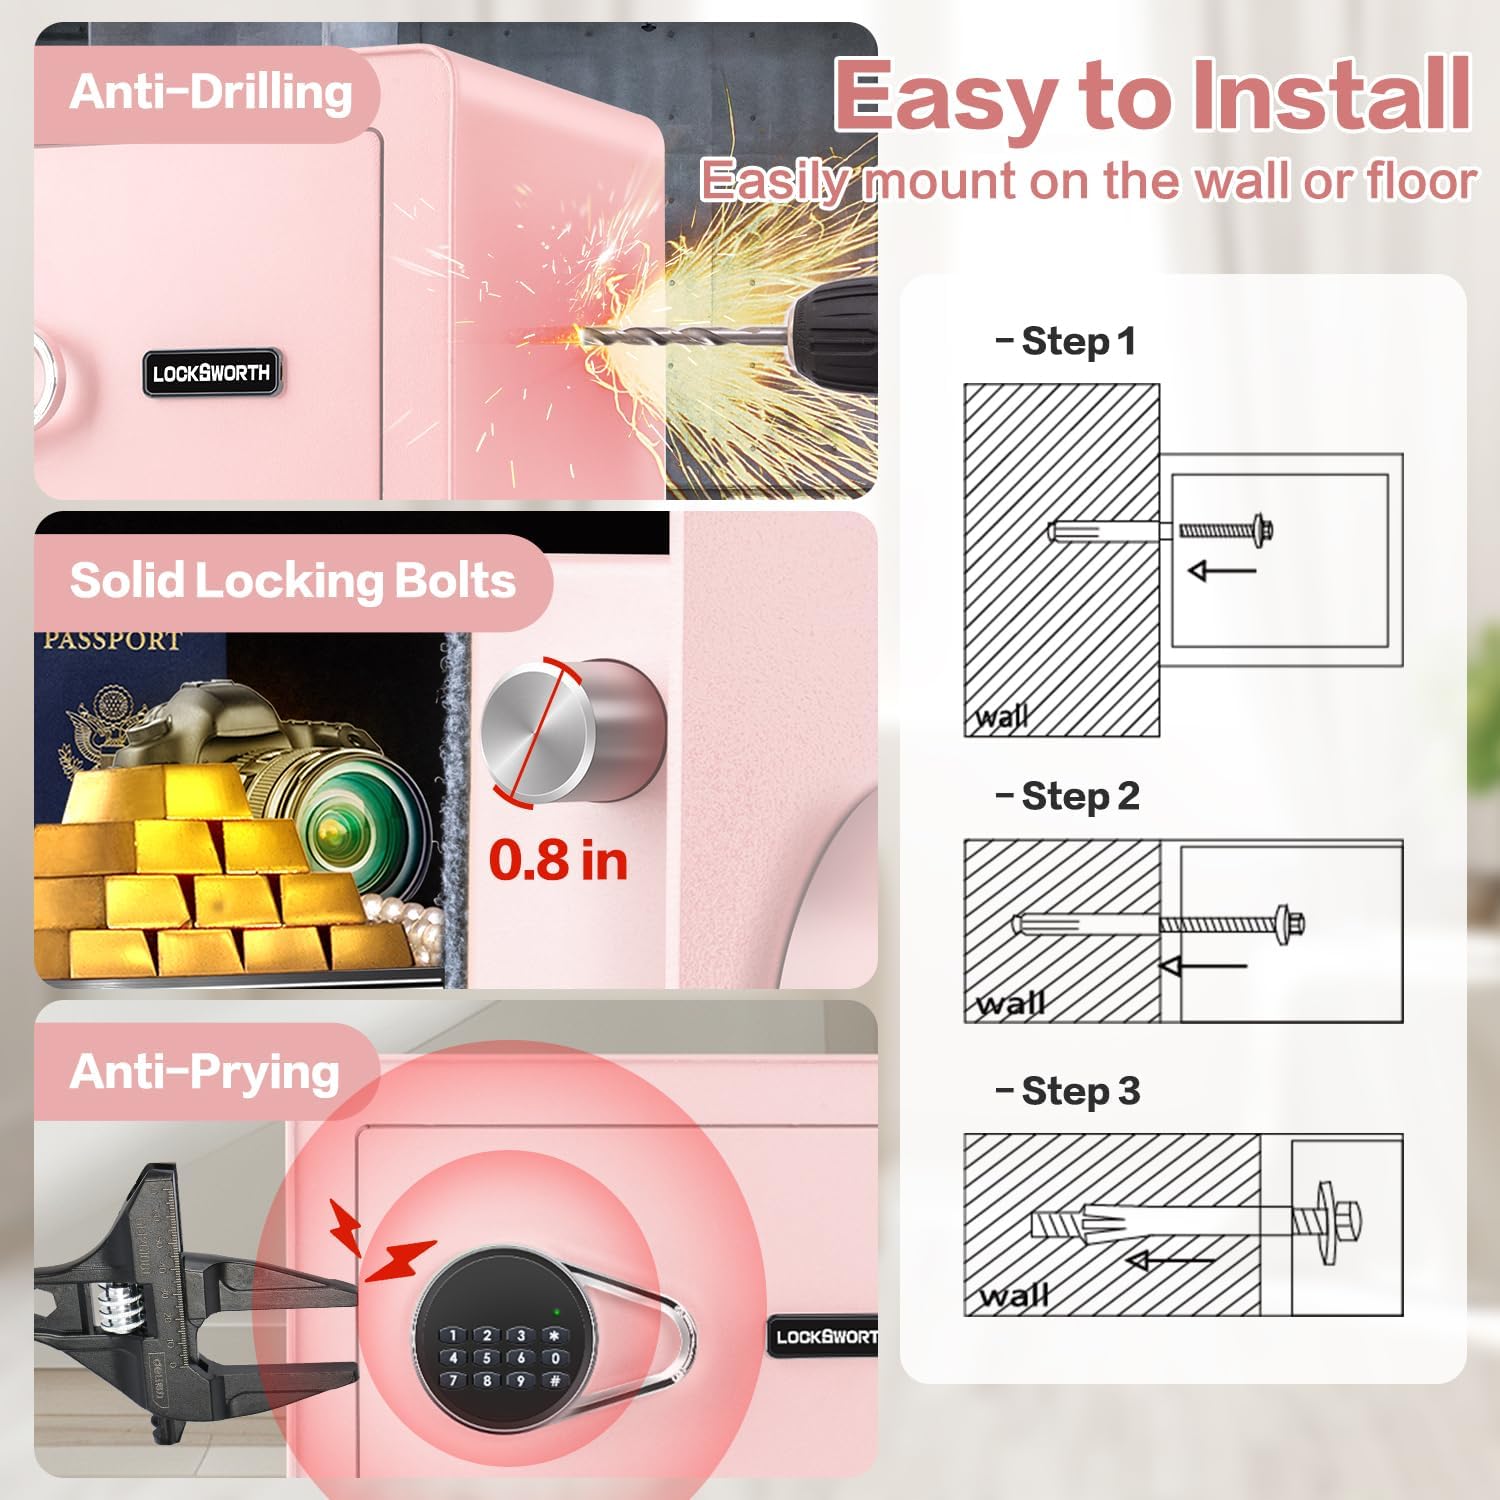
This image highlights the safe's robust construction and ease of installation. It shows the anti-drilling capability, the strength of the 0.8-inch solid locking bolts, and resistance to prying attempts. A three-step diagram illustrates how to easily mount the safe to a wall using expansion bolts.
8. Maintenance
- Battery Replacement: Replace all 4 AA batteries when the low battery indicator lights up or if the keypad becomes unresponsive. Always use new alkaline batteries.
- Cleaning: Wipe the safe's exterior with a soft, damp cloth. Do not use harsh chemicals or abrasive cleaners, as they may damage the finish or electronic components.
- Keypad Care: Keep the keypad free from dust and debris.
9. Troubleshooting
| Problem | Possible Cause | Solution |
|---|---|---|
| Safe does not open with code. | Incorrect code entered; dead batteries; keypad malfunction. | Re-enter code carefully. Replace batteries. Use emergency key. |
| Keypad is unresponsive. | Dead batteries. | Replace batteries. Use emergency key to open. |
| Alarm sounds unexpectedly. | Violent vibration detected; incorrect code entered multiple times. | Enter correct code to disarm. Ensure safe is stable if vibration is accidental. |
| Emergency key does not work. | Key not fully inserted; wrong key. | Ensure key is fully inserted and turned correctly. Verify it is the correct emergency key for this safe. |
10. Specifications
| Feature | Detail |
|---|---|
| Model Number | AZ4304 |
| External Dimensions (H x W x D) | 9.84" x 13.78" x 9.84" (24.99 x 35 x 24.99 cm) |
| Internal Capacity | 0.6 Cubic Feet |
| Weight | 8.5 kg |
| Material | Alloy Steel |
| Lock Type | Digital Electronic Combination Lock, Key Lock |
| Special Features | Alarm System, Anti-Theft, Combination Lock, Removable Shelf, Sensor Light |
| Power Source | 4 x AA Alkaline Batteries |
11. Warranty and Support
For warranty information or technical support, please refer to the documentation provided at the time of purchase or contact Locksworth customer service. Keep your purchase receipt as proof of purchase for any warranty claims.