VEVOR Hydraulic Strut Spring Compressor User Manual
Model: YH-13
Brand: VEVOR
1. Introduction
The VEVOR Hydraulic Strut Spring Compressor is a robust tool designed for the safe and efficient disassembly and maintenance of strut springs and shock absorbers in various vehicle types, including sedans, SUVs, off-road vehicles, and pickup trucks. It features a powerful hydraulic jack with a 4.5-ton load capacity and a 1-ton rated compression force, ensuring effortless handling of heavy springs. Its stable suspension system and multiple safety features prioritize user security during operation.
2. Safety Information
WARNING: Spring compression can be extremely dangerous. Always follow all safety precautions and instructions carefully. Failure to do so may result in serious injury or death.
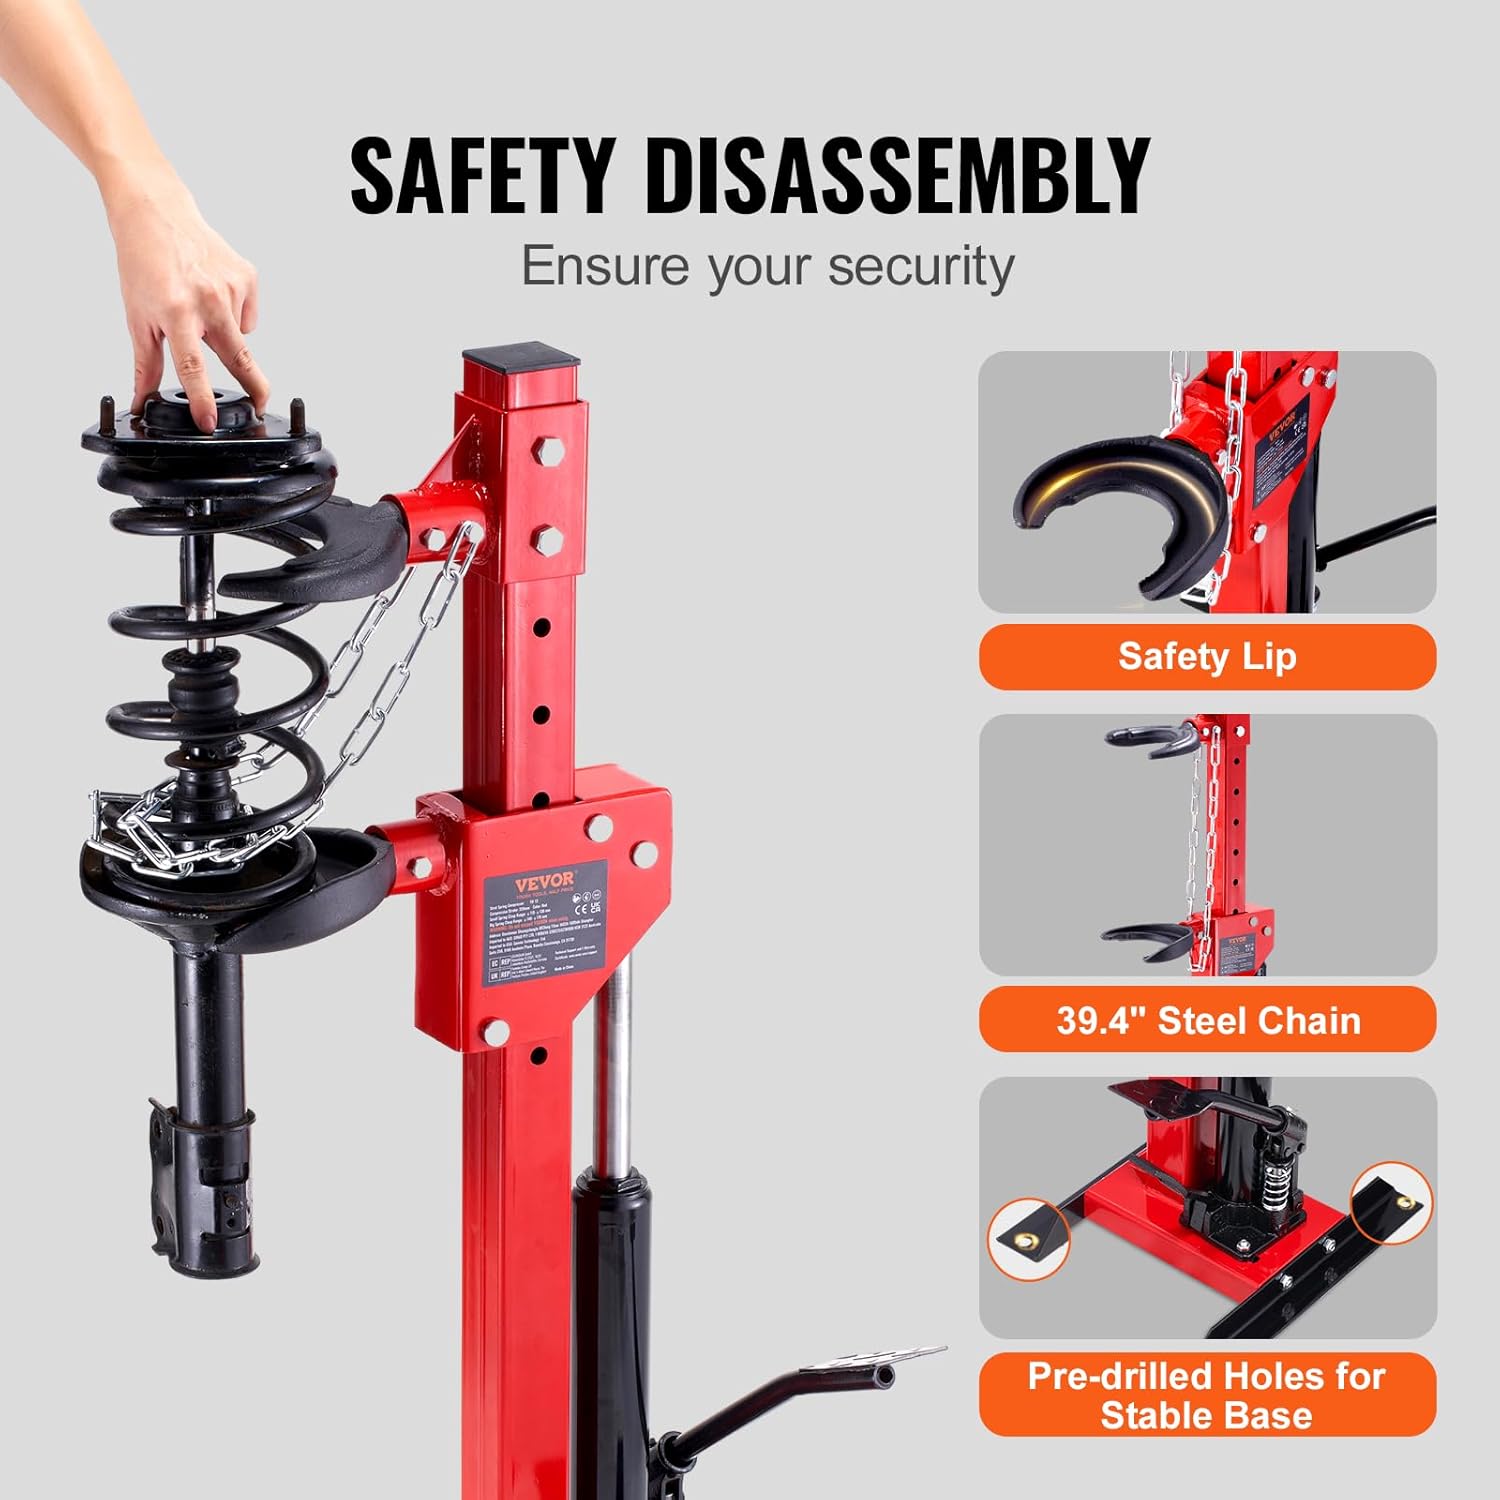
Always wear appropriate personal protective equipment, including safety glasses and heavy-duty gloves.
Ensure the compressor is placed on a stable, level surface. For added security, utilize the pre-drilled holes in the base to anchor the unit to the ground.
Verify that the spring and strut assembly are securely seated in the clamps before initiating compression.
Always attach the 39.4-inch extended safety chain to secure the springs and prevent bouncing during compression.
Do not exceed the rated compression force of 1 ton. The hydraulic jack has a 4.5-ton load capacity, but the compression force is limited to 1 ton.
Keep hands and other body parts clear of moving parts during operation.
Inspect the unit for any damage or wear before each use. Do not use if any components are damaged.
Only use the provided small and big spring clasps. Ensure the correct clasp size is used for the spring being compressed.
When releasing pressure, do so slowly and in a controlled manner by pressing the second pedal.
Image: Overview of safety features including the safety lip, 39.4" steel chain, and pre-drilled holes for stable base.
3. Product Components
The VEVOR Hydraulic Strut Spring Compressor (Model YH-13) includes the following main components:
1 x Coil Strut Spring Compressor Main Unit (Red steel column with integrated hydraulic jack and foot pedals)
1 x Small Spring Clasp (Accommodates sizes from 4.3" to 5.1")
1 x Big Spring Clasp (Caters to 5.5" to 6.7" sizes)
Mounting Hardware (Bolts, pins, etc., for assembly)
Safety Chain (Integrated with the main unit)
Image: The main unit of the VEVOR Hydraulic Strut Spring Compressor shown with both small and big spring clasps.
Image: A visual breakdown of the product's dimensions and the two types of spring clasps included.
4. Setup and Assembly
The VEVOR Hydraulic Strut Spring Compressor requires minimal assembly. Follow these steps for proper setup:
Unpack Components: Carefully remove all components from the packaging. Verify that all parts listed in the "Product Components" section are present.
Image: All individual parts of the compressor laid out for assembly.
Attach Base Supports: Secure the two black base supports to the main red column using the provided bolts. Ensure they are firmly tightened on both sides for stability.
Image: Close-up of attaching the base supports to the main column.
Install Hydraulic Jack: Position the hydraulic jack into its designated slot at the base of the main column. Secure it with the appropriate bolts and pins.
Image: Illustrates the process of securing the hydraulic jack to the main unit.
Assemble Upper and Lower Clamps:
Insert the upper clamp assembly into the top section of the main column. Ensure it is oriented correctly (arrow pointing upwards) to withstand greater loads. Secure it with the provided pin and cotter pin.
Slide the lower clamp assembly onto the hydraulic rod. Secure it with the provided pin and cotter pin.
Image: Shows the installation of the upper clamp, emphasizing correct orientation.
Image: Shows the installation of the lower clamp onto the hydraulic rod.
Choose and Install Spring Clasp: Select either the small or big spring clasp based on the size of the spring you intend to compress. Insert the chosen clasp into the upper and lower clamp assemblies and secure them with the pins.
Image: Illustrates the two available spring clasp sizes and their installation points.
Anchor the Unit (Recommended): For maximum stability and safety, use the pre-drilled holes in the H-shaped base to anchor the compressor to the ground using appropriate fasteners (not included).
5. Operating Instructions
Follow these steps to safely operate your VEVOR Hydraulic Strut Spring Compressor:
Prepare the Strut Assembly: Ensure the strut and spring assembly is clean and free of debris.
Position the Strut: Carefully place the strut and spring assembly into the installed spring clasps. Ensure it is seated firmly and centrally within both the upper and lower clasps.
Image: A strut and spring assembly positioned within the compressor, highlighting the 12.6" max compression stroke.
Attach Safety Chain: Secure the extended safety chain around the spring to prevent it from bouncing or detaching during compression. Ensure the chain is properly latched.
Image: Close-up showing the safety chain being attached to secure the spring.
Compress the Spring: Slowly and steadily press the hydraulic foot pedal to raise the lower clamp and compress the spring. Observe the spring carefully during compression. The maximum compression stroke is 12.6 inches (320 mm).
Image: A user operating the foot pedal to compress a strut spring, demonstrating the ease of use.
Maintain Stable Suspension: The compressor is designed to hold the spring in its compressed position when pressure is stopped, providing stable suspension.
Image: Illustrates the stable suspension feature, showing the spring held in place and the release pedal.
Perform Work: Once the spring is sufficiently compressed and held securely, you can proceed with disassembling the strut or performing necessary maintenance.
Release the Spring: After completing your work, slowly press the second foot pedal (release valve) to gradually lower the clamp and decompress the spring. Ensure the spring is fully decompressed before removing the assembly.
Remove Strut Assembly: Once the spring is fully decompressed, carefully remove the strut and spring assembly from the clasps.
6. Maintenance
Proper maintenance will extend the life of your VEVOR Hydraulic Strut Spring Compressor:
Cleaning: After each use, wipe down the unit with a clean cloth to remove any dirt, grease, or debris.
Lubrication: Periodically apply a light coat of machine oil to all moving parts, including the hydraulic rod and pivot points, to ensure smooth operation and prevent rust.
Inspection: Regularly inspect all bolts, pins, and the safety chain for tightness and wear. Check the ductile cast iron clasps for any signs of cracks or damage. Inspect the hydraulic jack for any leaks.
Image: A view of the internal components, including the smooth hydraulic rod and ductile iron casting clamps, which should be regularly inspected.
Storage: Store the compressor in a dry, clean environment when not in use to prevent corrosion.
Hydraulic Fluid: If the hydraulic jack's performance degrades, consult a qualified technician for hydraulic fluid level checks and refills. Do not attempt to service the hydraulic system yourself unless properly trained.
7. Troubleshooting
This section addresses common issues you might encounter with your VEVOR Hydraulic Strut Spring Compressor.
Problem
Possible Cause
Solution
Compressor not lifting or lifting slowly.
Low hydraulic fluid level, air in the hydraulic system, or hydraulic pump malfunction.
Check hydraulic fluid level and refill if necessary (consult professional). Bleed air from the system if applicable. If issues persist, contact VEVOR customer support.
Spring not holding compression.
Release valve not fully closed, internal hydraulic leak, or worn seals.
Ensure the release pedal is fully disengaged. If the problem continues, there may be an internal hydraulic issue requiring professional service.
Clasps not gripping spring securely.
Incorrect clasp size used, spring not properly seated, or worn clasp surfaces.
Verify you are using the correct small or big spring clasp for your spring size. Re-seat the spring properly. Inspect clasps for wear and replace if necessary.
Unit wobbles during operation.
Not on a level surface, base supports not tightened, or unit not anchored.
Ensure the compressor is on a firm, level surface. Tighten all base support bolts. Anchor the unit to the ground using the pre-drilled holes for maximum stability.
8. Specifications
Feature
Detail
Model Number
YH-13
Max Hydraulic Jack Capacity
4.5 Ton / 9920 LBS
Rated Compression Force
1 Ton / 1000 kg
Max Compression Stroke
12.6 inches / 320 mm
Small Spring Clasp Range
4.3" - 5.1"
Big Spring Clasp Range
5.5" - 6.7"
Product Dimensions (L x W x H)
18.9 x 15.8 x 40.9 inches (480 x 400 x 1040 mm)
Net Weight
57.3 lbs / 26 kg
Material
Q235 Reinforced Steel (Column), Ductile Cast Iron (Clasps)
Power Source
Hydraulic
Recommended Use
Automotive maintenance (strut springs and shock absorbers)
Image: A visual representation of the product's key dimensions and specifications.
9. Warranty and Support
For warranty information, technical support, or to inquire about replacement parts, please contact VEVOR customer service. Refer to your purchase documentation for specific warranty terms and contact details.
You can also visit the official VEVOR website for additional resources and support: www.vevor.com