1. Introduction
Thank you for choosing the VEVOR TC250-VI-I 10-inch Wet Tile Saw with Stand. This manual provides essential information for the safe operation, assembly, maintenance, and troubleshooting of your new wet tile saw. Please read this manual thoroughly before initial use to ensure proper function and to prevent injury or damage.
The VEVOR TC250-VI-I is designed for cutting various materials such as ceramic tiles, floor tiles, and stones. It features an adjustable cutting angle from 0 to 45 degrees, a maximum cutting depth of 3.75 inches (95 mm), and can accommodate tiles up to 36 inches (914 mm). The saw is equipped with a 65Mn steel blade and a 4500 RPM motor for efficient cutting. Its integrated water reservoir minimizes dust, and the infrared guidance system assists in precise cuts. The unit includes a stable stand with caster wheels for mobility.

Figure 1.1: VEVOR TC250-VI-I 10-inch Wet Tile Saw with Stand. This image displays the complete wet tile saw unit, including the saw head, cutting table, water reservoir, and foldable stand with wheels.
2. Important Safety Instructions
Always observe basic safety precautions to reduce the risk of fire, electric shock, and personal injury when operating this power tool.
2.1 General Safety Warnings
- Read all instructions: Familiarize yourself with the controls and proper use of the tool.
- Wear appropriate personal protective equipment (PPE): Always wear safety glasses, hearing protection, and a dust mask. Use non-slip footwear.
- Keep work area clean and well-lit: Cluttered or dark areas invite accidents.
- Do not operate in explosive atmospheres: Do not use power tools in the presence of flammable liquids, gases, or dust.
- Keep children and bystanders away: Distractions can cause you to lose control.
- Avoid accidental starting: Ensure the switch is in the off-position before plugging in the tool.
- Do not overreach: Maintain proper footing and balance at all times.
- Secure workpiece: Always clamp or secure the material being cut to prevent movement.
- Disconnect power: Always unplug the saw before making adjustments, changing accessories, or performing maintenance.
2.2 Electrical Safety
- Grounding: This tool is equipped with a grounded plug. Ensure it is plugged into an appropriately installed and grounded outlet.
- Avoid body contact with grounded surfaces: Such as pipes, radiators, ranges, and refrigerators. There is an increased risk of electric shock if your body is grounded.
- Do not expose power tools to rain or wet conditions: Water entering a power tool will increase the risk of electric shock.
- Do not abuse the cord: Never use the cord for carrying, pulling, or unplugging the power tool. Keep cord away from heat, oil, sharp edges, or moving parts.
2.3 Specific Wet Tile Saw Safety
- Blade Safety: Always use the correct type and size of blade for the material being cut. Ensure the blade is securely installed and the blade guard is in place before operation.
- Water System: Ensure the water reservoir is filled and the pump is functioning correctly to provide adequate cooling and dust suppression. Never operate the saw dry.
- Kickback Prevention: Avoid binding the blade. Maintain a firm grip on the workpiece and guide it smoothly through the cut.
- Maintenance: Regularly inspect the blade, power cord, and all moving parts for damage or wear. Replace damaged parts immediately.
3. Product Components
The VEVOR TC250-VI-I Wet Tile Saw comes with several components designed for optimal performance and ease of use.
3.1 Included Parts
- Wet Tile Saw Unit
- Foldable Stand with Caster Wheels
- 10-inch 65Mn Steel Blade
- Water Reservoir (removable)
- Water Pump
- Infrared Guide Module
- Extension Tables (Right and Front)
- Blade Wrenches (2)
- User Manual (this document)
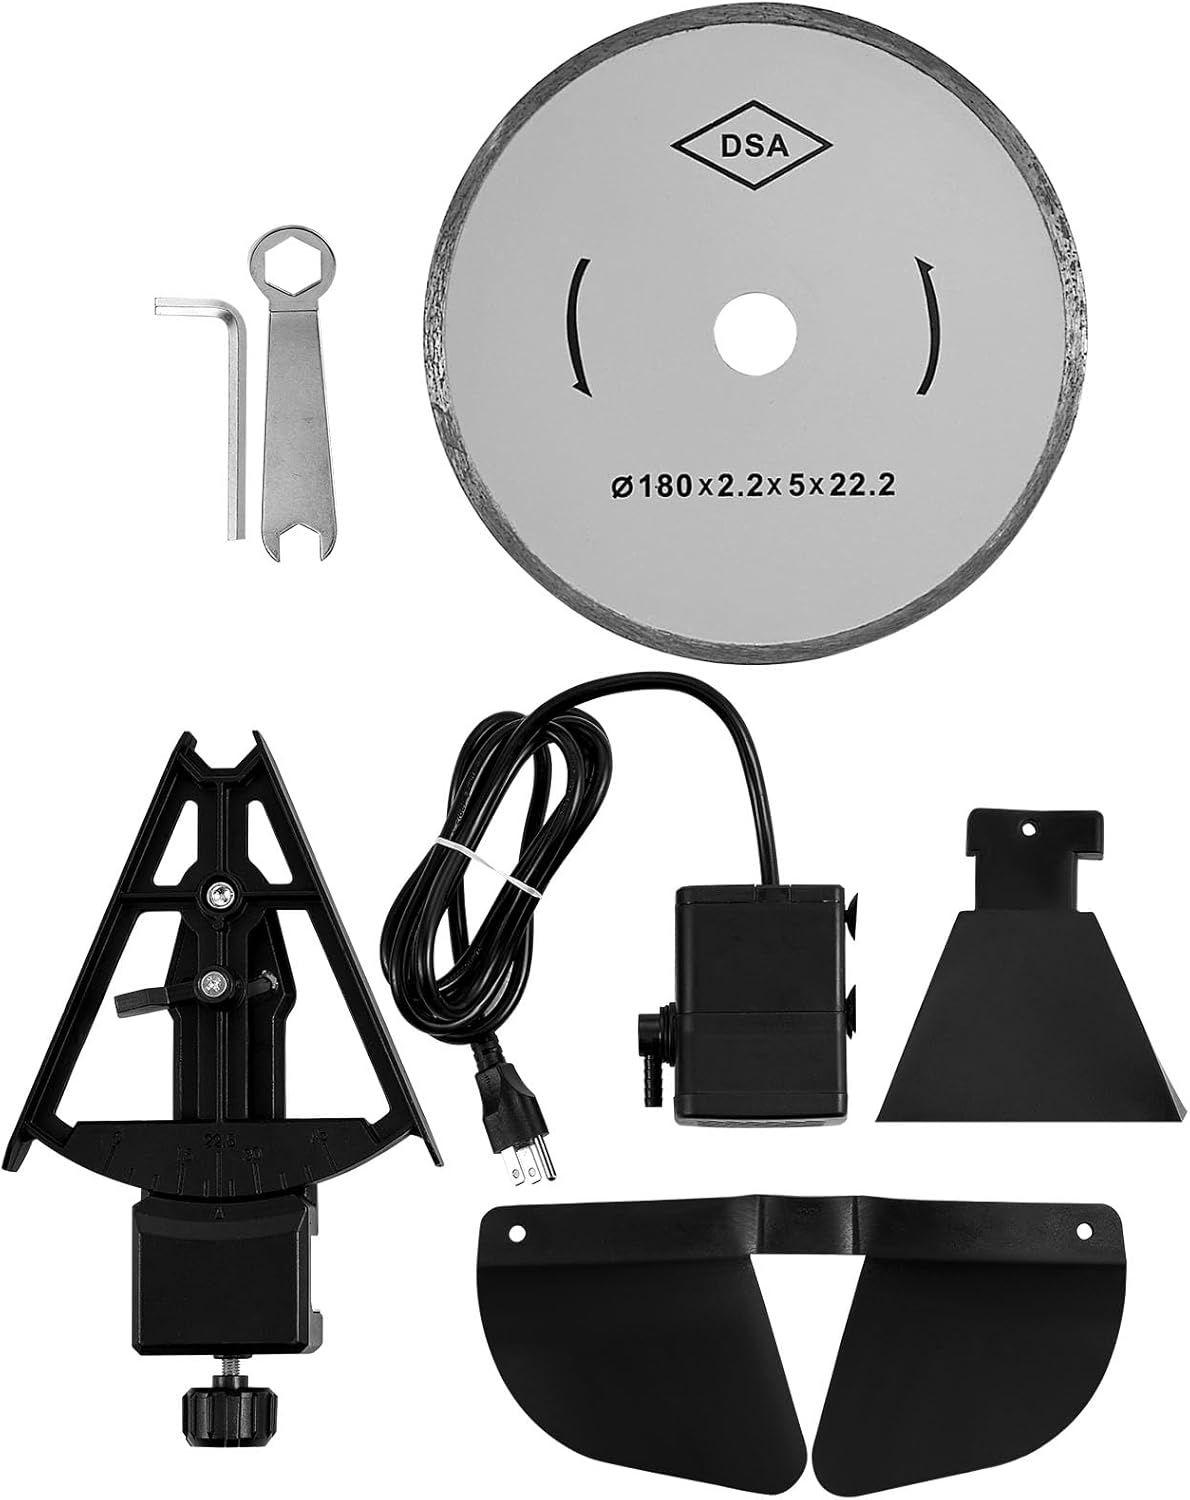
Figure 3.1: Included Accessories. This image shows the 10-inch blade, two wrenches, the water pump, and protective guards, which are essential components for the saw's operation.
4. Setup and Assembly
Before operating the wet tile saw, proper assembly is crucial for safety and performance.
4.1 Stand Assembly
- Unfold the stand frame and ensure all locking mechanisms are engaged.
- Attach the caster wheels to the designated points on the stand legs. Ensure they are securely fastened for mobility and stability.
4.2 Saw Unit Placement
- Carefully place the wet tile saw unit onto the assembled stand.
- Secure the saw unit to the stand using the provided fasteners. Verify that the saw is stable and does not wobble.
4.3 Blade Installation
- Ensure the saw is unplugged.
- Lift the blade guard to expose the blade arbor.
- Using the provided wrenches, loosen the arbor nut.
- Place the 10-inch 65Mn steel blade onto the arbor, ensuring the rotation arrow on the blade matches the direction of rotation indicated on the saw.
- Securely tighten the arbor nut with the wrenches. Do not overtighten.
- Lower the blade guard back into position.
4.4 Water Reservoir and Pump Setup
- Slide the removable water reservoir into its designated slot beneath the cutting table.
- Place the water pump into the reservoir.
- Connect the pump's hose to the water nozzle on the saw head.
- Fill the reservoir with clean water until the pump is fully submerged and the water level is sufficient for operation.

Figure 4.1: Water Reservoir Setup. This image illustrates the process of filling the removable water reservoir, which is crucial for dust suppression and blade cooling during operation.
4.5 Extension Table Installation
- Attach the right and front extension tables to the main cutting table as indicated by the saw's design. These tables provide additional support for larger workpieces.
- Ensure the extension tables are level and securely locked in place.

Figure 4.2: Adjustable Depth and Angle. This image highlights the saw's capabilities for cutting various materials like ceramic tiles, floor tiles, and marble, along with key dimensions and features such as adjustable angle, max cutting depth, and max tile size.
5. Operating Instructions
Follow these steps for safe and effective operation of your VEVOR wet tile saw.
5.1 Powering On/Off
- Plug the saw into a grounded 120V power outlet.
- Press the ON switch to start the motor and water pump. Allow the blade to reach full speed and water to flow before beginning a cut.
- Press the OFF switch to stop the saw.
5.2 Adjusting Cutting Angle (Miter Cuts)
- Ensure the saw is unplugged.
- Locate the angle adjustment lever or knob.
- Loosen the adjustment mechanism.
- Tilt the saw head to the desired angle between 0 and 45 degrees. Common markings are at 0°, 22.5°, and 45°.
- Securely tighten the adjustment mechanism.
5.3 Adjusting Cutting Depth
- Ensure the saw is unplugged.
- Locate the depth adjustment mechanism.
- Adjust the blade height to achieve the desired cutting depth, up to a maximum of 3.75 inches (95 mm).
- Securely lock the depth adjustment.
5.4 Using the Infrared Guidance System
- Activate the infrared guide (if it has a separate switch).
- A laser line will project onto the workpiece, indicating the cutting path.
- Align the desired cut line on your tile with the projected infrared line for precise positioning.

Figure 5.1: Precise Cutting Alignment. This image demonstrates the infrared guidance system, which projects a laser line onto the tile to assist in making straight and accurate cuts.
5.5 Making a Cut
- Place the tile firmly against the fence and align it with the infrared guide line.
- Hold the tile securely with both hands, keeping fingers away from the blade path.
- Slowly and steadily push the tile through the blade. Do not force the cut. Allow the blade to do the work.
- Maintain consistent pressure and speed throughout the cut.
- Once the cut is complete, turn off the saw and wait for the blade to stop before removing the workpiece.

Figure 5.2: Operating the Saw. This image shows a user making a cut on a tile, demonstrating proper hand placement and the use of the cutting table.
6. Maintenance
Regular maintenance ensures the longevity and safe operation of your wet tile saw.
6.1 Cleaning
- Always unplug the saw before cleaning.
- Empty and clean the water reservoir after each use to prevent algae growth and sediment buildup.
- Rinse the cutting table and blade guard to remove tile dust and debris.
- Wipe down the motor housing and electrical components with a dry cloth. Do not use water directly on electrical parts.
6.2 Blade Replacement
- Replace the blade when it becomes dull or damaged. A dull blade can cause chipping, slow cuts, and increased motor strain.
- Follow the blade installation steps (Section 4.3) in reverse to remove the old blade, and then install a new, sharp blade.
6.3 Water Pump Care
- Periodically check the water pump for blockages from sediment or debris. Clean the pump filter if necessary.
- Ensure the pump is fully submerged in water during operation to prevent damage.
7. Troubleshooting
This section addresses common issues you might encounter with your wet tile saw.
| Problem | Possible Cause | Solution |
|---|---|---|
| Saw does not start | No power supply; Faulty switch; Motor overload. | Check power connection and circuit breaker; Test switch; Allow motor to cool down. |
| Blade not cutting efficiently or chipping tiles | Dull or incorrect blade; Insufficient water flow; Forcing the cut. | Replace blade; Check water pump and reservoir level; Reduce cutting pressure. |
| Excessive dust during operation | Insufficient water flow; Water pump malfunction; Reservoir empty. | Check water level; Clean water pump; Ensure pump hose is connected. |
| Saw vibrates excessively | Loose blade; Unstable stand; Damaged blade. | Tighten blade arbor nut; Ensure stand is fully locked and on a level surface; Replace damaged blade. |
| Infrared guide not visible | Laser module off; Batteries depleted (if applicable); Excessive ambient light. | Turn on laser module; Replace batteries; Reduce ambient light if possible. |
8. Specifications
Detailed technical specifications for the VEVOR TC250-VI-I Wet Tile Saw.
| Feature | Specification |
|---|---|
| Model Number | TC250-VI-I |
| Brand | VEVOR |
| Power Source | Corded Electric |
| Voltage | 120 Volts |
| Wattage | 1200 Watts |
| Motor Speed | 4500 RPM |
| Blade Diameter | 10 Inches |
| Blade Material | 65Mn Steel |
| Max Cutting Depth | 3.75 inches (95 mm) |
| Max Cutting Tile Size | 36 inches (914 mm) |
| Cutting Angle | 0-45 Degrees |
| Product Dimensions (L x W x H) | 18.9" x 17" x 52.36" |
| Item Weight | 20.2 Pounds |
| Special Features | Dust-Free Operation with Water Reservoir, Precision with Infrared Guidance, Convenient Mobility |
| UPC | 840349946610 |

Figure 8.1: Product Dimensions and Key Specifications. This image provides a visual overview of the saw's dimensions and lists important technical details such as model number, table sizes, blade material, cutting capacity, and motor specifications.
9. Warranty and Support
The VEVOR TC250-VI-I Wet Tile Saw comes with a limited warranty. For specific warranty terms and conditions, please refer to the warranty card included with your product or visit the official VEVOR website.
For technical support, replacement parts, or any questions regarding the operation or maintenance of your product, please contact VEVOR customer service. Contact information can typically be found on the VEVOR website or on the product packaging.