SPORTARC LCD-S966
SPORTARC LCD-S966 Ebike Display User Manual
Model: LCD-S966
Brand: SPORTARC
1. Introduction
Thank you for choosing the SPORTARC LCD-S966 Ebike Display. This high-quality, durable display is designed to enhance your electric bicycle riding experience by providing crucial information at a glance. It accurately reflects battery charge, records real-time energy consumption to ensure riding mileage, and displays useful data such as riding speed, time, power, and temperature. The colorful screen makes data viewing clear and easy. Please note that this display must be used with a Protocol No. 2 controller for proper functionality.
2. Safety Information
- Always ensure the display is securely mounted before riding.
- Do not attempt to open or modify the display unit, as this may void the warranty and cause damage.
- Keep the display clean and dry. Avoid exposure to extreme temperatures or direct sunlight for prolonged periods.
- Ensure all connections are properly seated and waterproofed (if applicable) to prevent electrical issues.
- Operate your ebike responsibly and always prioritize safety.
3. Package Contents
The package includes the following items:
- 1 x SPORTARC LCD-S966 Ebike Display
- Integrated connection cable (5-pin waterproof connector)
- Control button unit
4. Product Overview
4.1 Display Features
The LCD-S966 display provides a comprehensive overview of your ebike's status and riding data. Key indicators include:
- Speed: Current riding speed (km/h or mph).
- Battery Level: Real-time battery charge indicator.
- Error Indicator: Displays error codes if issues arise.
- Riding Modes: SPORT, STD (Standard), ECO (Economy) modes.
- Gear: Current assist level or gear.
- ODO (Odometer): Total distance traveled.
- TRIP: Current trip distance.
- AVG (Average Speed): Average speed for the current trip.
- MAX (Maximum Speed): Maximum speed achieved during the current trip.
- VWh/Ah: Voltage-Watt-hour or Amp-hour consumption.

Figure 1: Front view of the SPORTARC LCD-S966 Ebike Display, showing the screen interface with various data points like speed, battery level, error indicators, and riding modes.
4.2 Control Buttons and Connectors
The display unit is operated via a separate control button unit, typically mounted near the handlebar grip. This unit usually includes:
- 'M' Button: Mode/Menu button for cycling through display information or entering settings.
- Up Arrow Button: Increases values or navigates up in menus.
- Down Arrow Button: Decreases values or navigates down in menus.
The display connects to your ebike's controller via a 5-pin waterproof connector, ensuring a secure and reliable connection.

Figure 2: The LCD-S966 display unit, its 5-pin waterproof connector, and the separate control buttons. The image also indicates the overall length of the display unit with its cable.
5. Setup and Installation
5.1 Mounting the Display
- Choose a suitable location on your ebike's handlebars for the display, ensuring it is easily visible and accessible without obstructing your view or controls.
- Securely attach the display bracket to the handlebars using the provided hardware.
- Mount the control button unit near your thumb for easy operation while riding.

Figure 3: The LCD-S966 display securely mounted on the handlebars of an electric bicycle, demonstrating its typical placement and user perspective during operation.
5.2 Connecting the Display
The LCD-S966 display features clearly configured individual joints for straightforward installation. It is crucial to connect the display to an ebike controller that supports Protocol No. 2. Failure to do so will result in the display not functioning.
- Locate the corresponding 5-pin connector on your ebike's controller or wiring harness.
- Align the pins and carefully push the display's 5-pin waterproof connector into the controller's port until it clicks securely into place.
- Ensure the connection is firm and free from any loose wires.
- Route the cable neatly along the handlebars and frame, securing it with cable ties if necessary, to prevent interference with moving parts.

Figure 4: This image presents two wiring configurations for the LCD-S966 display: one with a direct 5-pin waterproof connector and another showing individual wire connections. It also provides a dimension for the cable length.
6. Operating Instructions
6.1 Power On/Off
To power on the display, turn on your ebike's main power switch. The display should illuminate automatically. To power off, turn off your ebike's main power switch.
6.2 Display Modes
Press the 'M' (Mode) button on the control unit to cycle through different display modes, such as ODO (Odometer), TRIP (Trip Distance), AVG (Average Speed), and MAX (Maximum Speed).
6.3 Gear Selection / Assist Levels
Use the Up and Down arrow buttons on the control unit to adjust the ebike's assist level or gear. The current gear will be displayed on the screen.
6.4 Error Indicators
If an error occurs, the display will show an 'ERROR' message along with a specific code. Refer to the troubleshooting section or your ebike's controller manual for details on specific error codes.
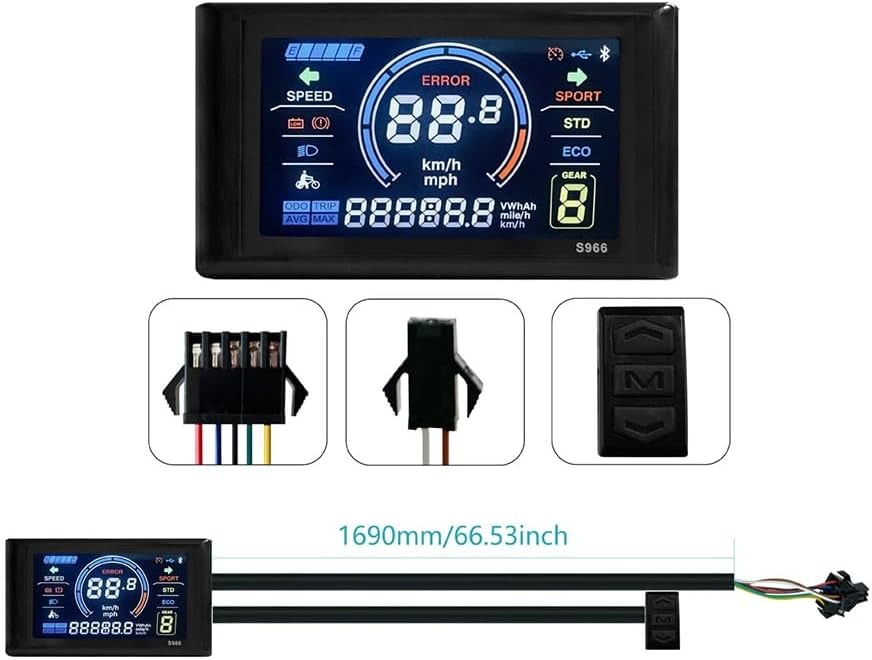
Figure 5: This image compares the visibility of the LCD-S966 display in different lighting conditions, showing its clear readability during both daytime and nighttime riding.
7. Maintenance
- Cleaning: Wipe the display screen and body with a soft, damp cloth. Do not use abrasive cleaners or solvents.
- Water Exposure: While the display is designed to be waterproof, avoid submerging it in water or exposing it to high-pressure water jets.
- Storage: When not in use for extended periods, store the ebike and display in a dry, cool place away from direct sunlight.
- Connection Check: Periodically check all cable connections to ensure they are secure and free from corrosion.
8. Troubleshooting
- Display Does Not Turn On:
- Ensure your ebike's main power is on.
- Check all cable connections, especially the 5-pin connector, for proper seating.
- Verify that your ebike's controller is compatible with Protocol No. 2. The display will not function with incompatible controllers.
- Check the ebike's battery level.
- Incorrect Data Displayed:
- Ensure the wheel circumference setting (if adjustable via controller) is correct.
- Check for any loose sensor connections on your ebike.
- 'ERROR' Message on Screen:
- Note the specific error code displayed.
- Consult your ebike's controller manual or contact ebike support for interpretation of error codes.
- Buttons Not Responding:
- Check the connection of the control button unit to the main wiring harness.
- Ensure buttons are not physically stuck or damaged.
9. Specifications
| Feature | Detail |
|---|---|
| Model | LCD-S966 |
| Product Model Number | 1401919856 |
| Material | ABS |
| Color | Black |
| Voltage Compatibility | 24-72V |
| Connector Type | 5-pin waterproof |
| Input Interface | Buttons |
| Product Dimensions (L x W x H) | Approximately 15 x 10 x 5 cm (5.9 x 3.9 x 2 inches) |
| Product Weight | Approximately 190g - 200g (0.42 - 0.44 lbs) |
| Origin | China |
10. Warranty and Support
For warranty information or technical support, please refer to the documentation provided with your ebike or contact the retailer where you purchased the SPORTARC LCD-S966 Ebike Display. Keep your purchase receipt as proof of purchase.
Related Documents - LCD-S966
 |
668有线自行车码表用户使用手册 本手册详细介绍了SPORTARC 668有线自行车码表的功能、安装、设置、使用方法及故障排除,帮助用户全面了解和使用该产品。 |
 |
STIEBEL ELTRON DHB-E LCD: Bedienungs- und Installationsanleitung Umfassende Anleitung zur Bedienung, Installation, Wartung und Fehlerbehebung der STIEBEL ELTRON DHB-E LCD Serie von elektronisch geregelten Komfort-Durchlauferhitzern. Enthält Sicherheitshinweise, Gerätebeschreibung, Einstellungen, technische Daten und mehr. |
 |
Ordone LCD : Système de Désenfumage pour Immeubles d'Habitation Manuel technique pour le système de désenfumage Ordone LCD d'Aldes, conçu pour les immeubles d'habitation (3ème et 4ème familles). Ce guide détaille l'installation, la configuration, le fonctionnement et la maintenance du système et de ses composants (BEA-LCD, BCE-LCD, BNS-LCD). |
 |
LOGIK L24DIGB10 24" HD Ready 1080p Digital LCD TV Instruction Manual Comprehensive instruction manual for the LOGIK L24DIGB10 24" HD Ready 1080p Digital LCD TV. Learn how to set up, connect, and use all features of your new television. |
 |
CyberView X124 24" Ultra High Resolution LCD User Manual Comprehensive user manual for the CyberView X124 1U LCD Console Drawer, detailing specifications, installation, connectivity options like HDMI and SDI, and KVM integration. Learn about product features and safe usage. |
 |
ViewSonic VX2418-P-MHD 24-inch LCD Display Service Manual This service manual provides detailed technical information for the ViewSonic VX2418-P-MHD 24-inch LCD Display (Model No. VS18572), including maintenance, specifications, disassembly procedures, troubleshooting, and diagrams. |
Ask a question about this manual
Ask about setup, troubleshooting, compatibility, parts, safety, or missing instructions. Manuals+ will review the question and use this page’s manual context to help answer it.