
Whubefy 8 in 1
WHUBEFY 8-in-1 Multifunctional Heat Press Machine User Manual
Model: 8 in 1
Brand: Whubefy
1. Introduction
The WHUBEFY 8-in-1 Multifunctional Heat Press Machine is a versatile digital industrial heat transfer machine designed for various sublimation and heat transfer projects. This comprehensive system allows for printing on T-shirts, mugs, caps, plates, and other DIY items, making it suitable for both industrial and home use. Its advanced features ensure efficient and safe operation, providing high-quality results for your creative endeavors.

Figure 1.1: The WHUBEFY 8-in-1 Heat Press Machine, showcasing its main unit and various interchangeable attachments for different applications.
2. Safety Instructions
Please read all safety instructions carefully before operating the heat press machine to prevent injury or damage to the equipment.
- Always operate the machine on a stable, heat-resistant surface.
- Ensure the machine is properly grounded to prevent electrical shock.
- Keep hands and body clear of the heating platen during operation. The platen reaches high temperatures (up to 450°F / 232°C) and can cause severe burns.
- Despite advanced insulation technology keeping the surface temperature around 50°C when the working temperature reaches 200°C, exercise caution.
- Do not leave the machine unattended while it is powered on or operating.
- Unplug the machine from the power outlet when not in use or before cleaning and maintenance.
- Do not immerse the machine or its electrical components in water or other liquids.
- Keep children and pets away from the operating area.
- Use heat-resistant gloves when handling hot items or changing attachments.
- Do not attempt to modify or repair the machine yourself. Contact qualified service personnel for assistance.
3. Product Components
The WHUBEFY 8-in-1 Heat Press Machine includes the main heat press unit and various interchangeable attachments to accommodate different items.
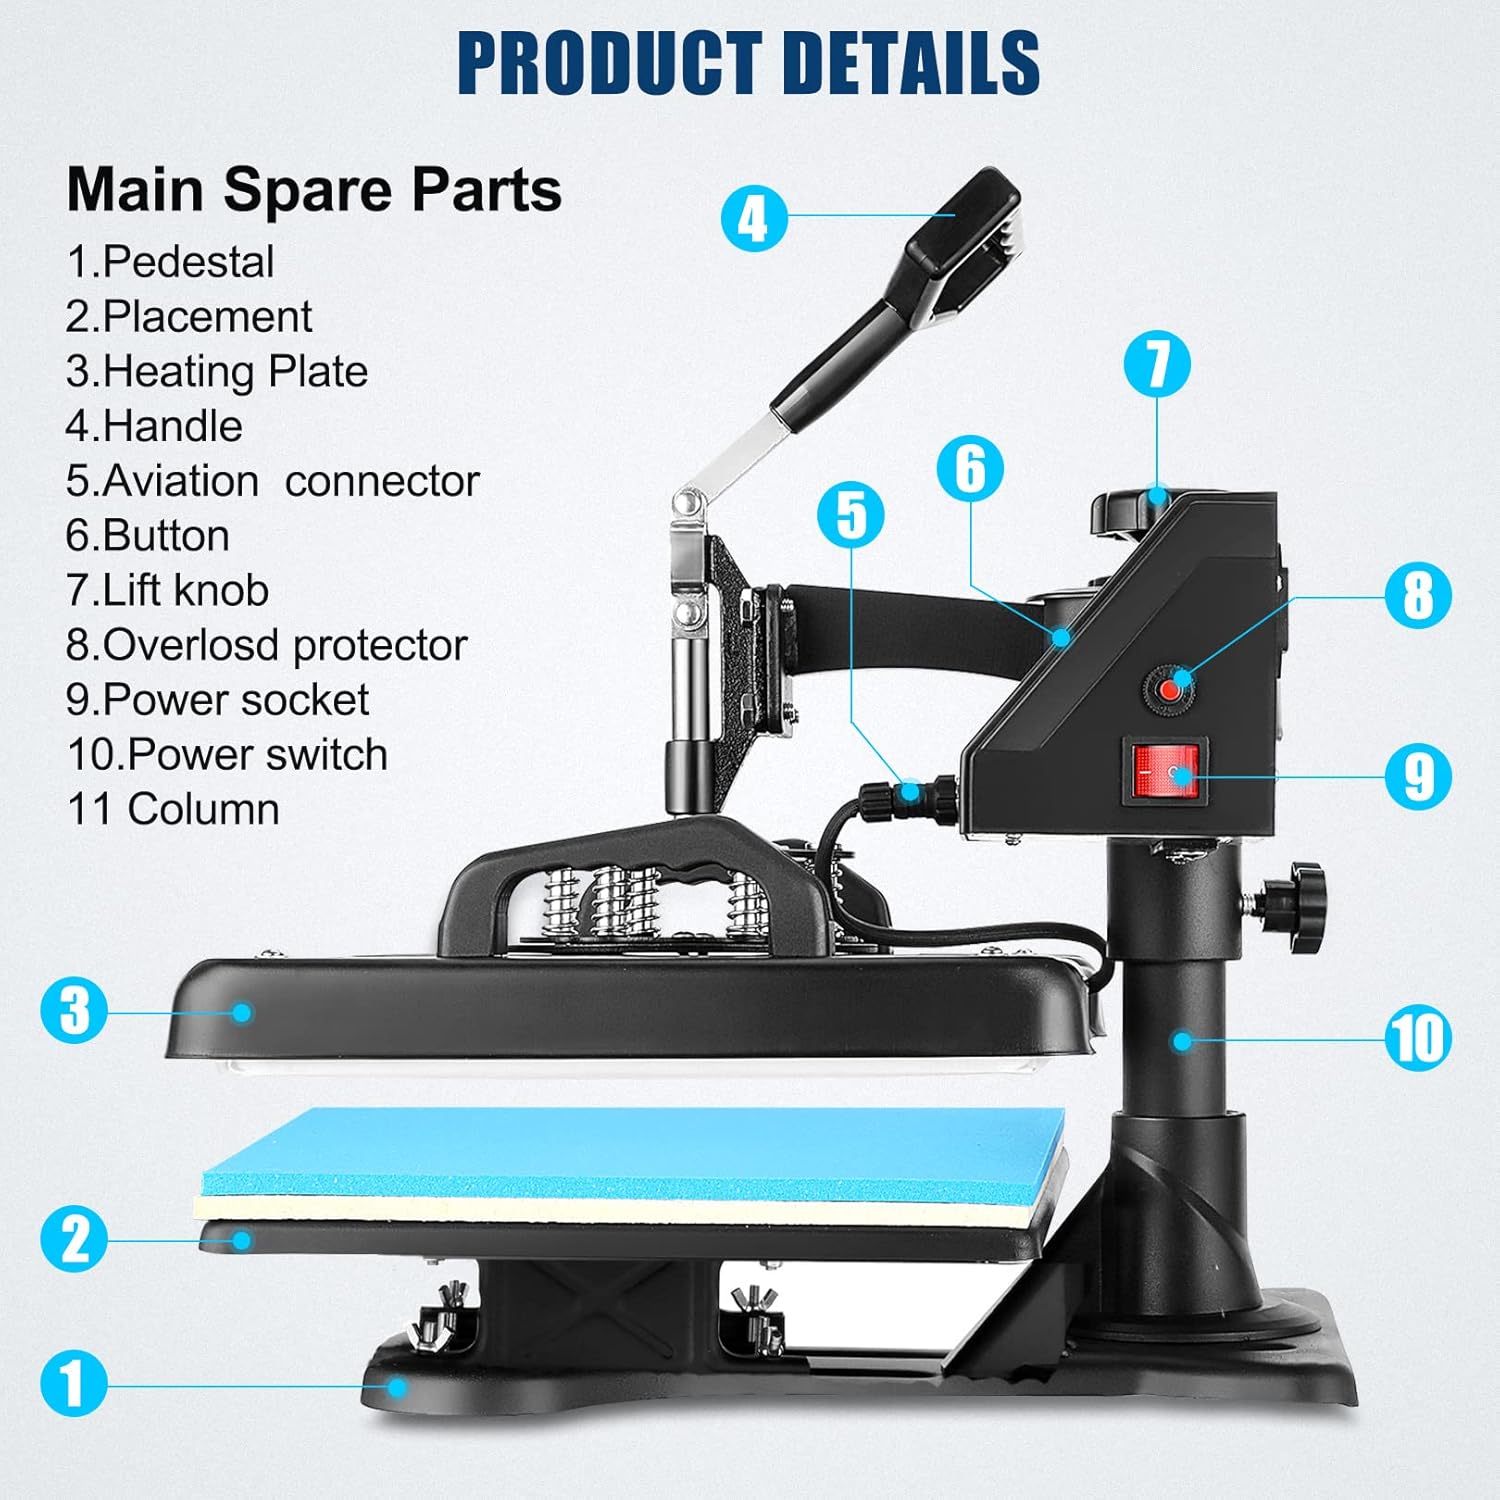
Figure 3.1: Main components of the heat press machine, including the pedestal, placement area, heating plate, handle, aviation connector, buttons, lift knob, overload protector, power socket, and power switch.
Included Attachments:
- Heat Press Machine (15"x12"): Main flat platen for T-shirts, fabrics, etc.
- Cap Press (5.5"x3.3"): For pressing designs onto hats and caps.
- Mug Press Attachments:
- 11oz Mug Press
- 10oz Mug Press
- 12oz Mug Press (cone)
- 17oz Mug Press (cone)
- Plate Press Attachments:
- 5" Plate Press
- 6" Plate Press
- Accessories: 2 heat-resistant silicone pads, Teflon coated sheet.

Figure 3.2: The heat press with its diverse attachments, illustrating its capability to customize cups, clothing, hats, and plates.
4. Setup and Assembly
Before first use, ensure all components are present and undamaged. The main unit comes pre-assembled. Attachments are interchangeable.
- Place the main heat press unit on a sturdy, flat, and heat-resistant surface. Ensure adequate clearance around the machine for the 360-degree swing-away function.
- Connect the power cord to a 110V power outlet.
- To attach different heating elements (mug, cap, plate presses), align the connector on the attachment with the aviation connector on the main unit and secure it.
- For the flat platen, ensure the two heat-resistant silicone pads are correctly placed on the lower platen. The Teflon coated sheet should be placed over the heating platen to prevent sticking and protect your workpieces.
- Adjust the pressure using the pressure adjustment knob located on top of the heating platen. Turn clockwise for more pressure, counter-clockwise for less. Test the pressure by closing the platen without a workpiece; it should require moderate effort to close.
Video 4.1: Demonstrates the 8-in-1 multi-functionality and premium safety design of the heat press, including attachment changes and basic operation.
5. Operating Instructions
This section provides general operating procedures and specific guidelines for different applications.
5.1. Digital LCD Control Panel
The digital control panel allows precise setting of temperature and time.

Figure 5.1: Close-up of the digital LCD control panel, showing temperature and time displays, mode, plus, minus, and start buttons.
- Turn on the power switch.
- Press the "MODE" button to cycle through temperature and time settings.
- Use the "+" and "-" buttons to adjust the desired temperature (200-450°F / 95-232°C) and time (0-999 seconds).
- Press "START" to begin heating. The machine will beep when the set temperature is reached.
5.2. General Heat Transfer Process
- Prepare your design and material according to the transfer type (e.g., heat transfer vinyl, sublimation paper).
- Pre-heat the machine to the recommended temperature for your material.
- Place the item (T-shirt, mug, etc.) on the appropriate platen/attachment.
- Position your design on the item. Use heat-resistant tape if necessary to secure it.
- Lower the heating platen and apply pressure. Start the timer.
- Once the timer completes, lift the platen and carefully remove the item. Allow it to cool before peeling the transfer (if required by your material).
5.3. Recommended Settings for Common Applications
The following table provides general guidelines. Always refer to your specific transfer material's instructions for optimal results.

Figure 5.2: Recommended settings for various heat transfer applications, including T-shirts, mugs, plates, and caps.
| Application | Ironing Technology | Recommended Time | Recommended Temperature |
|---|---|---|---|
| T-Shirt | Heat transfer vinyl | 20s | 320°F (160°C) |
| T-Shirt | DTF transfer | 18s | 310°F (154°C) |
| T-Shirt | Sublimation | 60s | 360°F (182°C) |
| Mug | Sublimation | 60-90s | 360-370°F (182-188°C) |
| Plate | Sublimation | 60-70s | 360-370°F (182-188°C) |
| Cap | Sublimation | 60-90s | 360-370°F (182-188°C) |
The machine features a 360-degree swing-away design, allowing the heating platen to be safely moved aside, reducing the risk of accidental contact with the hot surface and providing a full range press evenly.

Figure 5.3: The 360-degree swing-away feature of the heat press, enhancing safety and ease of use during operation.
Video 5.1: A demonstration of the Whubefy heat press in action, showcasing its various functions and ease of use for different items.
6. Maintenance
Proper maintenance ensures the longevity and optimal performance of your heat press machine.
- Always unplug the machine and allow it to cool completely before cleaning.
- Wipe the Teflon-coated heating platen with a soft, damp cloth. Do not use abrasive cleaners or sharp objects that could damage the coating.
- Clean the silicone pads regularly to remove any residue.
- Inspect all electrical connections and cords for any signs of wear or damage. Replace if necessary.
- Keep the machine free from dust and debris.
- Store the machine in a dry, cool place when not in use.
7. Troubleshooting
This section addresses common issues you might encounter.
| Problem | Possible Cause | Solution |
|---|---|---|
| Machine not heating up. | Power cord not connected, power switch off, circuit breaker tripped. | Check power connections, ensure switch is on, reset circuit breaker. |
| Uneven heat transfer. | Uneven pressure, damaged heating element, incorrect temperature. | Adjust pressure knob, ensure even contact. If issue persists, contact support. Verify temperature settings. |
| Design not adhering properly. | Incorrect temperature/time, insufficient pressure, wrong material. | Verify recommended settings for your material. Increase pressure if needed. Ensure material is suitable for heat transfer. |
| Timer not working consistently. | Possible internal fault. | If the timer is inconsistent, use an external stopwatch for accuracy. Contact customer support for repair service. |
| Attachments difficult to change. | Residue buildup, misalignment. | Ensure connectors are clean. Align carefully before attempting to secure. |
8. Specifications
- Brand: Whubefy
- Model: 8 in 1
- Product Dimensions: 15 x 12 x 18 inches (15"L x 12"W x 18"H)
- Item Weight: 45.3 pounds
- Material: Aluminum, Plastic, Iron
- Color: Black + Blue
- Voltage: 110 Volts
- Wattage: 900 watts
- Temperature Range: 200-450 °F (95-232 °C)
- Timer Range: 0-999 Seconds
- Recommended Uses: Hat, T-Shirt, Mug, Plate
- Manufacturer: Whubefy
- Country of Origin: China
- UPC: 661954043552
9. Warranty and Support
WHUBEFY is committed to customer satisfaction. All WHUBEFY products come with impeccable repair service.
- Repair Service: WHUBEFY provides professional repair service. For any issues or repair needs, please contact customer support.
- Customer Support: 24-hour sales service is available to assist with product inquiries and support.
For further assistance, please visit the official Whubefy store or contact their customer service team.
Related documents8 in 1

Ask a question about this manual
Ask about setup, troubleshooting, compatibility, parts, safety, or missing instructions. Manuals+ will review the question and use this page’s manual context to help answer it.