1. Introduction

Figure 1.1: Comfort Glow DVP11 Direct Vent Liquid Propane Gas Wall Heater. This image shows the main view of the heater unit, featuring its gray and black design.
This manual provides essential information for the installation, operation, and maintenance of your Comfort Glow 11,000 BTU Direct Vent Liquid Propane Gas Wall Heater, Model DVP11. This heater is designed to provide reliable warmth for spaces up to 375 sq. ft. by utilizing a fully enclosed combustion system that vents directly through an exterior wall, eliminating the need for a chimney. Please read all instructions carefully before installation and use to ensure safe and efficient operation.
2. Safety Information
WARNING: Improper installation, adjustment, alteration, service, or maintenance can cause property damage, injury, or death. Read the installation, operating, and maintenance instructions thoroughly before installing or servicing this equipment.
- This appliance is for use with liquid propane gas only. Do not attempt to use natural gas or any other fuel.
- Ensure proper ventilation as specified in the installation instructions. This is a direct vent unit, meaning combustion air is drawn from outside and exhaust gases are vented outside.
- The heater features a sealed burn system, a safety pilot, and a built-in pressure regulator. The safety pilot will stop the flow of gas if the pilot light is extinguished.
- A minimum 100 lb. propane tank and a two-stage low-pressure regulator are required for proper operation.
- Do not store or use gasoline or other flammable vapors and liquids in the vicinity of this or any other appliance.
- Keep the area around the appliance clear and free from combustible materials, gasoline, and other flammable vapors and liquids.
- This product can expose you to chemicals including carbon monoxide, which is known to the State of California to cause cancer, birth defects, or other reproductive harm. For more information, visit www.P65Warnings.ca.gov.
- When not in use, turn the unit completely off to prevent unnecessary gas consumption by the pilot light.
3. Package Contents
Verify that all components are present before beginning installation:
- Comfort Glow DVP11 Direct Vent Liquid Propane Gas Wall Heater Unit
- Wall Mounting Bracket
- Professional Vent Kit (includes vent pipe, outdoor mounting plate, heat shield, silicone rubber ring)
- Hardware Kit (screws, anchors, etc.)
- Instruction Manual

Figure 3.1: Included Components. This image displays the various parts included with the heater: the wall mounting bracket, the professional vent kit (consisting of a vent pipe, outdoor mounting plate, heat shield, and silicone rubber ring), and a hardware pack containing screws and other fasteners.
4. Setup and Installation
Installation of this direct vent heater requires careful attention to detail and adherence to local codes. It is recommended that installation be performed by a qualified professional.
- Location Selection: Choose a suitable wall location that allows for direct venting to the outside. Ensure adequate clearances from combustible materials as specified in the full instruction manual. The heater is approved for use in bedrooms, bathrooms, mobile homes, and modular homes.
- Wall Thickness: The professional vent kit is designed to accommodate wall thicknesses ranging from 4.5 inches to 10 inches.
- Mounting the Heater: Securely attach the wall mounting bracket to the wall. Then, mount the heater unit onto the bracket.
- Vent Kit Installation: Install the professional vent kit through the exterior wall. This involves creating an opening for the vent pipe, installing the heat shield, silicone rubber ring, and outdoor mounting plate. Ensure a tight seal to prevent drafts and maintain the integrity of the sealed combustion system.
- Gas Connection: Connect the heater to your liquid propane supply. This connection must be performed by a qualified gas technician. Ensure a two-stage low-pressure regulator is used with a minimum 100 lb. propane tank.
- Leak Test: After all connections are made, perform a thorough leak test using a non-corrosive leak detection solution.

Figure 4.1: Installation Diagram. This illustration demonstrates how the direct vent heater is installed, showing the unit mounted on an interior wall and its vent system passing through to the exterior. It highlights the heater's compatibility with various wall thicknesses.

Figure 4.2: Heater Features and Venting. This image provides an overview of the heater's key components, including the piezo ignitor, thermostat control, stainless steel burner, and the professional vent kit that allows for direct venting through a wall without a chimney.
5. Operating Instructions
Your Comfort Glow Direct Vent Heater is designed for user-friendly operation with matchless piezo ignition and adjustable thermostat control.
- Initial Startup (Lighting the Pilot):
- Ensure the gas supply is open.
- Turn the control knob to the "PILOT" position.
- Press and hold the control knob in. While holding, repeatedly press the piezo ignitor button until the pilot light ignites.
- Continue to hold the control knob in for approximately 30-60 seconds after the pilot lights to allow the thermocouple to heat up. Release the knob slowly. If the pilot goes out, repeat the process.
- Turning On the Main Burner: Once the pilot light is stable, turn the control knob from "PILOT" to your desired temperature setting. The main burner will ignite.
- Adjusting Temperature: Use the adjustable thermostat control knob to set the desired room temperature. The heater will cycle on and off to maintain this setting.
- Turning Off the Heater: To turn off the main burner, turn the control knob to the "PILOT" position. To completely shut off the heater (including the pilot light), turn the control knob to the "OFF" position and close the main gas supply valve.

Figure 5.1: Thermostat Control Knob. This image shows the heater's control knob, which allows users to select between OFF, PILOT, and various numbered temperature settings for precise heat control.

Figure 5.2: Top Controls. This image provides a view of the top panel of the heater, highlighting the red piezo ignitor button and the main control knob for managing the pilot light and temperature settings.
6. Maintenance
Regular maintenance ensures the longevity and safe operation of your heater.
- Cleaning: Keep the exterior of the heater clean by wiping it with a soft, damp cloth. Do not use abrasive cleaners. Ensure the air intake and exhaust vents are free from obstructions.
- Pilot Light and Burner Inspection: Periodically inspect the pilot light and main burner for proper flame appearance. The pilot flame should be steady and blue. Any yellowing or flickering may indicate a problem requiring professional service.
- Vent System Check: Annually inspect the vent system for any signs of damage, blockages, or leaks. Ensure the outdoor vent cap is clear of debris, snow, or ice.
- Professional Inspection: It is recommended to have your heater inspected by a qualified service technician at least once a year.
7. Troubleshooting
If you encounter issues with your heater, consult the following table before contacting customer service.
| Problem | Possible Cause | Solution |
|---|---|---|
| Heater does not ignite or pilot light goes out. |
|
|
| Heater produces insufficient heat. |
|
|
| Unusual odors or sounds. |
|
|
8. Specifications
Key technical specifications for the Comfort Glow DVP11 Direct Vent Liquid Propane Gas Wall Heater:
| Feature | Detail |
|---|---|
| Model Number | DVP11 |
| Brand | Comfort Glow |
| BTU Output | 11,000 BTU |
| Heating Coverage | Up to 375 sq. ft. |
| Fuel Type | Liquid Propane (LP) |
| Ignition Type | Matchless Piezo Ignition |
| Special Features | Adjustable Temperature, Professional Vent Kit, Safety Pilot, Built-in Pressure Regulator |
| Color | Gray / Black |
| Product Dimensions (D x W x H) | 6.61"D x 17.36"W x 20"H |
| Item Weight | 28 pounds |
| Wall Thickness Compatibility | 4.5" - 10" |
| UPC | 013204001117 |
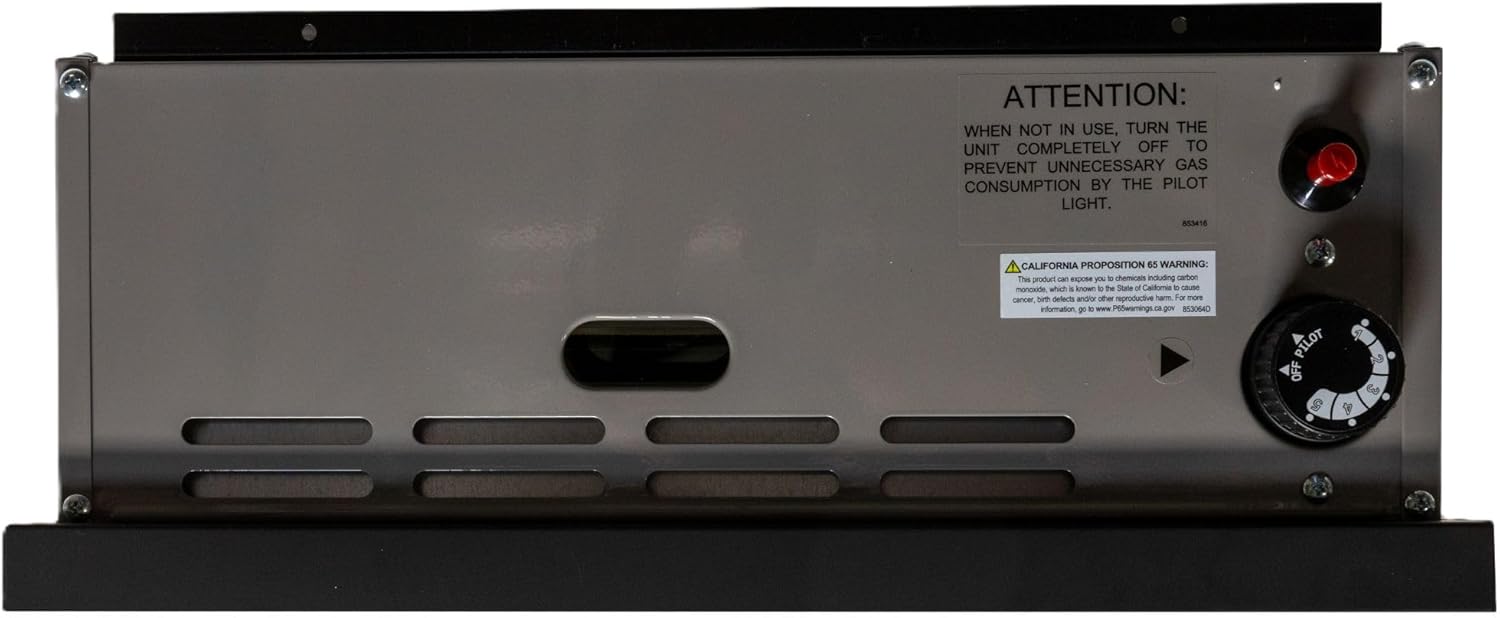
Figure 8.1: Heater Dimensions. This image illustrates the physical dimensions of the heater, indicating its height, width, depth, and overall weight for planning installation space.

Figure 8.2: Key Features. This graphic summarizes important operational and certification details, including BTU output, power requirements, heating area, safety certifications, and warranty period.
9. Warranty Information
The Comfort Glow DVP11 Direct Vent Liquid Propane Gas Wall Heater comes with a 2-year warranty. Please retain your proof of purchase for warranty claims. For specific terms and conditions, refer to the warranty documentation included with your product or contact Comfort Glow customer support.
10. Support
For technical assistance, parts, or warranty inquiries, please contact Comfort Glow customer service. Ensure you have your model number (DVP11) and proof of purchase available when contacting support.
Contact information is typically found on the product packaging, the official Comfort Glow website, or in the separate warranty documentation.