1. Introduction
Welcome to the Bestsee M33 4K Front and Rear Wireless Dash Cam user manual. This guide provides detailed instructions to help you set up, operate, and maintain your dash cam, ensuring you get the most out of its advanced features for reliable vehicle recording and security.
2. Product Overview
2.1 Included Components
- Bestsee M33 Dash Cam (Front Unit)
- Rear Camera
- Car Charger
- 64GB TF Card
- Pry Tool
- Installation Tool
- User Manual
- Warranty Card

Image 2.1: All components included in the Bestsee M33 Dash Cam package.
2.2 Key Features
- High-Resolution Recording: 4K (single front) or 2.5K front + 1080P rear dual recording.
- Wide-Angle Coverage: 170° front and 150° rear lenses to minimize blind spots.
- Advanced Imaging: F1.8 aperture, 30 FPS, and Wide Dynamic Range (WDR) for clear footage in various lighting conditions.
- Compact Design: Mini dash cam with a 1.47-inch display for discreet installation and easy status checks.
- Wireless Connectivity: Built-in WiFi for seamless connection to the Golook/GKugo app for video management and settings adjustment.
- Integrated GPS: Records vehicle position, trajectory, and speed for comprehensive incident data.
- 24-Hour Parking Monitoring: Detects collisions and motion when parked (requires optional hardwire kit).
- G-Sensor: Automatically locks emergency video files upon impact.
- Loop Recording: Overwrites oldest files when the memory card is full, ensuring continuous recording.
- Storage: Supports up to 256GB TF card (64GB included).

Image 2.2: The Bestsee M33 Dash Cam system, including the front unit, rear camera, and a view of the companion mobile application.

Image 2.3: The compact design of the Bestsee M33 Dash Cam, highlighting its 1.47-inch display for easy viewing of status and recordings.

Image 2.4: Visual representation of the wide-angle coverage provided by the front (170°) and rear (150°) cameras, minimizing blind spots.
3. Setup
3.1 Initial Preparation
- Insert TF Card: Ensure the included 64GB TF card (or another compatible card up to 256GB) is inserted correctly into the dash cam's card slot.
- Format TF Card: It is recommended to format the TF card within the dash cam settings before first use and periodically thereafter to ensure optimal performance.
3.2 Mounting the Dash Cam
- Front Camera Placement: Choose a location on your windshield, typically behind the rearview mirror, that does not obstruct your driving view. Clean the area thoroughly.
- Attach Mount: Use the provided 3M adhesive mount to securely attach the front dash cam to the chosen location. The removable mount allows for easy transfer between vehicles.
- Adjust Angle: The front camera can be rotated 360° to achieve the desired recording angle.
- Rear Camera Placement: Install the rear camera on the rear windshield, ensuring a clear view of the road behind.
3.3 Wiring and Power Connection
- Connect Power: Connect the front dash cam to your vehicle's cigarette lighter socket using the provided car charger.
- Connect Rear Camera: Connect the rear camera to the front unit using the provided AV-IN cable.
- Cable Management: Use the pry tool to neatly tuck the power and rear camera cables along the edges of your windshield and interior trim to avoid obstruction and maintain a tidy appearance.
- Optional Hardwire Kit: For 24-hour parking monitoring functionality, a separate hardwire kit (not included) is required. Consult the hardwire kit's instructions or a professional for installation.

Image 3.1: Simplified diagram illustrating the connection of the front and rear cameras and power supply within a vehicle.
4. Operating Instructions
4.1 Powering On/Off
- The dash cam will automatically power on and begin recording when your vehicle's ignition is turned on.
- It will automatically power off shortly after the ignition is turned off.
4.2 Recording Modes
- Dual Recording: Records simultaneously from the front (2.5K) and rear (1080P) cameras.
- Single Front Recording: Records from the front camera only at 4K resolution. This mode can be selected via the dash cam settings or the mobile app.
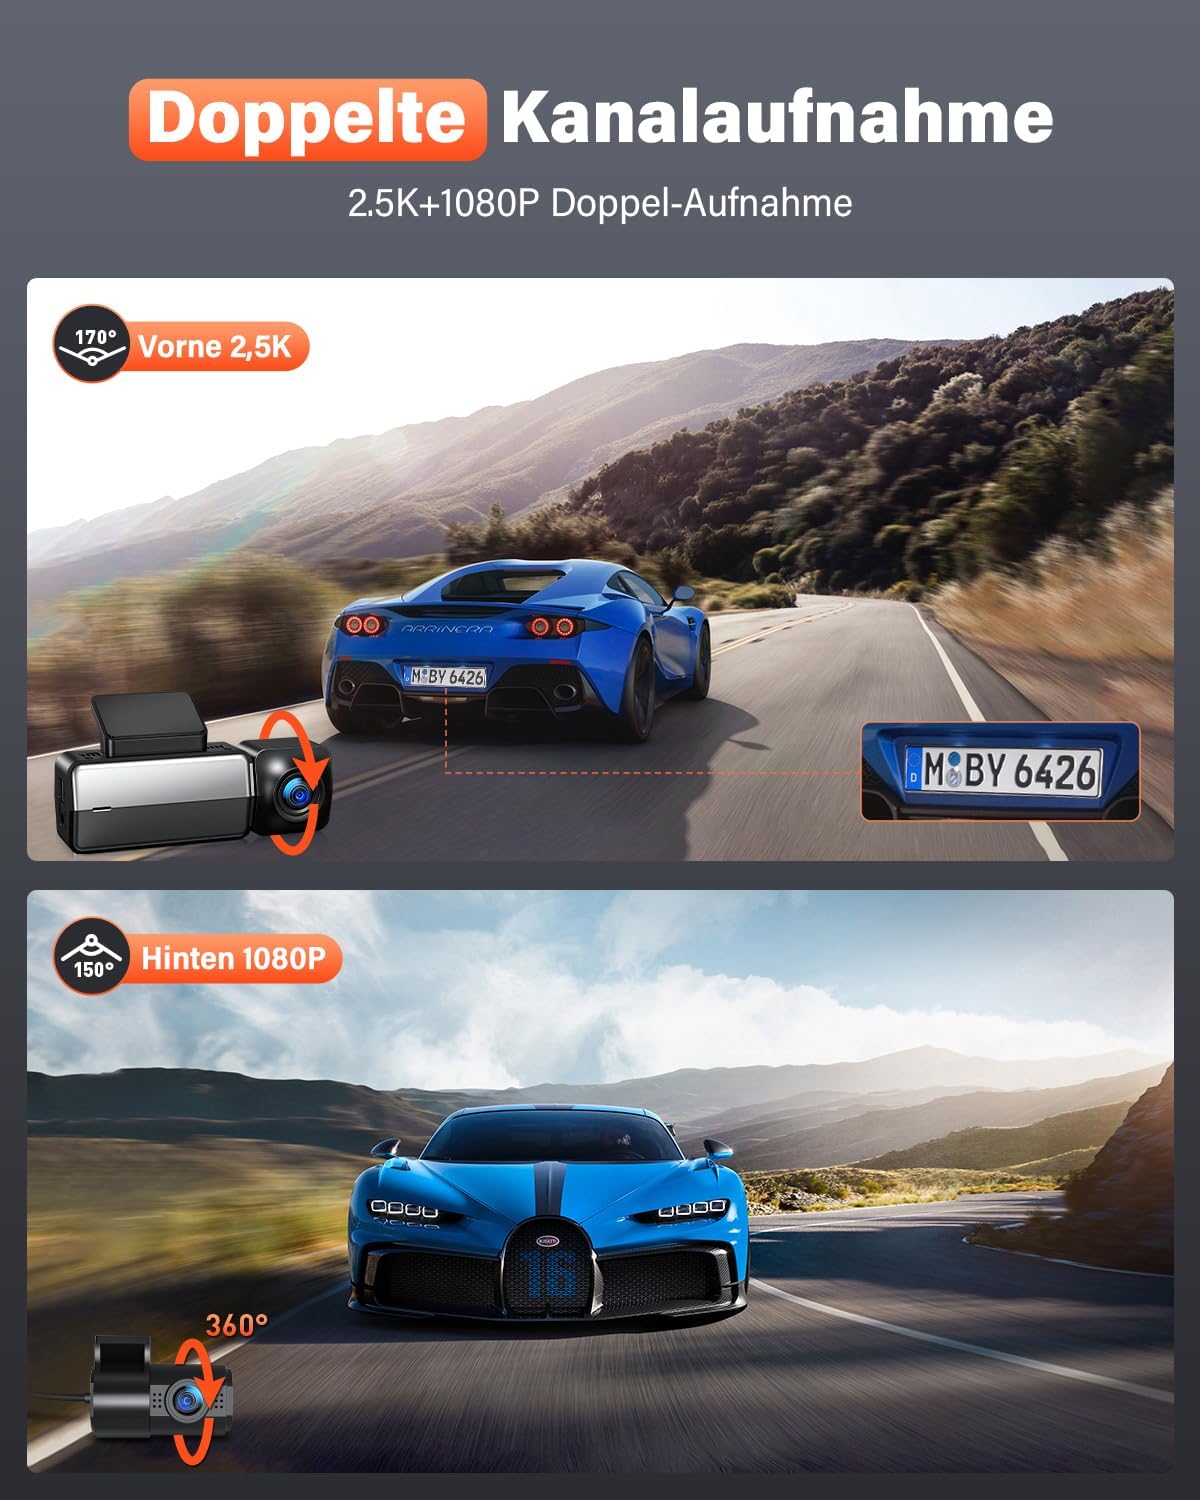
Image 4.1: Illustration of the dual-channel recording feature, capturing 2.5K resolution from the front and 1080P from the rear.

Image 4.2: Example of 4K single front recording, showcasing the clarity for identifying details like license plates and road signs.
4.3 Loop Recording
The dash cam continuously records in short segments (e.g., 1, 3, or 5 minutes). When the TF card reaches its storage limit, the oldest unprotected video files are automatically overwritten by new recordings. This ensures that recording never stops due to a full memory card.

Image 4.3: Visual representation of the loop recording feature, indicating continuous recording by overwriting older files.
4.4 G-Sensor and Emergency Video Lock
The built-in G-Sensor detects sudden impacts or collisions. When an event is detected, the current video segment is automatically locked and saved to a protected folder on the TF card, preventing it from being overwritten by loop recording. You can also manually lock a video segment by briefly pressing the left button on the dash cam.
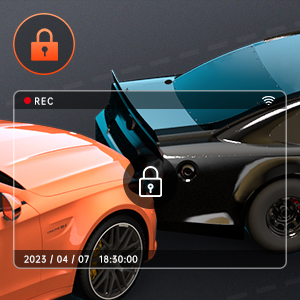
Image 4.4: Icon indicating the G-Sensor and video lock function, which protects important footage from being overwritten.
4.5 WiFi and Mobile App (Golook/GKugo)
The integrated WiFi allows you to connect your smartphone to the dash cam via the Golook (or GKugo) app. This app enables you to:
- View live footage from the dash cam.
- Download recorded videos and photos to your phone.
- Adjust dash cam settings.
- Share footage directly from your phone.
Download the app from the App Store (iOS) or Google Play Store (Android).

Image 4.5: A smartphone displaying the Golook app, demonstrating wireless connectivity for video viewing and management.
4.6 Built-in GPS
The built-in GPS module accurately records important data such as your vehicle's location, driving trajectory, and speed. This information is embedded in the video files and can be viewed via the mobile app or dedicated PC player, providing robust evidence in case of an incident.

Image 4.6: Screenshots from the dash cam app illustrating GPS tracking features, including vehicle location on a map and speed display.
4.7 24-Hour Parking Monitoring
With an optional hardwire kit (not included), the dash cam can provide continuous 24-hour parking monitoring. This feature allows the camera to detect potential collisions, scratches, or theft attempts even when your vehicle is parked and the ignition is off. Contact customer service for compatible hardwire kits.

Image 4.7: Visual explanation of 24-hour parking monitoring, detailing collision detection, motion detection, and time-lapse recording modes.
4.8 WDR and Night Vision
The Wide Dynamic Range (WDR) technology and F1.8 aperture enhance the camera's ability to capture clear details in both bright and dark areas simultaneously, significantly improving night vision performance for clear recordings in low-light conditions.

Image 4.8: Demonstration of the dash cam's superior night vision, utilizing WDR and F1.8 aperture to capture clear images in challenging low-light environments.
5. Maintenance
5.1 TF Card Management
- Regular Formatting: Format the TF card every 2-4 weeks to prevent data corruption and ensure smooth operation. This can be done through the dash cam's settings menu or the mobile app.
- Backup Important Files: Regularly transfer any important locked video files to a computer or cloud storage to prevent accidental deletion or overwriting.
- Card Replacement: If you experience frequent errors or recording issues, consider replacing the TF card with a new, high-quality endurance card.
5.2 Cleaning
- Lens Cleaning: Gently wipe the camera lenses with a soft, lint-free cloth to remove dust or smudges that could affect video quality. Do not use abrasive cleaners.
- Device Cleaning: Wipe the exterior of the dash cam with a dry or slightly damp cloth. Avoid using harsh chemicals.
6. Troubleshooting
If you encounter issues with your Bestsee M33 Dash Cam, please refer to the following common problems and solutions:
| Problem | Possible Solution |
|---|---|
| Dash cam does not power on. | Check the power connection to the cigarette lighter. Ensure the vehicle's ignition is on. Test the car charger in another port or with another device. |
| Recording stops or shows gaps. | Format the TF card regularly. Ensure you are using a high-quality TF card (Class 10 or U3 recommended). Replace the TF card if the issue persists. |
| WiFi connection issues with the app. | Ensure WiFi is enabled on the dash cam and your smartphone. Restart both devices. Make sure you are connecting to the dash cam's specific WiFi network. Update the app to the latest version. |
| GPS not recording location/speed. | Ensure the dash cam has a clear view of the sky to receive GPS signals. Allow a few minutes for the GPS to acquire a signal after powering on. |
| Video quality is poor or blurry. | Clean the camera lenses. Ensure the protective film has been removed from the lenses. Check recording resolution settings in the app or dash cam menu. |
| 24H Parking Monitoring not working. | Verify that a hardwire kit is correctly installed and connected to a constant power source. Ensure parking monitoring is enabled in the dash cam settings. |
If these solutions do not resolve your issue, please contact Bestsee customer support for further assistance.
7. Specifications
| Feature | Specification |
|---|---|
| Model | M33 |
| Front Camera Resolution | 4K (single), 2.5K (dual) |
| Rear Camera Resolution | 1080P (dual) |
| Field of View | Front: 170°, Rear: 150° |
| Display Size | 1.47 inches |
| Aperture | F1.8 |
| Frame Rate | 30 FPS |
| Special Features | WDR, Built-in WiFi, Built-in GPS, 24H Parking Monitoring (requires hardwire kit), G-Sensor, Loop Recording |
| Connectivity | Wi-Fi |
| Storage | Supports TF card up to 256GB (64GB included) |
| Mounting Type | Windshield Mount (3M adhesive) |
8. Warranty and Support
Bestsee provides the following warranty and support for your M33 Dash Cam:
- 30-Day Full Refund/Exchange: If you are not satisfied with your purchase, you may return it for a full refund or exchange within 30 days.
- 12-Month Warranty: The product is covered by a 12-month warranty from the date of purchase. This warranty can be extended to 18 months upon product registration with Bestsee.
- Lifetime Customer Support: Bestsee offers lifetime customer support for any questions or issues you may encounter.
For warranty claims, technical assistance, or any other inquiries, please contact Bestsee customer service. We aim to respond within 24 hours.