1. Introduction
Thank you for choosing the WLKBP Electric Peanut Butter Machine. This manual provides essential information for the safe and efficient operation, maintenance, and troubleshooting of your new appliance. Please read this manual thoroughly before initial use and keep it for future reference. This machine is designed for grinding various nuts into butter, such as peanuts, sesame, and walnuts, suitable for both household and commercial applications.

Figure 1: WLKBP Electric Peanut Butter Machine
This image shows the complete electric peanut butter machine, featuring a stainless steel body, a top-mounted hopper for feeding ingredients, and an outlet spout from which the finished nut butter is dispensed into a bowl. Several spare parts, including grinding wheels, are visible on the right side of the machine.
2. Safety Instructions
To prevent injury or damage, always observe the following safety precautions:
- Electrical Safety: Ensure the power supply matches the machine's voltage (220V). Do not operate with wet hands or in wet environments. Always unplug the machine before cleaning or maintenance.
- Proper Use: This machine is intended for grinding nuts only. Do not use it for other purposes. Keep hands and foreign objects away from the grinding mechanism during operation.
- Ventilation: Ensure adequate ventilation around the machine during operation to prevent overheating.
- Stability: Place the machine on a stable, level surface to prevent tipping. The rubber feet are designed to reduce vibration and maintain stability.
- Children and Pets: Keep children and pets away from the machine, especially during operation.
- Emergency Stop: Familiarize yourself with the power switch location for quick shutdown in an emergency.
3. Product Overview
3.1 Components
- Hopper: Top-mounted funnel for feeding nuts.
- Grinding Chamber: Houses the grinding wheel.
- Outlet Spout: Where the finished nut butter exits.
- Lever Handle: Adjusts the fineness of the grind.
- Quick Buckles: Securely fasten the top section to the base.
- Motor: 1100W all-copper motor for powerful operation.
- Base: Thickened base with rubber feet for stability.
- Grinding Wheel: Premium alumina grinding wheel for efficient milling.
3.2 Key Features
- High Efficiency: Equipped with a powerful 1100W all-copper motor, operating at 2850 RPM, capable of producing up to 15 kg (33 lbs) of nut butter per hour. The white alumina grinding wheel ensures superior grinding performance.
- Superior Quality Construction: Manufactured from thickened stainless steel and high-quality aluminum alloy, meeting food hygiene standards. The double waterproof shell design facilitates easy cleaning.
- Improved Lever Handle: The upgraded lever handle allows for much easier and more precise adjustment of grinding fineness compared to older disk-type handles.
- Thoughtful Design Details: Features quick lock and unlock buckles to prevent accidental spills. The thickened, corrosion-resistant base ensures extended lifespan, and rubber feet minimize vibration for stable operation.
- Wide Application: Ideal for producing various nut butters, including peanut butter, sesame paste, almond butter, and other nut spreads. Suitable for use in hotels, restaurants, canteens, and other catering industries.

Figure 2: Thickened Stainless Steel Construction
This image illustrates the layered construction of the machine's body, highlighting the stainless steel coating and reinforced layers, emphasizing the thickened stainless steel material used for durability and hygiene.
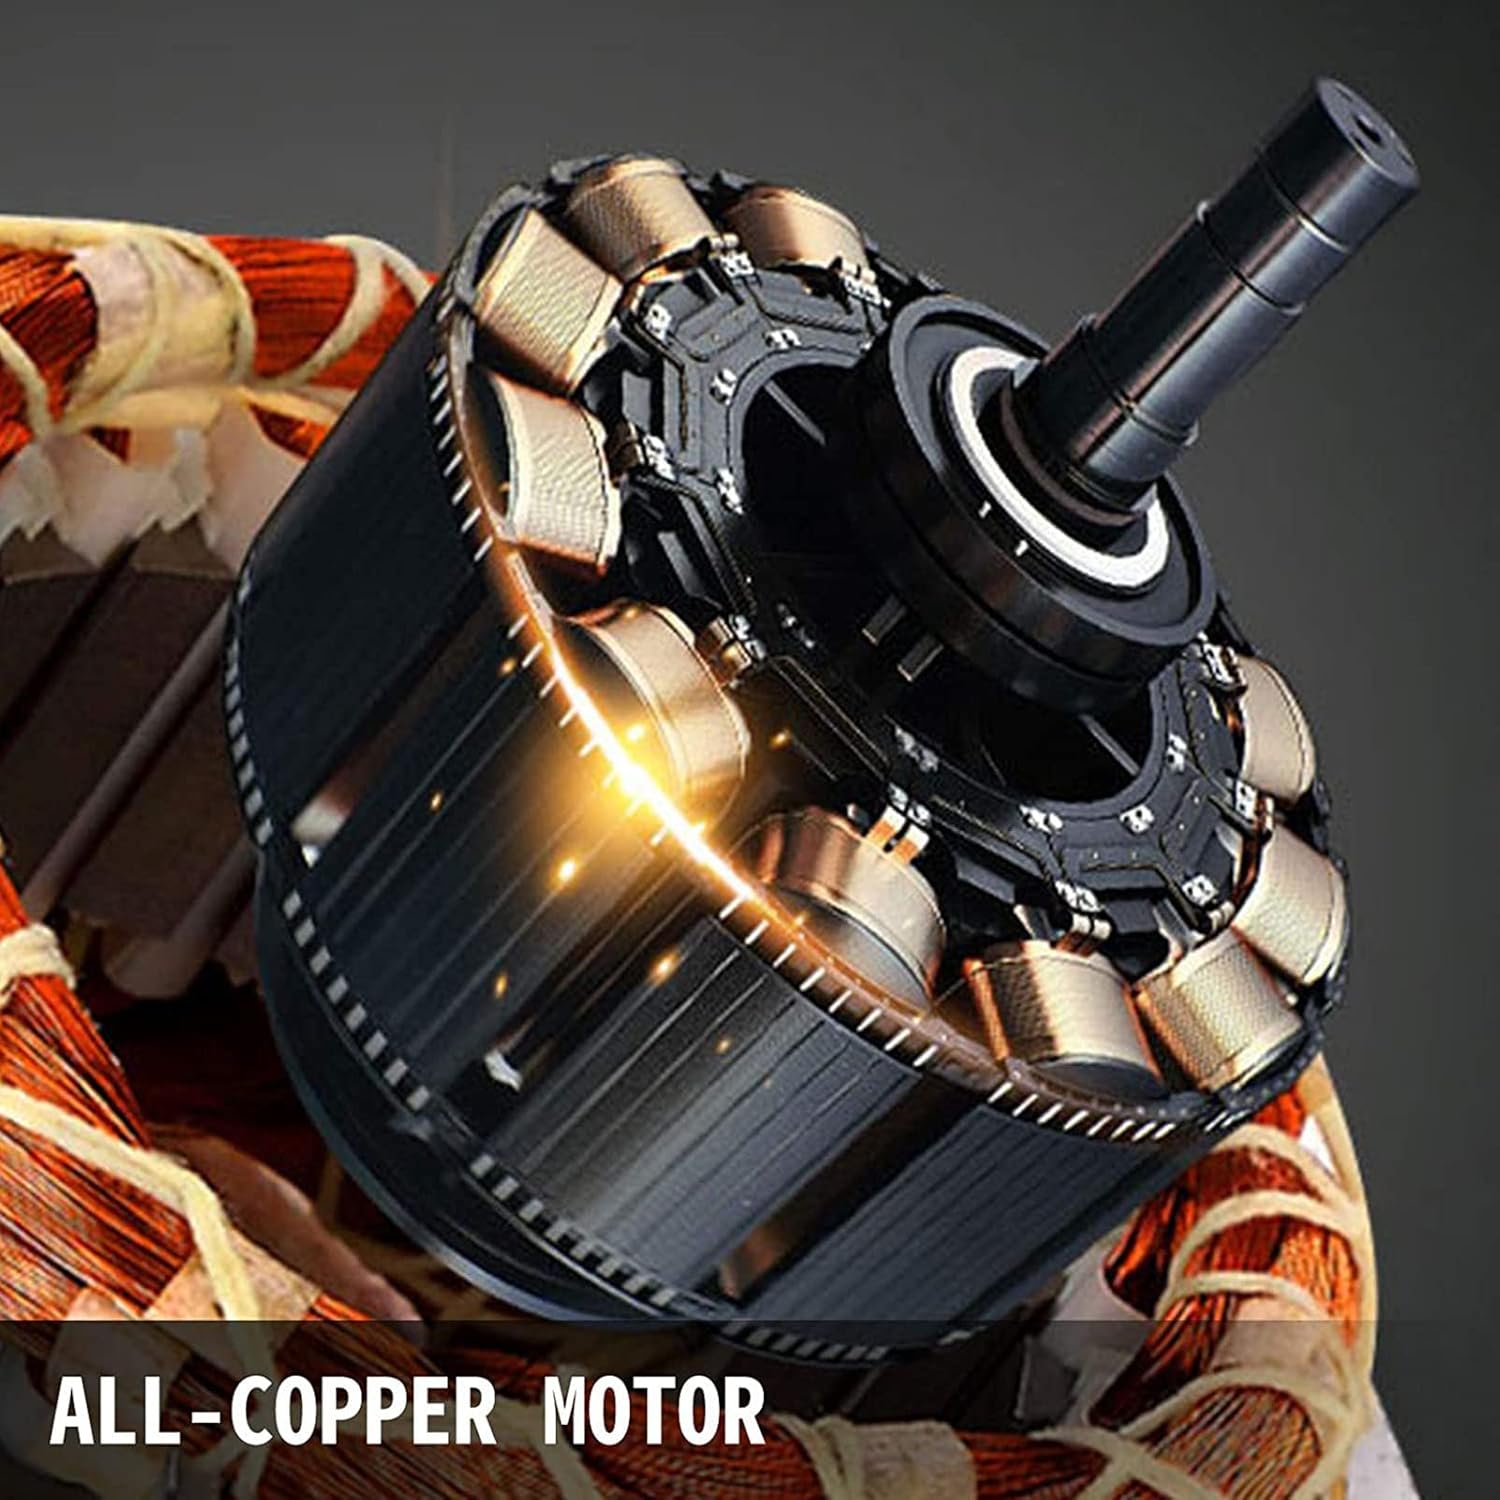
Figure 3: All-Copper Motor
A close-up view of the machine's internal all-copper motor, showcasing its robust winding and construction, which contributes to the machine's high efficiency and durability.

Figure 4: Premium Grinding Wheel
This image displays the premium white alumina grinding wheel, which is the core component responsible for milling nuts into butter. Its textured surface is designed for effective grinding.

Figure 5: Quick Buckles
A detailed view of the quick buckles on the side of the machine, which are used to securely lock the upper part of the grinder to its base, ensuring stability and preventing spills during operation.

Figure 6: Wide Application
This image illustrates the versatility of the machine by showing various nuts it can process, including peanuts, walnuts, soybeans, and black sesame seeds, highlighting its wide range of applications.
4. Setup
- Unpacking: Carefully remove the machine and all accessories from the packaging. Retain packaging for future storage or transport.
- Inspection: Check for any visible damage. If damaged, do not operate and contact customer support.
- Placement: Place the machine on a clean, dry, stable, and level surface. Ensure there is sufficient space around the machine for ventilation. The rubber feet on the base will help secure it.
- Initial Cleaning: Before first use, clean all parts that will come into contact with food. Refer to the 'Maintenance' section for detailed cleaning instructions.
- Power Connection: Ensure the power switch is in the 'OFF' position. Plug the power cord into a grounded electrical outlet matching the machine's voltage (220V).

Figure 7: Product Dimensions
This image provides the key dimensions of the machine: approximately 25.0 inches in height and 8.0 inches in width at the base. The hopper diameter is indicated as 10.0 inches. These measurements are crucial for proper placement and setup.
5. Operating Instructions
- Prepare Ingredients: Ensure nuts are clean, dry, and free from shells or foreign objects. For best results, nuts can be lightly roasted if desired, but ensure they are cooled before grinding.
- Assemble Machine: Ensure the grinding chamber is properly assembled and the quick buckles are securely fastened.
- Place Collection Container: Position a suitable container (bowl, jar) under the outlet spout to collect the finished nut butter.
- Adjust Grinding Fineness: Use the lever handle to adjust the gap between the grinding wheels. Turning the handle clockwise typically results in a finer grind, while counter-clockwise results in a coarser grind. Start with a medium setting and adjust as needed.
- Start Machine: Turn the power switch to the 'ON' position. Allow the motor to reach full speed before adding ingredients.
- Load Hopper: Gradually feed the prepared nuts into the hopper. Do not overload the hopper or force nuts into the grinding chamber.
- Monitor Output: Observe the consistency of the nut butter being dispensed. Adjust the fineness lever if necessary during operation.
- Stop Machine: Once all ingredients have been processed, turn the power switch to the 'OFF' position. Allow any remaining butter to dispense before unplugging.
6. Maintenance
Regular cleaning and maintenance will ensure the longevity and optimal performance of your machine.
- Unplug Before Cleaning: Always ensure the machine is unplugged from the power outlet before cleaning or performing any maintenance.
- Disassembly for Cleaning: Unlock the quick buckles and carefully separate the upper grinding chamber from the motor base.
- Clean Grinding Chamber: Remove any residual nut butter from the grinding wheel and chamber using a brush or spatula. The double waterproof shell design allows for easy rinsing. Use warm, soapy water for thorough cleaning. Rinse thoroughly and dry completely before reassembly.
- Clean Exterior: Wipe the exterior of the motor base with a damp cloth. Do not immerse the motor base in water.
- Grinding Wheel Inspection/Replacement: Periodically inspect the grinding wheel for wear. If the grinding performance deteriorates significantly, the grinding wheel may need replacement. A spare wheel is included with your purchase. Refer to the assembly instructions for replacement.
- Storage: Store the machine in a clean, dry place when not in use.
7. Troubleshooting
If you encounter issues with your machine, refer to the following common problems and solutions:
| Problem | Possible Cause | Solution |
|---|---|---|
| Machine does not start | Not plugged in; Power switch off; Power outage; Motor overload. | Check power connection; Turn power switch on; Check circuit breaker; Unplug, wait 5 minutes, then restart. |
| Poor grinding consistency (too coarse/fine) | Grinding fineness not adjusted correctly; Worn grinding wheel. | Adjust the lever handle for desired fineness; Inspect and replace grinding wheel if worn. |
| Machine clogs or slows down | Overloading hopper; Nuts are too moist or contain foreign objects. | Reduce feeding rate; Ensure nuts are dry and clean; Clear any blockages after unplugging. |
| Unusual noise or vibration | Loose components; Foreign object in grinding chamber; Machine not on a stable surface. | Check all parts are securely fastened; Unplug and inspect grinding chamber; Ensure machine is on a stable, level surface. |
If the problem persists after attempting these solutions, please contact customer support.
8. Specifications
| Feature | Specification |
|---|---|
| Model Number | WBAIBQ90225 |
| Motor Power | 1100 W |
| Rotation Speed | 2850 RPM |
| Capacity | 15 kg/h (33 lbs/h) |
| Net Weight | 23 kg (50.7 lbs) |
| Product Dimensions (L x W x H) | 270 x 270 x 640 mm (approx. 10.6 x 10.6 x 25.2 inches) |
| Voltage | 220 Volts |
| Material | Thickened Stainless Steel, Aluminum Alloy |
| Grinding Wheel Material | Alumina |
9. Warranty and Support
Information regarding specific warranty terms and conditions for this product is not available in the provided details. For warranty claims, technical support, or to inquire about spare parts, please contact the manufacturer or your point of purchase. Always provide your model number (WBAIBQ90225) when seeking support.


