1. Introduction
Thank you for choosing the HOMCOM Freestanding Shoe Storage Cabinet. This manual provides essential information for the safe assembly, operation, and maintenance of your new shoe cabinet. Please read these instructions thoroughly before beginning assembly and retain them for future reference.
2. Safety Information
To ensure safe use of this product, please adhere to the following safety guidelines:
- Anti-Tipping Kit: It is crucial to attach the shoe cabinet to a wall using the provided anti-tipping kit. This prevents accidental tipping, especially in households with children or pets.
- Weight Capacity: Do not exceed the maximum weight capacity of 44 lbs (overall), 6 lbs (each shelf/drawer), and 11 lbs (top surface). Overloading can compromise stability and cause damage.
- Assembly: Assemble the unit on a soft, clean surface to prevent scratches. Ensure all parts are correctly aligned and fasteners are tightened securely before use.
- Placement: Place the cabinet on a flat, stable surface. Avoid placing it in areas with high humidity or direct sunlight, which can damage the material.

Figure 2.1: Diagram illustrating the anti-tipping design and how to secure the cabinet to a wall for enhanced stability.
3. Product Overview
The HOMCOM Shoe Cabinet is designed to provide efficient and space-saving storage for your footwear. It features two convenient flip drawers and a top storage drawer, capable of holding up to 8 pairs of shoes. The inner shelves are adjustable and removable to accommodate various shoe types and sizes.

Figure 3.1: Front view of the HOMCOM Shoe Cabinet, showcasing its clean white finish and compact design.

Figure 3.2: The shoe cabinet placed in an entryway, demonstrating its compact design and how it integrates into a home environment.

Figure 3.3: Detailed dimensions of the shoe cabinet, including height (38.25"), width (23.5"), and depth (9.5").
4. Setup and Assembly
Assembly of the HOMCOM Shoe Cabinet is required. Please follow the step-by-step instructions provided in the separate assembly guide included with your product packaging. Ensure all components are present before you begin.
4.1. Pre-Assembly Checklist
- Verify all parts and hardware are accounted for against the parts list in your assembly guide.
- Gather necessary tools (e.g., screwdriver, hammer) as specified in the assembly guide.
- Clear a spacious, clean area for assembly.
4.2. Anti-Tipping Kit Installation
After assembling the cabinet, it is mandatory to install the anti-tipping kit. This kit secures the cabinet to the wall, preventing it from falling over. Refer to the specific instructions in your assembly guide for detailed steps on how to properly attach the anti-tipping hardware to both the cabinet and your wall.
5. Operating Instructions
5.1. Using the Flip Drawers
The shoe cabinet features two flip drawers designed for easy access and compact storage. Gently pull the handle to open the drawer downwards. Place shoes inside with the toes pointing towards the back of the cabinet. Push the drawer upwards until it clicks securely into place.

Figure 5.1: Illustration of the shoe cabinet's storage capacity, showing shoes neatly stored in the open flip drawers.
5.2. Adjusting and Removing Shelves
Each flip drawer contains inner shelves that can be adjusted or removed to accommodate different types of footwear, such as boots or high heels. To adjust, carefully lift the shelf and reposition it into the desired slot. To remove, lift the shelf completely out of its supports.

Figure 5.2: Close-up view demonstrating the 2-level adjustable shelf mechanism within the flip drawers.

Figure 5.3: Image showing the removable divider feature, allowing storage of taller footwear like ankle boots and high heels.
5.3. Utilizing the Top Drawer
The top drawer provides additional storage for smaller items such as keys, wallets, or other entryway essentials. Pull the knob to open the drawer and push it back in to close.
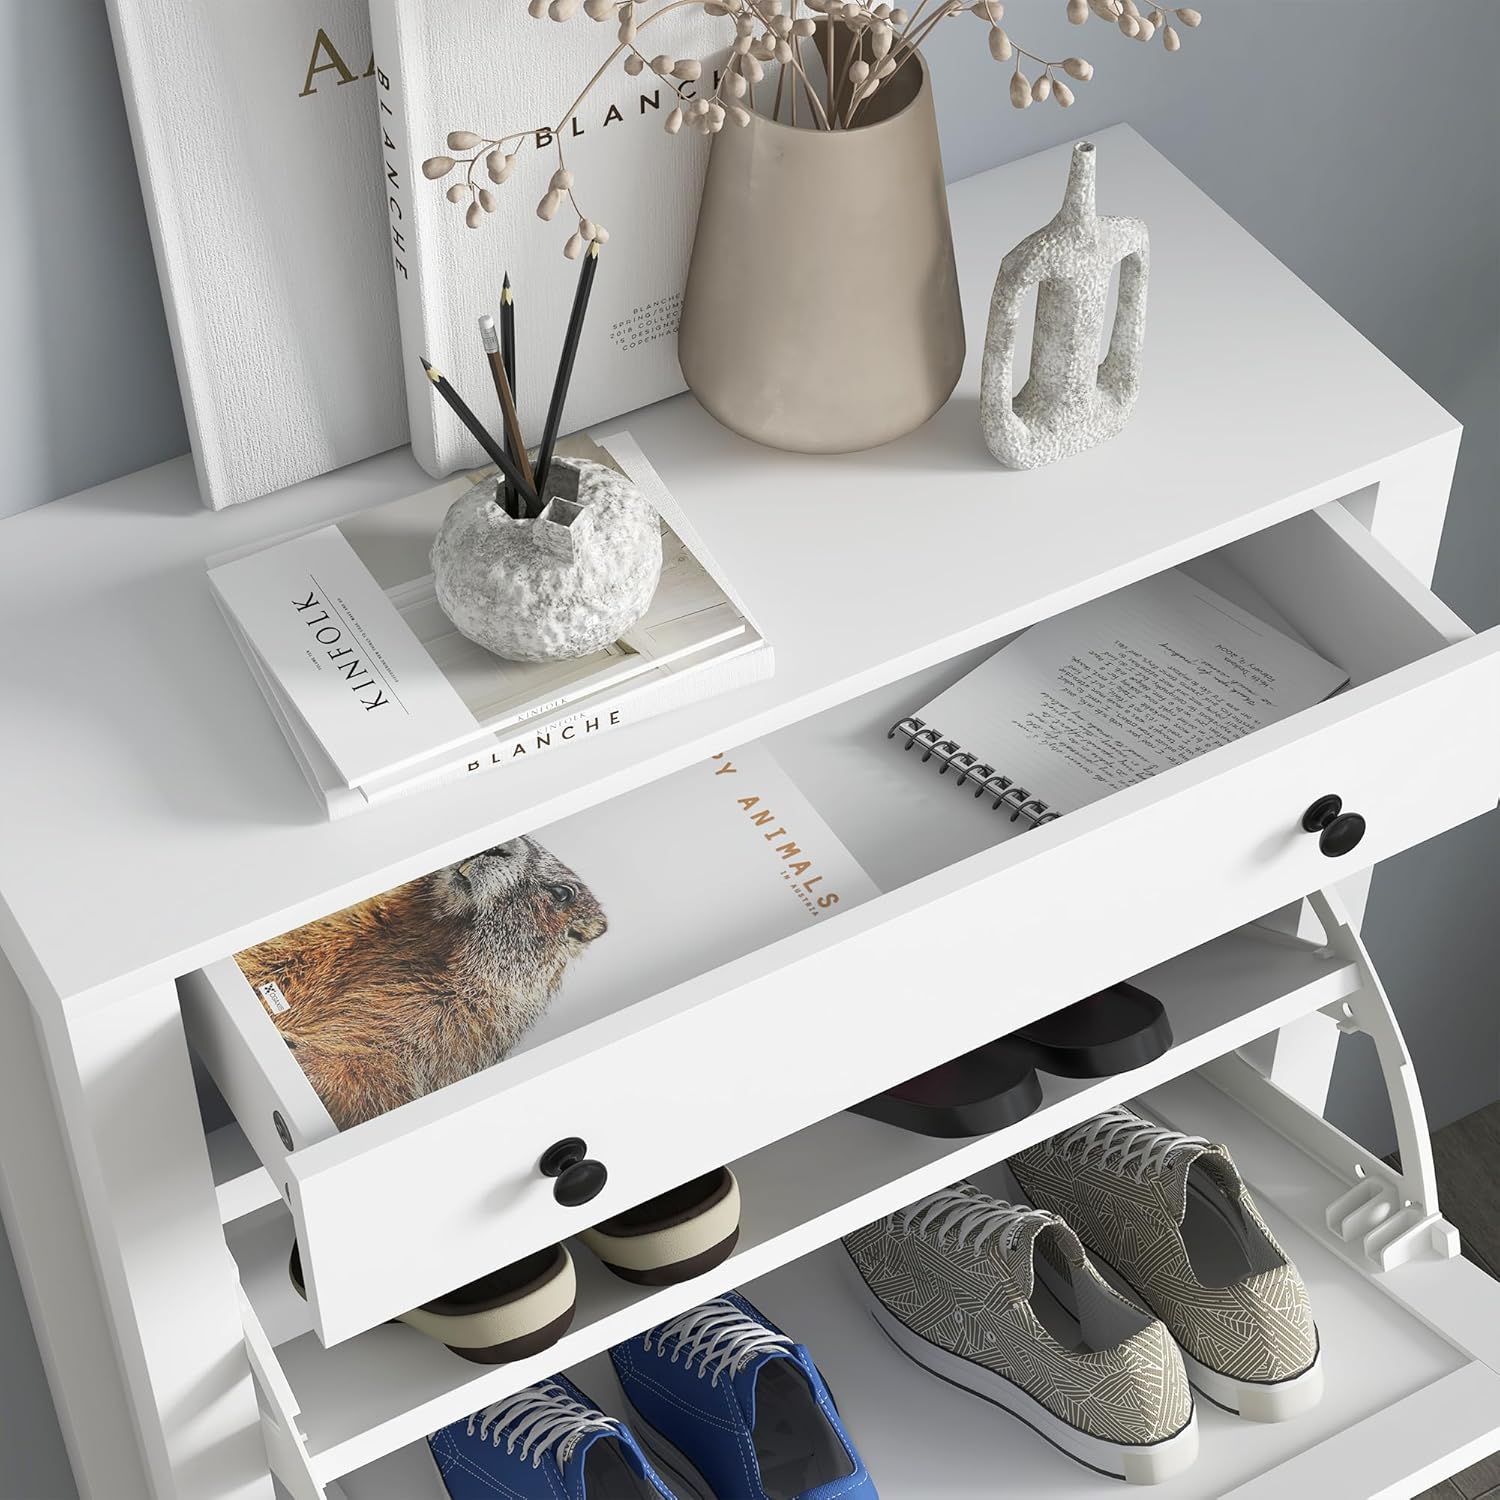
Figure 5.4: View of the top drawer, showing its use for small items like notebooks, pens, or other personal belongings.
6. Maintenance
Proper maintenance will extend the life and appearance of your HOMCOM Shoe Cabinet:
- Cleaning: Wipe surfaces with a soft, damp cloth. Avoid harsh chemicals or abrasive cleaners, which can damage the painted finish.
- Spills: Immediately wipe up any spills to prevent moisture damage to the engineered wood.
- Fasteners: Periodically check all screws and fasteners to ensure they remain tight. Retighten if necessary.
- Ventilation: Ensure adequate air circulation around the cabinet, especially if storing damp shoes, to prevent odor buildup.
7. Troubleshooting
If you encounter any issues with your shoe cabinet, refer to the following common troubleshooting tips:
- Drawers not closing smoothly: Check for obstructions inside the drawer or along the mechanism. Ensure the cabinet is on a level surface. Verify that all assembly screws are properly tightened.
- Cabinet feels wobbly: Confirm that the cabinet is placed on a flat, stable floor. Ensure all assembly fasteners are securely tightened. Re-check the anti-tipping kit installation to ensure it is firmly anchored to the wall.
- Scratches or minor damage: For minor blemishes, a furniture repair pen or touch-up paint matching the white finish may be used.
If problems persist, please contact HOMCOM customer support for assistance.
8. Specifications
| Feature | Specification |
|---|---|
| Brand | HOMCOM |
| Model Name | 837-390V80WT |
| Color | White |
| Product Dimensions | 9.5"D x 23.5"W x 38.25"H |
| Overall Weight Capacity | 44 lbs |
| Shelf/Drawer Weight Capacity | 6 lbs (Each) |
| Top Weight Capacity | 11 lbs |
| Material | Engineered Wood |
| Number of Flip Drawers | 2 |
| Number of Top Drawers | 1 |
| Shoe Capacity | Up to 8 pairs |
| Special Features | Adjustable Shelf, Anti-Tipping |
| Mounting Type | Floor Mount (with wall attachment) |
| Assembly Required | Yes |
| Item Weight | 38.9 Pounds |
| UPC | 196393154670 |
9. Warranty and Support
9.1. Warranty Information
HOMCOM products typically come with a limited warranty covering manufacturing defects. Please refer to the warranty card included with your product or visit the official HOMCOM website for detailed warranty terms and conditions specific to your region and purchase date.
9.2. Customer Support
For assembly assistance, missing parts, or any other inquiries regarding your HOMCOM Shoe Cabinet, please contact HOMCOM customer support. You can usually find contact information (phone number, email, or support portal) on the HOMCOM website or on your purchase receipt.
Visit the HOMCOM Store on Amazon for more information and products.
10. Official Product Videos
No relevant official product videos from the seller were found for this model at the time of manual creation.