1. Introduction
This manual provides detailed instructions for the installation, operation, and maintenance of the FOUNCY D52-2066 Din Rail AC Smart Meter. This device is designed to accurately monitor AC voltage, current, active power, electric energy (KWH), frequency, and power factor.
The D52-2066 meter offers good stability, standard size for Din-Rail installation, and high precision for various electrical monitoring applications.
2. Safety Information
WARNING:
- Incorrect connection methods with voltage can destroy the meter. Always follow the wiring diagrams carefully.
- This meter is designed for measuring 50Hz AC city electricity only. Do not use it to measure square wave, inverter output, or corrected sine wave signals, as this will damage the device.
- Installation should be performed by qualified personnel to ensure safety and proper function.
- Ensure power is disconnected before any installation or wiring work.
3. Product Features
- Multi-functional digital display for various electrical parameters.
- Measures AC Voltage, AC Current, Active Power, Electric Energy (KWH), Frequency, and Power Factor.
- High precision and good stability.
- Din-Rail installation for easy integration into electrical panels.
- Equipped with a reset button for electric energy (KWH) accumulation.
4. Specifications
| Parameter | Value |
|---|---|
| Accuracy | 1% ± 2 words |
| AC Voltage Range | AC 40.0-300.0V or AC 250.0-450.0V (model dependent) |
| AC Current Range | AC 0-100.0A (Resolution: 0.01A) |
| Frequency Range | 45.0Hz-65.0Hz |
| Power Factor | 0.00-1.00PF |
| Electric Power Range | 0-450000W (Resolution: 0.1W for 0-9999.9W; 1W for >9999.9W) |
| Electric Energy Range (KWH) | 0-99999kwh (Resolution: 0.01kwh for 0-999.99kwh; 0.1kwh for 1000.0-9999.9kwh; 1kwh for >9999.9kwh) |
| Measurement Speed | 2 times per second |
| Dimensions (L×W×H) | 54mm × 80mm × 64mm |
| Installation | Din-Rail |

Image: Physical dimensions and key measurement ranges of the D52-2066 meter. The meter measures 54mm wide, 80mm high, and 64mm deep. It displays electric power up to 450000W, electric energy up to 99999KWh, AC voltage (40-300V or 250-450V), frequency (45-65Hz), AC current (0-100A), and power factor (0.00-1.00PF).
5. Package Contents
The package typically includes:
- 1 x FOUNCY D52-2066 Din Rail AC Smart Meter
- 1 x Current Transformer (CT) (Built-in or External, depending on model)

Image: The D52-2066 multi-function digital meter shown with its built-in current transformer (CT). The meter displays various electrical parameters on its screen.

Image: A collage showing different perspectives of the D52-2066 meter and its current transformer. This includes the meter mounted on a Din-Rail, the external CT, and a comparison of two meters.
6. Setup and Installation
Follow these steps for proper installation of the D52-2066 meter. Ensure all power is OFF before proceeding.
6.1 Din-Rail Mounting
The D52-2066 is designed for standard Din-Rail installation. Securely mount the meter onto a compatible Din-Rail within your electrical panel.
6.2 Wiring Instructions
The wiring method depends on whether your meter uses a built-in Current Transformer (CT) or an external CT, and the current level.
Method 1: Wiring with Built-in CT (AC Current lower than 100A)
- Identify the measuring signal input terminals (typically labeled 1 and 2) and the load terminals.
- Connect the main circuit wire (measuring signal) through the hole in the built-in current transformer located on the right side of the meter. Ensure the wire passes correctly through the CT.
- Connect the voltage input wires to terminals 1 and 2 of the meter.
- Connect the load to the output side of the circuit.
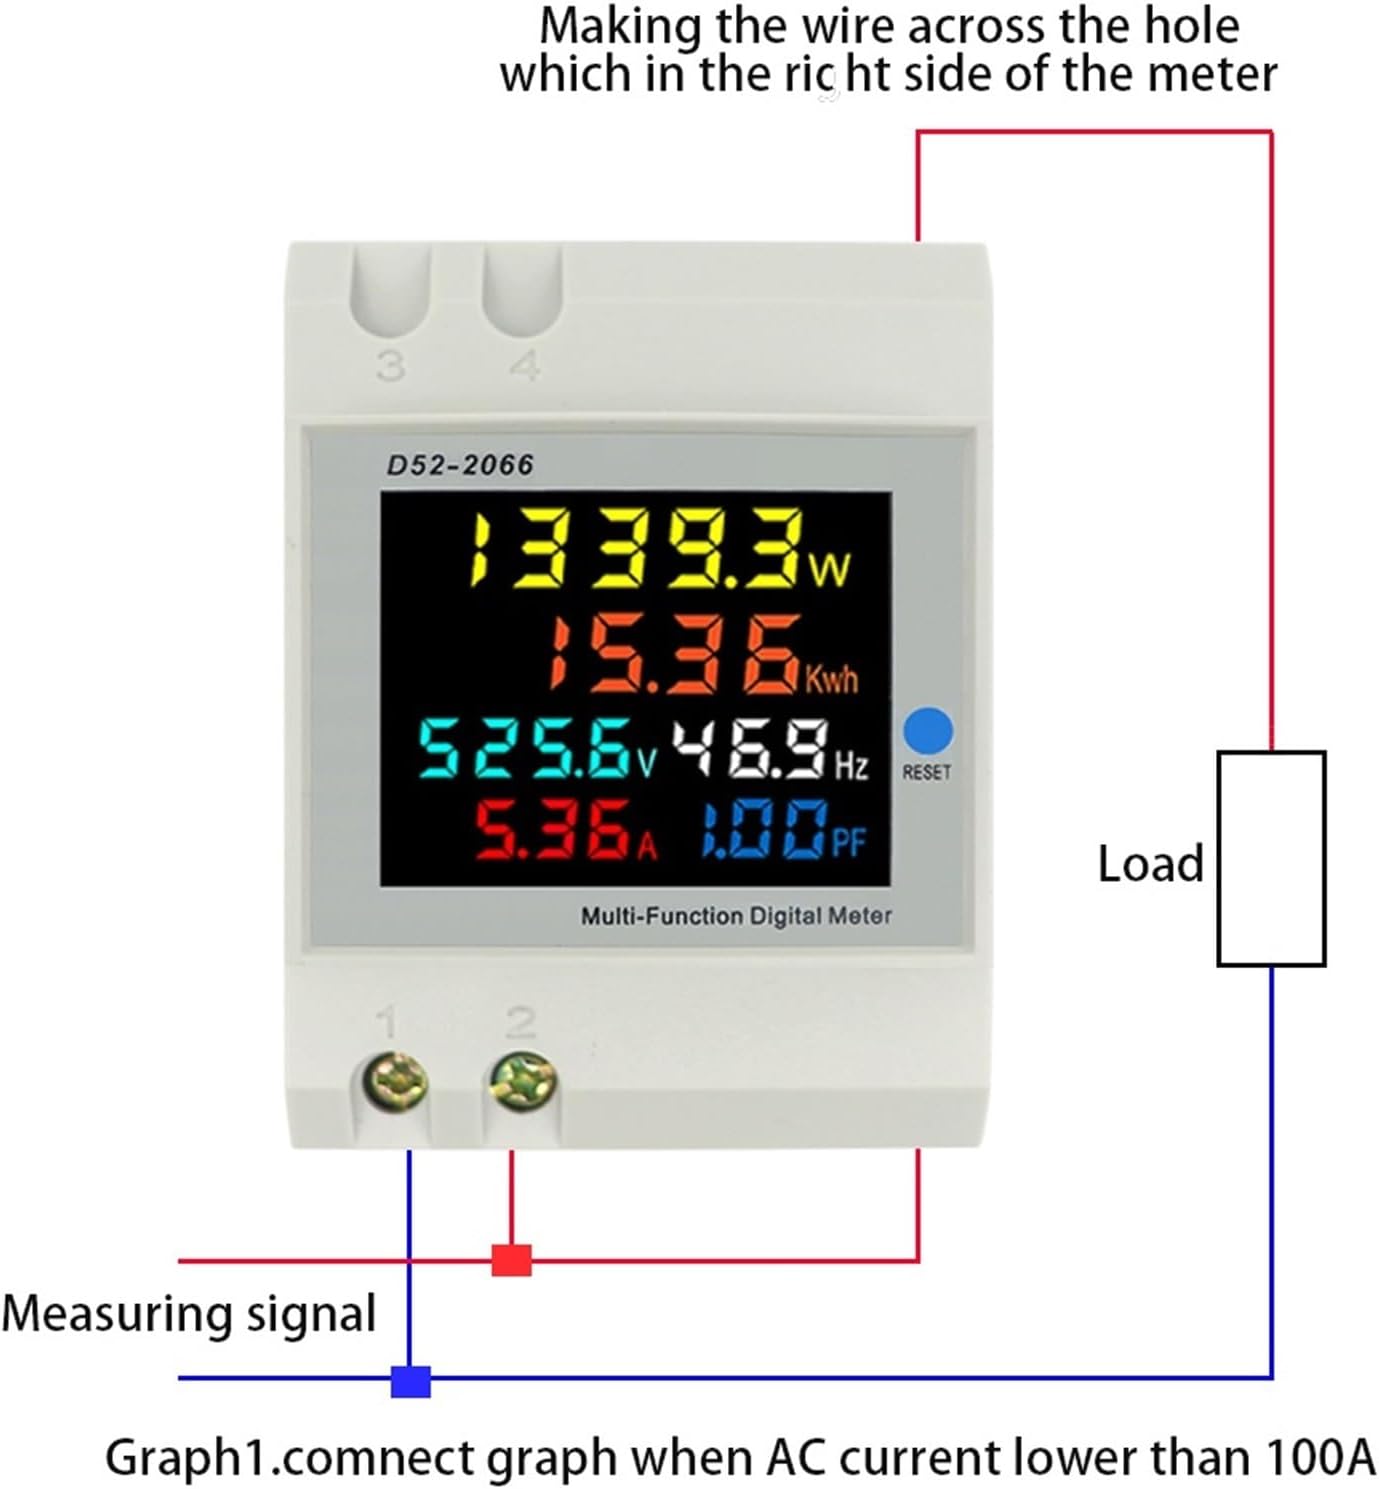
Image: Wiring diagram for the D52-2066 meter when using its built-in current transformer for AC currents below 100A. The measuring signal wire passes through the CT hole on the meter's right side, and voltage inputs connect to terminals 1 and 2.
Method 2: Wiring with External CT (for higher currents or specific installations)
- Identify the secondary current transformer terminals (typically blue terminals) on the meter.
- Connect the green wire of the external secondary current transformer to the blue terminal of the meter.
- Make the wire of the measurement circuit pass through the hole in the external current transformer.
- Connect the voltage input wires to the appropriate terminals (e.g., 3 and 4) on the meter.

Image: Wiring diagram for the D52-2066 meter using an external current transformer. The green wire from the external CT connects to the meter's blue terminal, and the main circuit wire passes through the external CT. Voltage inputs connect to terminals 3 and 4.

Image: The D52-2066 meter displayed alongside an external current transformer and a simplified wiring diagram. The diagram illustrates connecting the CT and voltage inputs to the meter.
7. Operation
Once properly installed and powered on, the meter will automatically begin measuring and displaying the electrical parameters.
7.1 Display Readings
The multi-function digital display will show the following parameters:
- Active Power (W)
- Electric Energy (KWH)
- AC Voltage (V)
- Frequency (Hz)
- AC Current (A)
- Power Factor (PF)

Image: A close-up view of the D52-2066 meter's digital display, showing simultaneous readings for active power (W), electric energy (KWh), voltage (V), frequency (Hz), current (A), and power factor (PF).
7.2 Resetting Electric Energy (KWH)
To reset the accumulated electric energy (KWH) reading:
- Locate the "RESET" button on the front panel of the meter.
- Press and hold the "RESET" button for approximately 5 seconds.
- The electric energy (KWH) value will reset to zero.
8. Maintenance
- Keep the meter clean and free from dust. Use a soft, dry cloth for cleaning.
- Avoid exposing the meter to excessive moisture, direct sunlight, or extreme temperatures.
- Do not attempt to open or repair the meter yourself. Refer to qualified service personnel for any issues.
9. Troubleshooting
- No Display / Meter Not Powering On:
- Check the power supply to the meter's voltage input terminals.
- Ensure all wiring connections are secure and correct according to the diagrams.
- Verify that the input voltage is within the specified range (AC 40-300V or AC 250-450V).
- Incorrect Readings:
- Confirm that the current transformer (CT) is correctly installed and the measurement circuit wire passes through it properly.
- Ensure the meter is used with a 50Hz AC city electricity supply. Using it with square wave, inverter output, or corrected sine wave will result in incorrect readings or damage.
- Check for loose connections in the wiring.
- KWH Not Resetting:
- Ensure you are pressing and holding the "RESET" button for the required duration (approximately 5 seconds).
10. Warranty and Support
For warranty information or technical support, please refer to the product packaging or contact FOUNCY customer service through their official channels. Keep your purchase receipt for warranty claims.