1. Introduction
Thank you for choosing the XCQQ S8L-Elongated Bidet Toilet Seat. This manual provides essential information for the safe installation, operation, and maintenance of your new bidet toilet seat. Please read these instructions thoroughly before installation and retain them for future reference.

Image 1.1: The XCQQ S8L-Elongated Bidet Toilet Seat, featuring a side control panel and a self-cleaning nozzle.
2. Important Safety Information
Please read all safety warnings and instructions carefully to reduce the risk of fire, electric shock, or injury.
- Electrical Requirements: This unit operates on 120 Volts and requires a 1300-watt power supply. Ensure the electrical outlet is a B-type US style with a ground plug and is GFCI (Ground Fault Circuit Interrupter) protected. Do not use extension cords.
- Water Supply: Connect the bidet seat only to a potable cold water supply. Ensure all connections are secure to prevent leaks.
- Weight Limit: The maximum weight capacity for this bidet toilet seat is 280 pounds. Exceeding this limit may cause damage or injury.
- Lid Caution: The toilet seat lid is designed for soft closing and is not intended to support body weight. Avoid sitting or standing on the lid to prevent damage.
- Cleaning: Always unplug the unit before cleaning. Use only mild, non-abrasive cleaners.
- Children and Individuals with Reduced Capabilities: This appliance can be used by children aged 8 years and above and persons with reduced physical, sensory or mental capabilities or lack of experience and knowledge if they have been given supervision or instruction concerning use of the appliance in a safe way and understand the hazards involved. Children shall not play with the appliance. Cleaning and user maintenance shall not be made by children without supervision.
3. Package Contents
Verify that all components are present before beginning installation:
- XCQQ Bidet Toilet Seat
- 3-way Valve + DMT Pipe (Pre-Installed)
- Fixing Plate
- Mounting Hardware (screws, rubber expansion nuts)
- Instruction Manual (this document)
4. Product Features
The XCQQ S8L-Elongated Bidet Toilet Seat offers a range of features designed for enhanced hygiene and comfort:
- Warm Water Wash: Adjustable water temperature with 5 settings, ranging from room temperature to 102°F (39°C).
- Heated Seat: Provides warmth with 4 adjustable temperature levels, from room temperature up to 102°F (39°C).
- Warm Air Dryer: Features an efficient air drying system with 5 adjustable temperature settings to reduce toilet paper usage.
- Soft-Close Lid: Prevents slamming and reduces noise.
- Night Light: Integrated LED night light for visibility in low-light conditions, with a beep-off mode to avoid disturbance.
- Self-Cleaning Nozzle: A stainless steel nozzle that performs self-cleaning before and after each use.
- LED Display: Real-time display of water temperature, seat temperature, and drying temperature.
- Memory Customized Settings: The unit retains your preferred settings for water pressure, water temperature, drying temperature, nozzle position, and heated toilet seat temperature level (settings may need to be re-memorized after a power outage).
- Multiple Cleaning Styles: Includes Female Cleaning, Rear Cleaning, Oscillating Cleaning, and Self-Cleaning functions.

Image 4.1: Illustration of the heated toilet seat and warm air drying functions.

Image 4.2: Depiction of the soft-close lid mechanism and the integrated LED night light.

Image 4.3: Visual representation of the various cleaning modes, including female, rear, oscillating, and self-cleaning.
5. Installation Guide
Before installation, ensure your toilet is an elongated shape and has an accessible electrical outlet. Refer to Image 5.1 to confirm your toilet size.
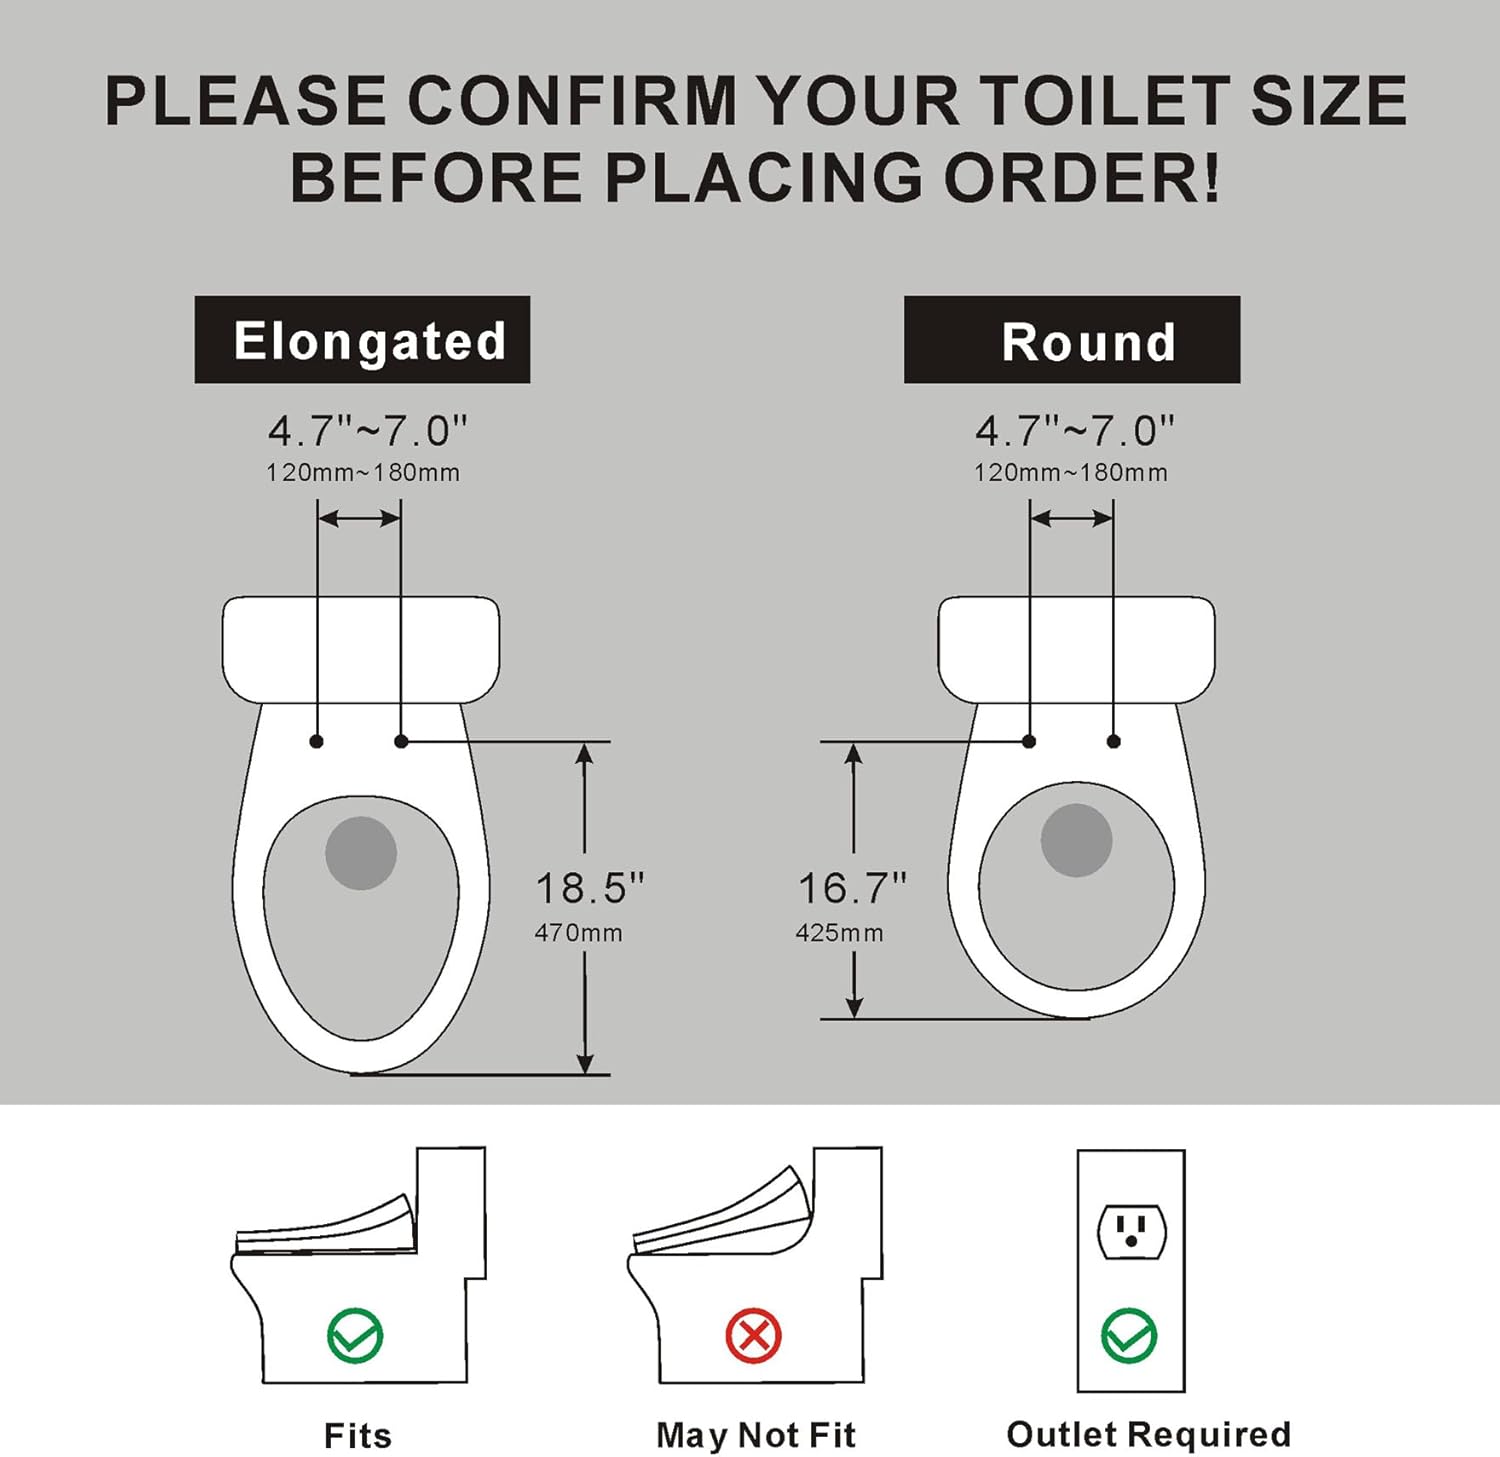
Image 5.1: Toilet size confirmation diagram for elongated and round models, highlighting the requirement for an electrical outlet.
Pre-Installation Check:
- Turn off the water supply to your toilet.
- Flush the toilet to drain the tank.
- Remove your existing toilet seat and lid.
Step-by-Step Installation:
- Remove Fixing Plate: Hold down the buckle on the right side of the bidet unit and pull the fixing plate out from the bottom of the unit.

Image 5.2: Removing the fixing plate from the bidet seat.
- Secure Fixing Plate: Insert the rubber expansion nuts into the toilet holes. Use the metal adjustment sheets and screws to secure the fixing plate onto the toilet bowl.

Image 5.3: Securing the fixing plate to the toilet bowl.
- Attach Bidet Unit: Push the bidet unit into the secured fixing plate while holding down the buckle until the plate slides completely into the bottom of the unit.

Image 5.4: Attaching the bidet unit to the fixing plate.
- Connect Water Supply: Insert the black rubber ring (optional) into the 3-way valve and screw it onto the inlet of the toilet tank. Connect the bidet's water hose to the 3-way valve.

Image 5.5: Connecting the bidet to the toilet's water supply.
- Restore Water and Power: Open the main water supply valve. Wait 3-5 minutes for the bidet to fill with water. Then, plug the unit into a GFCI-protected electrical outlet.
Initial Power-On and Water Spray Check:
When the power is activated, the LED light will start to blink. The spray bar will automatically extend (without spraying water) and water will flow down the bar into the toilet. This is a system self-check. The blue light will stop blinking in approximately 1 minute automatically.
If the LED light blinks continuously for more than 5 minutes:
- Unplug the bidet.
- Turn off the water valve.
- Wait 3-5 minutes.
- Plug it back in and do not operate any functions. The blue light should stop blinking in 1 minute.

Image 5.6: Important attention notice for initial power-on and LED light behavior.
6. Operation
The XCQQ S8L-Elongated Bidet Toilet Seat is controlled via a side panel. Familiarize yourself with the buttons and their functions:

Image 6.1: Detailed view of the side control panel, indicating various function buttons.
Control Panel Functions:
- Power: Turns the unit on/off.
- Stop: Stops any active washing or drying function.
- Spray: Initiates a general wash.
- Bidet: Initiates a feminine wash.
- Turbo Wash: Provides a stronger, more focused wash.
- Drying: Activates the warm air dryer.
- Auto: Starts an automatic washing and drying cycle with a single touch.
- Light: Toggles the LED night light on/off.
- Water Pressure / Drying Temp (HI/LO): Adjusts water pressure during wash or air temperature during drying.
- Nozzle Position (FR/BK): Adjusts the nozzle's forward or backward position.
- Water Temp: Adjusts the water temperature.
- Seat Temp: Adjusts the heated seat temperature.
- Memory: Saves current settings for personalized use.

Image 6.2: The LED display provides real-time information, and the 'Auto' button initiates a combined wash and dry cycle.
7. Maintenance
Regular Cleaning:
- Nozzle Cleaning: The stainless steel nozzle performs an automatic self-cleaning cycle before and after each use. For additional cleaning, a manual nozzle cleaning function may be available via the control panel (refer to specific button if present).
- Unit Cleaning: Always unplug the bidet toilet seat from the electrical outlet before cleaning. Use a soft, damp cloth and a mild, non-abrasive household cleaner. Avoid harsh chemicals, abrasive pads, or strong solvents, as these can damage the surface.
- Seat Removal for Cleaning: The bidet seat can be unclipped from the fixing plate for thorough cleaning of the toilet bowl and the underside of the seat. Refer to the installation steps in reverse to remove and reattach the seat.
- Exterior: Wipe down the exterior surfaces, including the control panel, with a soft, damp cloth.
Long-Term Storage:
If the unit will not be used for an extended period, especially in cold climates, it is recommended to drain the water from the unit to prevent freezing damage. Consult a qualified plumber if you are unsure how to perform this task.
8. Troubleshooting
This section addresses common issues you might encounter. If the problem persists, please contact customer support.
| Problem | Possible Cause | Solution |
|---|---|---|
| No power / Unit not turning on | Unit unplugged; GFCI tripped; Power outage. | Ensure the unit is securely plugged into a GFCI outlet. Reset the GFCI if tripped. Check household power supply. |
| LED light blinks continuously for more than 5 minutes after power-on | Initial water fill incomplete or system error. | Unplug the bidet, turn off the water valve, wait 3-5 minutes, then plug it back in without operating functions. The light should stop blinking within 1 minute. Ensure water supply is fully open. |
| No water spray / Weak water pressure | Water supply valve closed; Nozzle clogged; Water pressure setting too low. | Ensure the toilet's water supply valve is fully open. Check for any kinks in the water hose. Clean the nozzle if visibly clogged. Adjust water pressure settings on the control panel. |
| Heated seat not warm / Water not warm | Temperature settings too low; Power save mode active. | Adjust seat and water temperature settings on the control panel. Disable power save mode if applicable. |
| Air dryer not working / Air too hot | Drying function not activated; Temperature setting incorrect. | Activate the drying function. Adjust the drying temperature settings on the control panel. |
| Lid closes too quickly / Does not stay open | Improper installation or alignment. | Recheck the installation of the fixing plate and bidet unit to ensure proper alignment and secure attachment. |
9. Specifications
| Feature | Detail |
|---|---|
| Brand | XCQQ |
| Model Number | XCQQ-S8L |
| Style | S8L-Elongated (Panel Control) |
| Color | White |
| Material | Acrylonitrile Butadiene Styrene (ABS) |
| Shape | Oval |
| Product Dimensions | 20.1 x 17.5 x 5.5 inches |
| Item Weight | 12.27 pounds |
| Power Source | AC |
| Voltage | 120 Volts |
| Wattage | 1300 watts |
| Temperature Range (Water/Seat) | 59 - 95 Degrees Fahrenheit (Adjustable up to 102°F / 39°C) |
| Maximum Weight Capacity | 280 Pounds |
| Plug Format | B - US style with ground plug |
10. Warranty and Support
Warranty Information: Please refer to the product packaging or the official XCQQ website for detailed warranty terms and conditions. Retain your proof of purchase for warranty claims.
Customer Support: For technical assistance, troubleshooting beyond this manual, or warranty inquiries, please contact XCQQ customer support through the retailer where the product was purchased or visit the official XCQQ brand website.