Product Overview
This manual provides essential information for the installation, use, and maintenance of the ONE Pre-Cut 475 mm (~19 INCH) RoHS Steel Slotted 35 x 15 mm DIN Rail.
The DIN rail is a standardized metal rail type widely used for mounting circuit breakers and industrial control equipment inside equipment racks. These products are manufactured according to international standards, ensuring compatibility and ease of substitution with other manufacturers' DIN rails.
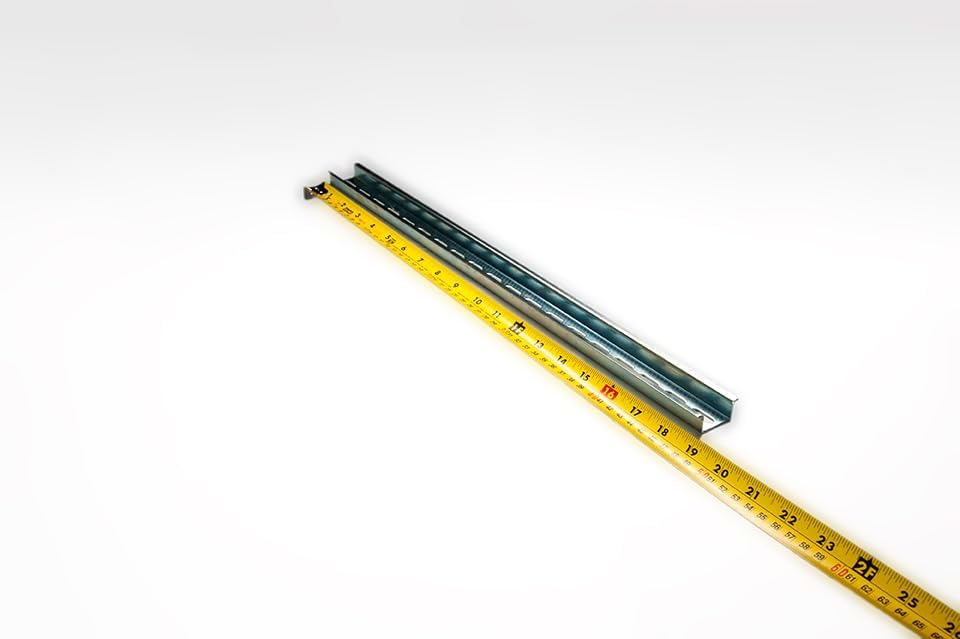
Image: A single piece of the ONE Pre-Cut 475 mm DIN Rail, showcasing its slotted design and metallic finish.
Key Features
- Dimensions: 475 mm (~19 INCH / 18.7") length, 35 mm width, 15 mm height.
- Material: 1.5 mm thick steel with RoHS compliant trivalent chrome plating.
- Slotted Design: Slots are 6.2 x 18 mm on 25 mm centers.
- Precision Cut: Machine cut, square, and burr-free. Cuts are made in fixed locations between slots to ensure whole slots and a repeating hole pattern.

Image: The DIN rail measured with a tape measure, indicating its approximate 19-inch length.

Image: A technical diagram illustrating the precise dimensions of the DIN rail's slots and overall profile, including 6.2 x 18 mm slots on 25 mm centers, and 35 x 15 mm profile dimensions.
Setup and Installation
The DIN rail is designed for easy installation within electrical enclosures, control panels, and other industrial applications. It serves as a mounting platform for various electrical components.
Tools Required:
- Screwdriver (appropriate for mounting screws)
- Measuring tape or ruler
- Pencil or marker for marking
- Drill (if mounting surface requires pilot holes)
Installation Steps:
- Prepare Mounting Surface: Identify the desired location for the DIN rail within your enclosure or panel. Ensure the surface is clean, flat, and capable of supporting the rail and mounted components.
- Mark Mounting Points: Align the DIN rail with the intended mounting position. Use a pencil or marker to mark the locations of the slotted holes on the mounting surface. The slots are designed to accommodate various screw sizes and allow for minor adjustments.
- Drill Pilot Holes (if necessary): If mounting to a material that requires pilot holes, drill them at the marked locations. Ensure the drill bit size is appropriate for your mounting screws.
- Secure the DIN Rail: Place the DIN rail back onto the marked or drilled mounting points. Insert appropriate screws through the slots and fasten the rail securely to the surface. Do not overtighten, but ensure the rail is firmly fixed and does not wobble.
- Mount Components: Once the DIN rail is installed, electrical components (e.g., terminal blocks, circuit breakers, relays) designed for DIN rail mounting can be snapped or slid onto the rail.
Operating Principles
The DIN rail itself is a passive mounting component and does not have active operating principles. Its function is to provide a standardized, secure, and organized method for mounting electrical and electronic components within an enclosure.
Components mounted on the DIN rail typically feature a spring-loaded or clip-on mechanism that allows them to be easily attached and detached without the need for additional tools in many cases. This facilitates quick installation, modification, and maintenance of control systems.
Maintenance
The ONE Pre-Cut DIN Rail requires minimal maintenance due to its robust steel construction and trivalent chrome plating, which provides corrosion resistance.
General Maintenance Guidelines:
- Cleaning: Periodically inspect the DIN rail for dust, dirt, or debris accumulation. Clean with a dry, lint-free cloth. For stubborn grime, a slightly damp cloth with mild detergent can be used, followed by immediate drying. Avoid abrasive cleaners or solvents that could damage the plating.
- Inspection: Regularly check the mounting screws for tightness. Vibrations in industrial environments can sometimes loosen fasteners. Ensure all mounted components are securely seated on the rail.
- Corrosion Check: While plated for corrosion resistance, inspect the rail in humid or corrosive environments for any signs of rust or degradation. Address any issues promptly to prevent further damage.
Troubleshooting
As a passive mechanical component, the DIN rail itself rarely experiences "malfunctions." Most issues relate to installation or compatibility.
Common Issues and Solutions:
| Problem | Possible Cause | Solution |
|---|---|---|
| DIN rail is loose after installation. | Screws are not tightened sufficiently, or mounting surface is unstable. | Retighten all mounting screws. If the surface is unstable, reinforce it or use larger washers. |
| Components do not fit or snap onto the rail. | Component is not designed for 35x15 mm DIN rail, or there is debris in the rail channel. | Verify component compatibility with 35x15 mm DIN rail. Clean the rail channel to remove any obstructions. |
| Rail shows signs of corrosion. | Exposure to harsh chemicals or extreme humidity/moisture. | Clean affected areas and consider applying a protective coating if the environment cannot be controlled. Ensure proper ventilation in the enclosure. |
Specifications
| Model Number | DR3515ST-19INCH |
| Part Number | DR3515ST-19INCH |
| UPC | 759626201734 |
| Length | 475 mm (~19 INCH / 18.7 inches) |
| Width | 35 mm |
| Height | 15 mm |
| Material | 1.5 mm thick Steel |
| Plating | RoHS compliant trivalent chrome |
| Slot Dimensions | 6.2 x 18 mm |
| Slot Center Spacing | 25 mm |
| Item Weight | 1.2 pounds |
| Manufacturer | Control Panel Supply |
Warranty and Support
This product is manufactured by Control Panel Supply. For specific warranty information, please refer to the terms and conditions provided by the seller or manufacturer at the time of purchase. General return policy is 30 days.
For technical support, inquiries about different lengths (minimum order required), or discounts on larger quantities, please contact Control Panel Supply directly. Their contact information can typically be found on their official website or through the platform where the product was purchased.
Original part number: Control Panel Supply DR3515ST-2 (Note: This product is a pre-cut version of the original part number).