1. Introduction
The Beelink SEi12 Mini PC is a compact and powerful desktop computer designed for various applications, from business and education to home theater and gaming. Equipped with an Intel 12th Gen i5-12450H processor, 16GB DDR4 RAM, and a 500GB NVMe SSD, it offers efficient performance in a small form factor. This manual provides detailed instructions to help you get the most out of your device.

Figure 1: Beelink SEi12 Mini PC Overview
2. Package Contents
Before you begin, please ensure all items are present in your package:
- 1 x Mini PC
- 1 x HDMI Cable
- 1 x Power Adapter
- 1 x User Manual
3. Setup
3.1 Initial Connections
To set up your Beelink SEi12 Mini PC, follow these steps:
- Connect the power adapter to the DC Jack on the Mini PC and plug it into a power outlet.
- Connect your monitor(s) to the HDMI and/or DP ports using the provided HDMI cable or a compatible DisplayPort cable.
- Connect your keyboard and mouse to the available USB ports.
- Press the power button on the front of the Mini PC to turn it on.

Figure 2: Rear Ports for Display and Power Connections

Figure 3: Front Ports for USB and Audio Connections
3.2 Operating System Installation
Your Beelink SEi12 Mini PC comes with a pre-installed operating system. If you need to reinstall or install a different OS, refer to the following video tutorials:
Video 1: How to install Windows 11 on Beelink Mini PC. This video guides you through the process of creating a bootable USB drive and performing a clean installation of Windows 11.
Video 2: How to install Windows 10 from USB. This video demonstrates the steps to create a bootable USB drive for Windows 10 and install it on your Mini PC.
4. Operating Your Mini PC
4.1 Dual Display Setup
The Beelink SEi12 supports dual 4K 60Hz displays via its HDMI and DisplayPort outputs, allowing for enhanced multitasking and productivity. Simply connect two monitors to the respective ports.

Figure 4: Dual Display Connectivity
4.2 Network and Connectivity
The Mini PC features Wi-Fi 6 (802.11ax) for high-speed wireless internet access and Bluetooth 5.2 for connecting wireless peripherals such as keyboards, mice, and headphones.

Figure 5: High-Speed Wireless Connectivity
5. Maintenance and Upgrades
5.1 Storage Expansion
The Beelink SEi12 Mini PC supports storage expansion with an additional 2.5-inch SATA HDD/SSD (up to 2TB) and an M.2 NVMe PCIe4.0 SSD (up to 1TB). This allows you to increase your storage capacity as needed.
Video 3: SSD replacement tutorial. This video demonstrates how to replace or add an SSD to your Mini PC.
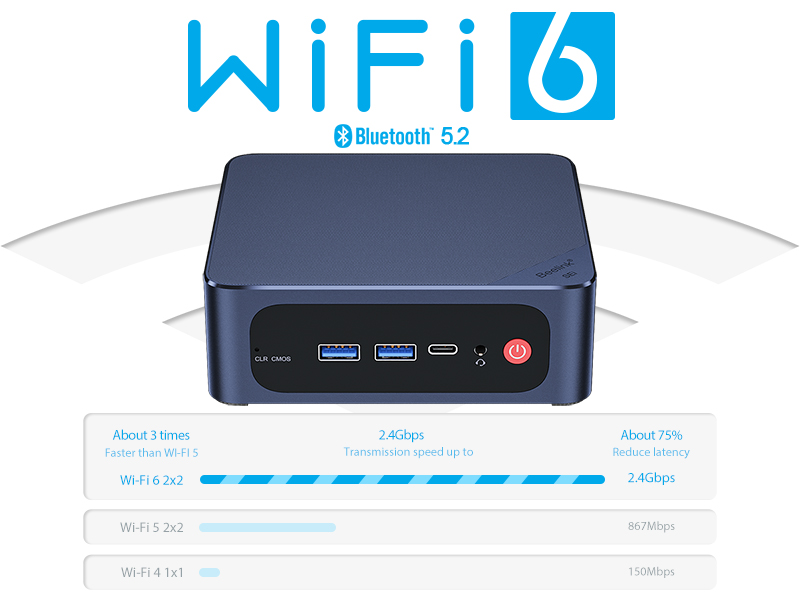
Figure 6: Internal Storage Options (M.2 NVMe SSD and 2.5-inch SATA)
5.2 RAM Upgrade
The Mini PC comes with 16GB DDR4 RAM, which can be upgraded to a maximum of 64GB (2x32GB) for enhanced performance. Consult the internal layout diagram for RAM slot locations.
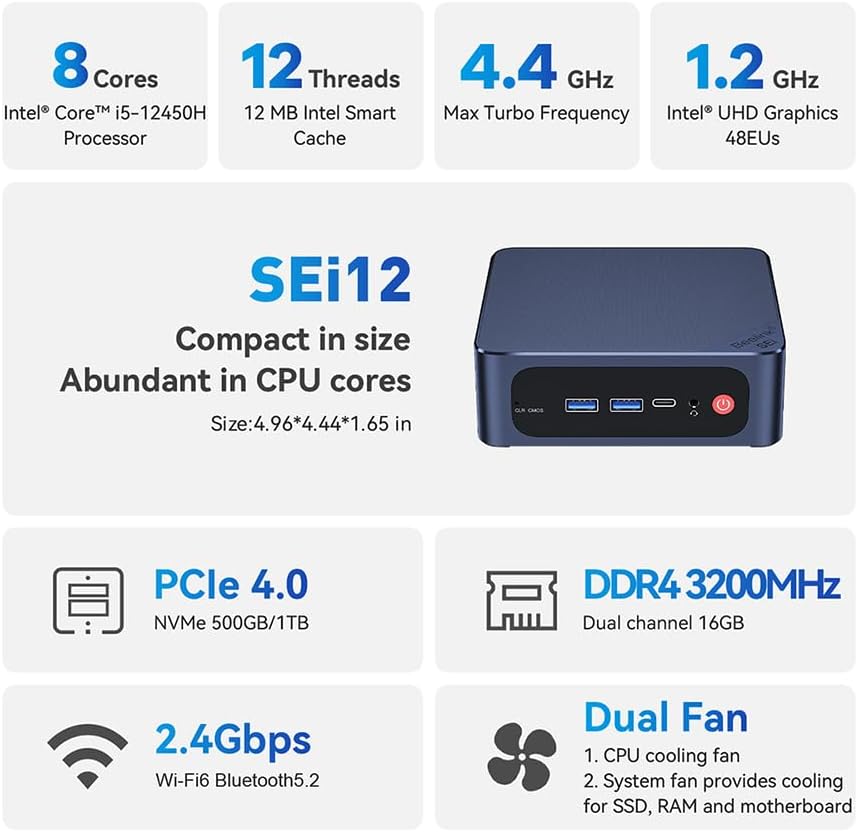
Figure 7: RAM Module Installation
5.3 Cooling System
The Beelink SEi12 features an upgraded dual-fan cooling system, including a CPU cooling fan and a system fan for SSD, RAM, and motherboard cooling. This design helps maintain optimal operating temperatures and ensures stable performance.

Figure 8: Dual Fan Cooling System Diagram
6. Troubleshooting
If you encounter any issues with your Beelink SEi12 Mini PC, consider the following general troubleshooting steps:
- No Power: Ensure the power adapter is securely connected to both the Mini PC and a working power outlet. Try a different outlet.
- No Display: Verify that the HDMI/DP cable is securely connected to both the Mini PC and the monitor. Try a different cable or monitor. Ensure the monitor is set to the correct input source.
- Peripheral Issues: If your keyboard or mouse is not responding, try connecting them to different USB ports. For wireless peripherals, check battery levels and ensure they are properly paired.
- Operating System Problems: If the OS is not booting correctly, you may need to reinstall it using the methods described in Section 3.2.
For more complex issues, please refer to the Warranty and Support section for contact information.
7. Product Specifications
Below are the detailed technical specifications for the Beelink SEi12 Mini PC:
| Feature | Specification |
|---|---|
| Processor | Intel 12th Gen i5-12450H (up to 4.4GHz, 8C/12T) |
| Graphics | Intel UHD Graphics 48EUs |
| RAM | 16GB DDR4 (expandable up to 64GB) |
| Storage | 500GB M.2 NVMe SSD (supports up to 2TB 2.5-inch SATA HDD) |
| Display Output | 1x HDMI 2.0 (4K 60Hz), 1x DP 1.4 (4K 144Hz) - Dual Display |
| Network | WiFi 6 (802.11ax), 2.5 Gbps RJ45 Ethernet |
| Bluetooth | Bluetooth 5.2 |
| Ports | 2x USB3.2 Gen2, 2x USB2.0, 1x Type-C (Data), 1x Audio Jack (HP&MIC), 1x DC Jack |
| Operating System | Windows 11 Pro (Licensed) / Linux OS support |
| Dimensions | 4.96 x 4.44 x 1.65 inches |
| Weight | 2.42 pounds |
| Power Source | Input: 100-240V AC, 50/60Hz |

Figure 9: Detailed Product Specifications
8. Warranty and Support
Beelink offers lifetime technical support, a 1-year free warranty, and 24/7 after-sales service for the SEi12 Mini PC. All products have obtained FCC, RoHS, and CE Certifications.
If you have any questions or require assistance, please do not hesitate to contact Beelink customer support. You can find contact information through the following video:
Video 4: How to contact Beelink customer support for assistance.
For additional support and resources, please visit the official Beelink website.