OLEVS XBC-G1106GH-HH
OLEVS XBC-G1106GH-HH Men's Chronograph Analog-Digital Watch Instruction Manual
Model: XBC-G1106GH-HH
Introduction
Thank you for choosing the OLEVS XBC-G1106GH-HH Men's Chronograph Analog-Digital Watch. This timepiece combines a classic analog display with modern digital functions, including chronograph, alarm, day, and date. This manual provides detailed instructions for setting up and operating your watch to ensure optimal performance and longevity.

Image: The OLEVS XBC-G1106GH-HH watch featuring a black band and black dial, showcasing its robust design.
Product Overview
Familiarize yourself with the main components and controls of your OLEVS watch.
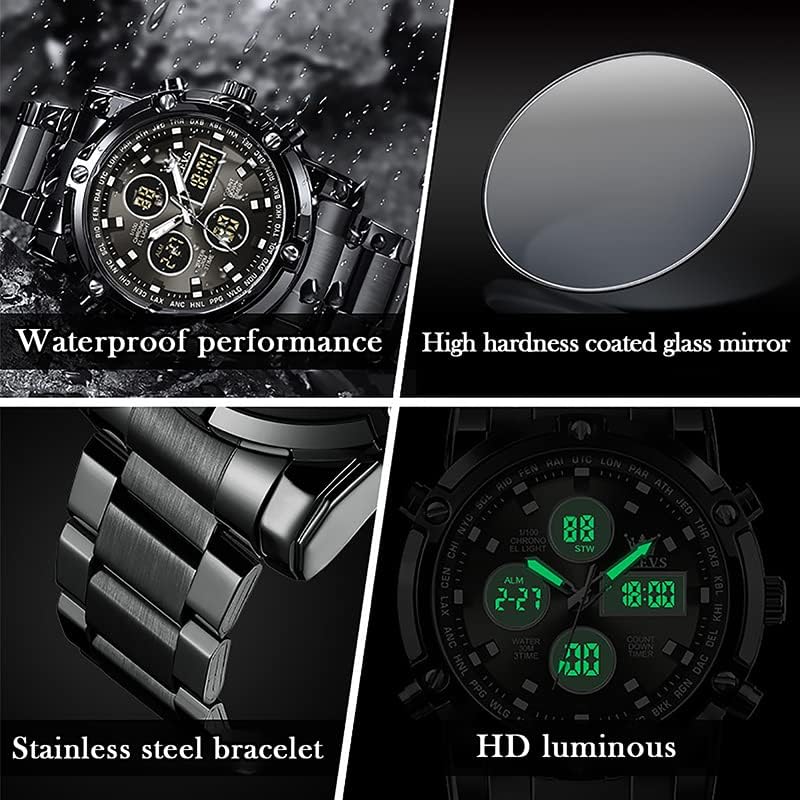
Image: Detailed diagram illustrating the various buttons and digital display functions of the OLEVS watch, including time, date, alarm, and chronograph indicators.
Watch Components and Functions:
- Crown: Used for setting analog time (pull out to adjust).
- Buttons (Pushers): Control digital functions such as mode selection, setting adjustments, and chronograph operations.
- Analog Display: Traditional hour, minute, and second hands.
- Digital Displays: Multiple digital screens showing time, date, day, alarm, stopwatch, and countdown timer.
- Backlight: Illuminates the digital display for visibility in low light conditions.
- Week Display: Indicates the current day of the week (MON, TUE, WED, THU, FRI, SAT, SUN).
- Mode Indicators: AL (Alarm mode), ST (Stopwatch mode), TR (Countdown mode).
Setup
1. Setting Analog Time
- Pull out the crown located on the right side of the watch.
- Rotate the crown to move the hour and minute hands to the desired time.
- Push the crown back in to secure the time setting.
2. Setting Digital Time and Date
The digital display allows for precise time, date, and day settings. Refer to the product overview image for button locations.
- Enter Setting Mode: Press and hold the button labeled "Long press to enter settings" (typically bottom-right) until the digital display starts flashing.
- Select Item to Adjust: Press the button labeled "Convert hours, minutes when setting week, month, day, etc." (typically top-left) to cycle through the settings: seconds, hours, minutes, year, month, day, and week.
- Adjust Value: Use the button labeled "Increment value when setting" (typically top-right) to increase the selected value.
- Confirm and Exit: Once all settings are correct, press the button labeled "Long press to enter settings" again to exit the setting mode.
3. Setting the Alarm
- Enter Alarm Mode: Press the mode button (typically bottom-left, labeled "Convert seconds, timing Functions such as normal time" or similar) until "AL" (Alarm mode) is displayed on the digital screen.
- Enter Alarm Setting: Press and hold the button labeled "Long press to enter settings" until the alarm time starts flashing.
- Adjust Alarm Time: Use the button labeled "Convert hours, minutes when setting week, month, day, etc." to select hours or minutes, and the button labeled "Increment value when setting" to adjust the values.
- Activate/Deactivate Alarm: While in Alarm mode (AL), press the button labeled "Alarm on" (typically bottom-right) to toggle the alarm on or off. An alarm icon will appear when activated.
- Exit Alarm Setting: Press the button labeled "Long press to enter settings" to save and exit.
Operating Functions
1. Using the Chronograph (Stopwatch)
The chronograph function allows you to measure elapsed time.
- Enter Stopwatch Mode: Press the mode button (typically bottom-left) until "ST" (Stopwatch mode) is displayed.
- Start/Stop: Press the button labeled "Convert seconds, timing functions such as normal time" (typically bottom-left) to start the stopwatch. Press it again to stop.
- Reset: While the stopwatch is stopped, press the button labeled "Increment value when setting" (typically top-right) to reset the stopwatch to zero.
2. Using the Countdown Timer
The countdown timer allows you to set a specific duration and will alert you when it reaches zero.
- Enter Countdown Mode: Press the mode button (typically bottom-left) until "TR" (Countdown mode) is displayed.
- Set Countdown Time: Press and hold the button labeled "Long press to enter settings" until the countdown time flashes. Use the button labeled "Convert hours, minutes when setting week, month, day, etc." to select hours or minutes, and the button labeled "Increment value when setting" to adjust the values. Press the button labeled "Long press to enter settings" again to save.
- Start/Stop: Press the button labeled "Convert seconds, timing functions such as normal time" to start the countdown. Press it again to pause/resume.
- Reset: While the countdown is paused, press the button labeled "Increment value when setting" to reset to the preset time.
3. Backlight Function
To illuminate the digital display in dark conditions, press the button labeled "Backlit keys" (typically top-left). The backlight will typically stay on for a few seconds.
Water Resistance Guidelines
Your OLEVS XBC-G1106GH-HH watch is rated for 30 meters (3ATM) water resistance. This means it is suitable for daily use and can withstand splashes, rain, and brief immersion in water. However, it is not suitable for swimming, diving, or showering with hot water, as steam and temperature changes can compromise the seals.
- Do not operate any buttons or pull out the crown while the watch is wet or submerged.
- Avoid exposing the watch to extreme temperature changes.
- If the watch comes into contact with saltwater, rinse it with fresh water and dry thoroughly.

Image: The OLEVS watch demonstrating its water-resistant capabilities, suitable for splashes and rain.
Maintenance
Proper care will extend the life and maintain the appearance of your watch.
- Cleaning: Wipe the watch case and strap regularly with a soft, dry cloth. For stainless steel, a slightly damp cloth can be used, followed by immediate drying.
- Avoid Chemicals: Do not expose the watch to solvents, detergents, perfumes, or cosmetic sprays, as these can damage the case, strap, or seals.
- Temperature: Avoid exposing the watch to extreme temperatures (above 60°C / 140°F or below 0°C / 32°F) or sudden temperature changes.
- Magnetic Fields: Keep the watch away from strong magnetic fields, which can affect the accuracy of the quartz movement.
- Battery Replacement: When the watch battery runs low, the digital display may dim or the watch may stop. Have the battery replaced by a qualified watch technician to ensure water resistance is maintained.
Troubleshooting
| Problem | Possible Cause | Solution |
|---|---|---|
| Analog hands not moving | Battery depleted; Crown pulled out; Mechanical issue. | Check if crown is pushed in. Replace battery. Contact service if issue persists. |
| Digital display is blank or dim | Battery depleted. | Replace battery. |
| Incorrect time/date displayed | Time/date not set correctly; Watch exposed to strong magnetic fields. | Reset time and date according to instructions. Keep watch away from magnets. |
| Buttons not responding | Watch is wet; Internal malfunction. | Ensure watch is dry before operating buttons. If issue persists, contact service. |
Specifications
- Brand: OLEVS
- Model Number: XBC-G1106GH-HH
- Display Type: Analog-Digital
- Movement: Quartz
- Power Source: Battery Powered
- Case Material: Stainless Steel
- Band Material: Stainless Steel
- Crystal: Hardlex
- Case Diameter: 48 Millimetres
- Case Thickness: 16 Millimetres
- Band Width: 23 Millimetres
- Water Resistance Depth: 30 Metres (3ATM)
- Clasp Type: Push Button Foldover Clasp With Safety
- Functions: Chronograph, LED Backlight, Day, Date, Alarm, Stopwatch, Countdown Timer
Warranty and Support
For warranty information and customer support, please refer to the documentation provided with your purchase or contact the retailer where you purchased the OLEVS XBC-G1106GH-HH watch. Keep your proof of purchase for any warranty claims.
For further assistance, you may also visit the official OLEVS website or contact their customer service department directly.
Ask a question about this manual
Ask about setup, troubleshooting, compatibility, parts, safety, or missing instructions. Manuals+ will review the question and use this page’s manual context to help answer it.