KAYINOW DF-580B
KAYINOW Hand Crank Emergency Radio User Manual
Model: DF-580B
Introduction
This manual provides detailed instructions for the operation, maintenance, and troubleshooting of your KAYINOW Hand Crank Emergency Radio. This versatile device is designed to provide reliable communication and power in various situations, including emergencies, outdoor activities, and daily use. It features AM/FM/NOAA weather radio reception, multiple charging options, a powerful flashlight, a reading lamp, an SOS alarm, and a power bank function.
Please read this manual thoroughly before using the product to ensure proper function and longevity.
What's in the Box
- Emergency Radio Hand Crank Solar
- USB Type C Cable
- Owner's Manual
- Carabiner
- Tool Needle
Product Overview
Familiarize yourself with the components of your emergency radio:

Figure 1: Front and side view of the KAYINOW Emergency Radio with key features labeled, including the flashlight, solar panel, hand crank, antenna, display, and control buttons.
- 1. Flashlight: Integrated LED light for illumination.
- 2. Reading Light: Located on the top, provides ambient light.
- 3. Solar Panel: For trickle charging the internal battery using sunlight.
- 4. Hand Crank: Manual power generation for charging.
- 5. Retractable Antenna: For improved radio signal reception.
- 6. Digital Display: Shows frequency, battery level, and mode.
- 7. Power Button: Long press to power on/off, short press to unmute.
- 8. Volume/Frequency Buttons (+/-): Long press for volume, short press for frequency adjustment.
- 9. Mode Button (M): Switches between AM/FM/WB/NOAA modes.
- 10. Play/Scan Button: Long press for auto scan, short press for next station.
- 11. USB-C Charging Port: Input for charging the radio.
- 12. USB Output Port: For charging external devices (power bank function).
- 13. SOS Button: Activates emergency alarm and flashing light.
- 14. Carabiner: For easy attachment and portability.
Setup
Initial Charge
Before first use, it is recommended to fully charge the radio's internal 5000mAh battery using the USB-C port.
- Connect the provided USB Type-C cable to the radio's USB-C input port.
- Connect the other end of the cable to a standard USB power adapter (not included) or a computer USB port.
- The battery indicator on the digital display will show charging progress.

Figure 2: The USB-C port for charging the radio, located on the side under a protective cover.
Operating Instructions
Power On/Off
- To turn on the radio, long press the Power button (⏻).
- To turn off the radio, long press the Power button (⏻) again.
- To unmute the radio when paused, short press the Power button (⏻).
Radio Functions (AM/FM/NOAA/WB)
The radio supports AM, FM, Weather Band (WB), and NOAA channels.

Figure 3: The radio's ability to receive AM, FM, and NOAA weather alerts, crucial for preparedness during various natural events.
- Switching Modes: Long press the "M" button to cycle through AM, FM, WB, and NOAA modes.
- Auto Scan: In AM or FM mode, long press the Play/Scan button (▶) to automatically scan and store available stations.
- Next/Previous Station: In AM or FM mode, short press the Play/Scan button (▶) to go to the next stored station. Short press the "-" button for the previous frequency.
- NOAA Channels: In NOAA mode, short press the "+" or "-" buttons to switch between the 7 preset NOAA channels.
- Volume Control: Long press the "+" button to increase volume. Long press the "-" button to decrease volume.
Flashlight and Reading Lamp
The radio is equipped with a 3W flashlight and 4 LED reading lights.

Figure 4: The radio provides both a powerful flashlight for directional lighting and a softer reading lamp for ambient illumination.
- To activate the flashlight, locate the flashlight button (usually on the side or front, refer to Product Overview diagram). Press once to turn on, press again to turn off.
- To activate the reading lamp, locate the reading lamp button (usually on the top). Press once to turn on, press again to turn off.
SOS Alarm Function
In emergency situations, the SOS alarm can be activated to attract attention.

Figure 5: The SOS alarm feature, which emits a loud sound and a flashing red light to signal for help.
- To activate the SOS alarm, long press the SOS button (located at the bottom).
- The radio will emit a loud siren sound and a flashing red light.
- To deactivate the SOS alarm, long press the SOS button again.
Power Bank Function (Charging External Devices)
The built-in 5000mAh battery can be used to charge your mobile devices.
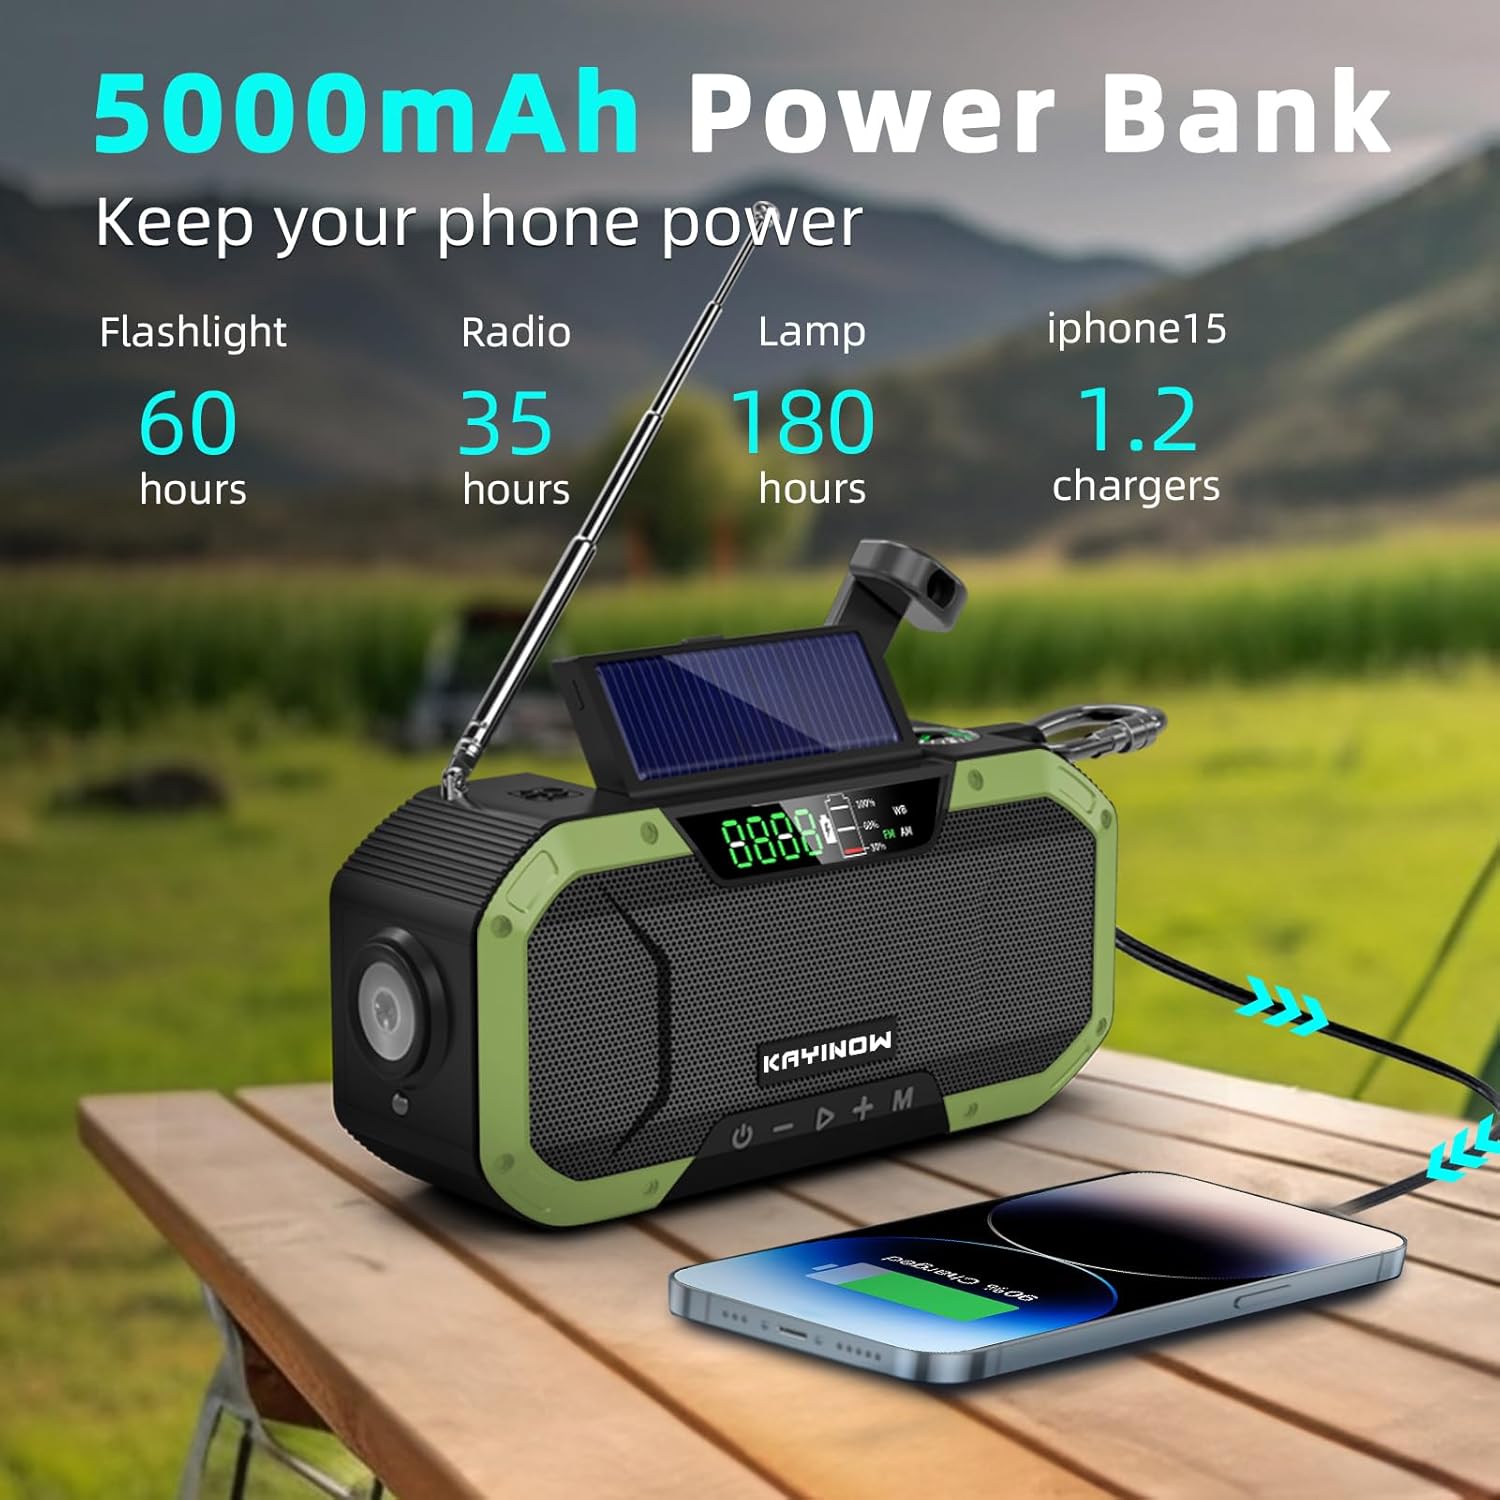
Figure 6: The radio functioning as a 5000mAh power bank, capable of charging a smartphone.
- Connect your device's USB charging cable to the USB output port on the radio.
- The radio will begin charging your device.
- Note: Charging speed may vary depending on the device and remaining battery level of the radio.
Charging the Radio
Your KAYINOW Emergency Radio offers three convenient charging methods:

Figure 7: Various charging options for the radio: USB Type-C, Hand Crank, and Solar Panel, along with the battery display.
1. USB Type-C Charging
- Connect the provided USB Type-C cable to the radio's USB-C input port and a power source. This is the fastest charging method.
2. Hand Crank Charging
- Unfold the hand crank handle located on the back of the radio.
- Rotate the hand crank clockwise or counter-clockwise at a steady pace (approximately 130-150 RPM) for 3-5 minutes to generate enough power for short-term use.
- This method is ideal for emergency power generation when other sources are unavailable.
3. Solar Panel Charging
- Place the radio with the solar panel facing direct sunlight.
- The solar panel provides a trickle charge to maintain battery life or provide minimal power in prolonged outdoor exposure. It is not intended for a full rapid charge.
Maintenance
- Cleaning: Wipe the radio with a soft, damp cloth. Do not use harsh chemicals or abrasive cleaners.
- Storage: Store the radio in a cool, dry place away from direct sunlight and extreme temperatures. If storing for extended periods, fully charge the battery every 3-6 months to prolong its lifespan.
- Water Resistance: The radio is IPX5 waterproof, meaning it can resist a sustained, low-pressure water jet spray. Do not submerge the radio in water. Ensure all port covers are securely closed to maintain water resistance.

Figure 8: The radio's IPX5 waterproof design, allowing it to withstand splashes and light rain.
Troubleshooting
| Problem | Possible Cause | Solution |
|---|---|---|
| Radio does not turn on. | Battery is depleted. | Charge the radio using USB-C, hand crank, or solar power. |
| Poor radio reception. | Antenna not extended; weak signal area. | Fully extend the telescopic antenna. Try repositioning the radio. |
| Cannot charge external device. | Radio battery too low; incorrect cable. | Ensure radio battery is sufficiently charged. Use a compatible USB cable. |
| Solar charging is slow. | Solar charging is a trickle charge; insufficient sunlight. | Solar charging is for maintenance, not primary charging. Ensure direct, strong sunlight. Use USB-C for faster charging. |
Specifications
- Model: DF-580B
- Dimensions: 6.5 x 1.8 x 3 inches (16.5 x 4.5 x 7.6 cm)
- Weight: 15.4 ounces (436.6 g)
- Battery: 5000mAh Lithium Polymer (included, non-removable)
- Radio Bands: AM (520-1710KHz), FM (88-108MHz), Weather Band (WB), NOAA
- Charging Methods: USB-C, Hand Crank, Solar Panel
- Flashlight Power: 3W
- Reading Light: 4 LED
- Water Resistance: IPX5 (Splashproof)
- Connectivity: USB (for charging external devices)
Warranty and Support
KAYINOW provides 24/7 customer support to address any issues you may encounter with your product.
For support, please contact KAYINOW customer service through the retailer where you purchased the product or visit the official KAYINOW store online.
Please retain your proof of purchase for warranty claims.
Ask a question about this manual
Ask about setup, troubleshooting, compatibility, parts, safety, or missing instructions. Manuals+ will review the question and use this page’s manual context to help answer it.