1. Introduction
Thank you for choosing the Ikaufen Cordless Combi Hammer Impact Drill Driver. This versatile tool is designed for a wide range of drilling and driving applications in various materials, including wood, metal, plastic, and masonry. This manual provides essential information for the safe and efficient operation, setup, and maintenance of your new tool. Please read it thoroughly before use and keep it for future reference.
2. General Safety Instructions
Always follow basic safety precautions when using power tools to reduce the risk of fire, electric shock, and personal injury.
- Work Area Safety: Keep your work area clean and well-lit. Cluttered or dark areas invite accidents. Do not operate power tools in explosive atmospheres, such as in the presence of flammable liquids, gases, or dust.
- Electrical Safety: Avoid body contact with earthed or grounded surfaces such as pipes, radiators, ranges, and refrigerators. Do not expose power tools to rain or wet conditions.
- Personal Safety: Always wear eye protection. Use hearing protection when operating the tool for extended periods. Dress properly; avoid loose clothing or jewelry. Secure long hair.
- Tool Use and Care: Do not force the power tool. Use the correct power tool for your application. Disconnect the plug from the power source and/or the battery pack from the power tool before making any adjustments, changing accessories, or storing power tools.
- Battery Safety: Only use the charger specified by the manufacturer. Recharge only with the charger specified for the battery pack. Do not use damaged battery packs or tools.
3. Package Contents
Verify that all items listed below are included in your package. If any items are missing or damaged, please contact your retailer.

Figure 3.1: Complete Ikaufen Cordless Combi Hammer Impact Drill Driver kit, including the drill, two batteries, charger, and various accessories, neatly organized within its carrying case.
- 1x 21V Cordless Drill
- 2x Li-ion batteries (36VF, 1500mAh capacity)
- 1x US Charger
- 9 x Socket Wrench (5/6/7/8/9/10/11/12/13mm)
- 3 x Twist Drill Bits (4/5/6mm)
- 3 x Brad Point Drill Bits (4/5/6mm)
- 6 x Screwdriver Bit (PH2/PZ2/PZ1/5/6/T25)
- 1 x Hex Screwdriver Holder
- 1 x 360° Bending Outer Hex Extend Screwdriver Holder
- 1 x Small Hex Screwdriver Holder (With telescopic non-slip warhead)
- 2 x Plum + Flat Head Wrench
- 1x Suitcase

Figure 3.2: An organized display of all included accessories and the main drill unit, highlighting the comprehensive nature of the kit.
4. Product Overview
The Ikaufen Cordless Combi Hammer Impact Drill Driver is a robust and versatile tool designed for various tasks. It features a comfortable ergonomic handgrip, an LED worklight, and a 3/8-inch keyless chuck for easy bit changes.
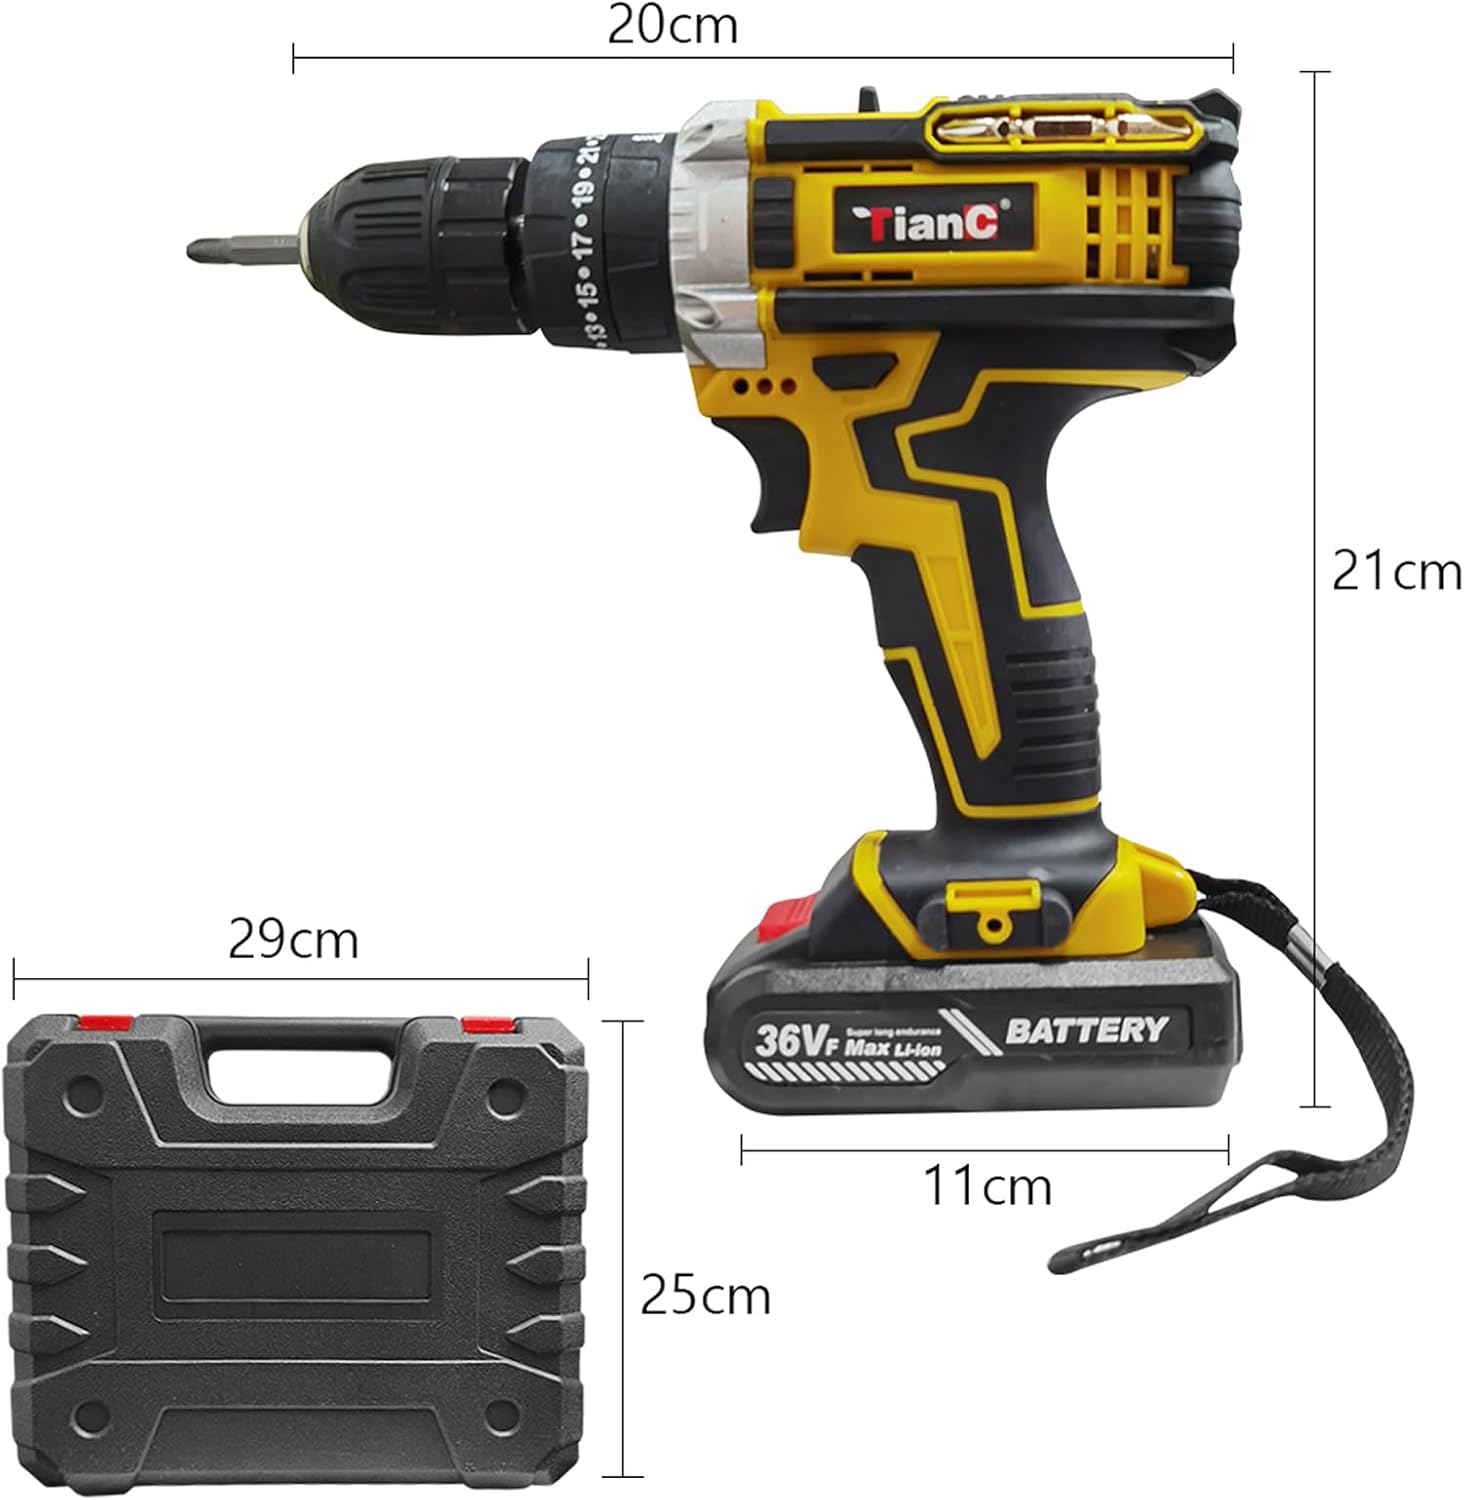
Figure 4.1: Dimensional view of the drill and its case, providing an understanding of the tool's physical size. The drill measures approximately 20cm in length and 21cm in height, while the case is 29cm long and 25cm high.

Figure 4.2: The drill unit displayed with its 25+1 torque setting ring and a visual representation of the speed control mechanism. Various drill bits and accessories are also shown.
5. Setup
5.1. Charging and Installing the Battery
- Ensure the battery is fully charged before first use. Connect the US Charger to a standard power outlet and then to the battery pack. The charging indicator will show the charging status.
- To install the battery, align the battery pack with the base of the drill handle and slide it in until it clicks securely into place.
- To remove the battery, press the release buttons on the sides of the battery pack and slide it out.
5.2. Installing Drill Bits and Accessories
The drill features a 3/8-inch keyless chuck for quick and easy bit changes.
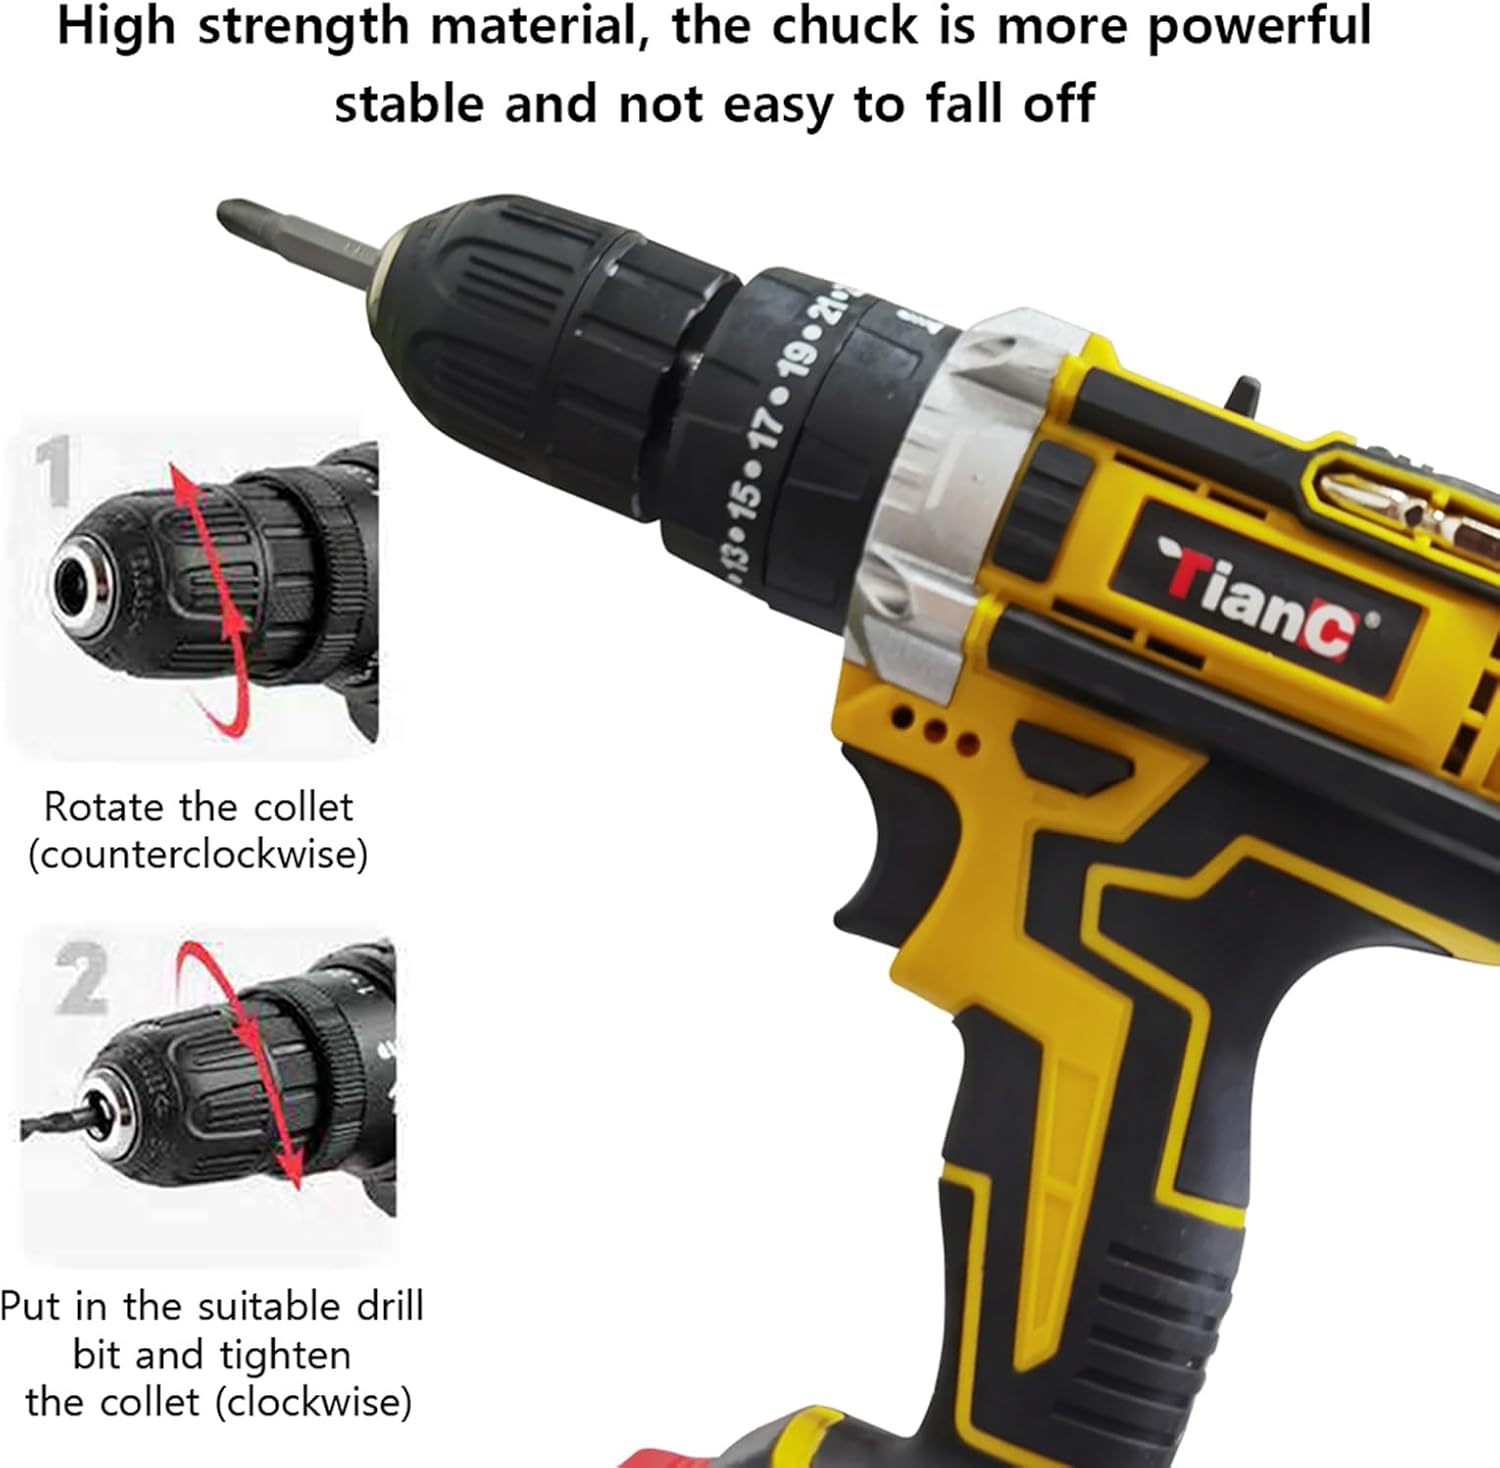
Figure 5.1: Visual guide for installing a drill bit. Step 1 shows rotating the collet counter-clockwise to open the chuck. Step 2 shows inserting the bit and rotating the collet clockwise to secure it firmly.
- Open the Chuck: Rotate the front part of the chuck (collet) counter-clockwise until the jaws are wide enough to accept the desired drill bit or accessory.
- Insert the Bit: Insert the shank of the drill bit fully into the chuck jaws.
- Tighten the Chuck: Rotate the collet clockwise until the bit is securely clamped. Ensure the bit is centered and tight to prevent slippage during operation.
6. Operating Instructions
6.1. Powering On/Off and Speed Control
The drill is activated by pressing the trigger switch. The speed is variable depending on the pressure applied to the trigger.

Figure 6.1: Speed control interface. The top bar indicates a gradual increase from slow to high speed. The vertical bar shows that applying more pressure to the trigger results in higher speed, while a separate switch allows selection between 'N' (High Speed) and 'Pressure' (Low Speed).
- Variable Speed Trigger: Press the trigger gently for low speed and increase pressure for higher speeds.
- 2-Speed Gear Selector: Use the gear selector switch (typically located on top of the drill) to choose between low speed (for high torque applications like driving screws) and high speed (for drilling).
- Forward/Reverse Lever: The lever above the trigger allows you to change the rotation direction for driving or removing screws. Position it to the left for forward rotation and to the right for reverse rotation. Center position locks the trigger.
- LED Worklight: The built-in LED worklight illuminates your work surface when the trigger is activated, improving visibility in dim conditions.
6.2. Torque Settings and Drilling Modes
The drill features a 25+1 position clutch for precise torque control and multiple operating modes.
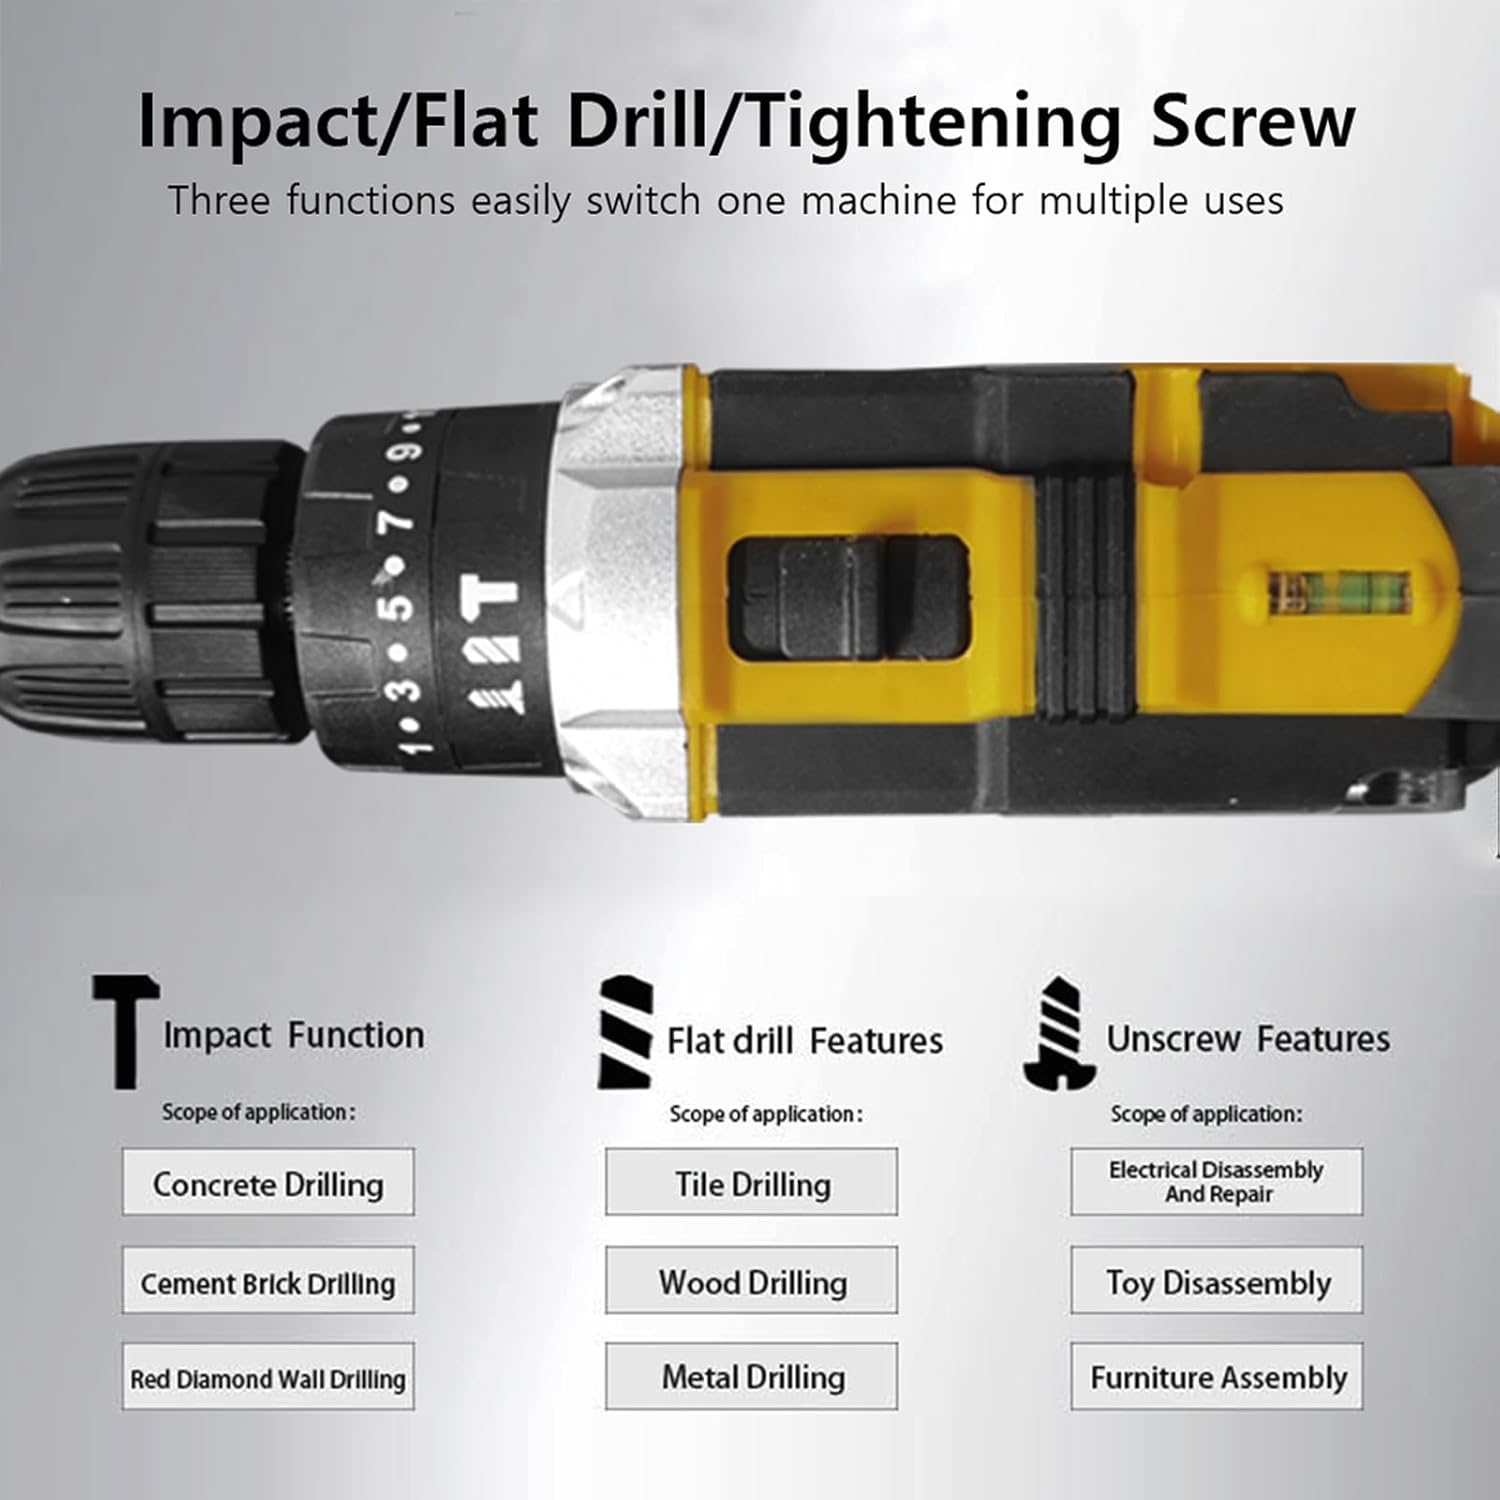
Figure 6.2: Overview of the drill's three primary functions: Impact, Flat Drill, and Unscrew, along with their respective applications.
- 25+1 Position Clutch: Rotate the torque adjustment ring (located behind the chuck) to select the desired torque setting. Lower numbers are for driving small screws, higher numbers for larger screws or harder materials. The '+' setting is for drilling. This prevents screws from stripping.
- Drilling Modes:
- Impact Function: Ideal for drilling into concrete, cement brick, and red diamond walls.
- Flat Drill Features: Suitable for drilling into tiles, wood, and metal.
- Unscrew Features: Perfect for electrical disassembly and repair, as well as furniture assembly.
6.3. Applications
The Ikaufen drill is designed for a variety of tasks, as illustrated below:

Figure 6.3: Visual representation of the drill's versatility across different materials and tasks, including drilling into concrete, metal, wood, planks, ceramics, and brick, as well as tightening screws.
- Drilling in Concrete/Brick: Use the impact function with appropriate masonry drill bits.
- Drilling in Metal/Wood/Plastic: Use the flat drill function with suitable drill bits for the material.
- Driving/Removing Screws: Use the unscrew function with the correct screwdriver bits and adjust the torque setting to prevent over-tightening or stripping.
7. Maintenance
Regular maintenance ensures the longevity and optimal performance of your drill.
- Cleaning: Keep the ventilation openings of the tool clean to prevent overheating. Use a soft, damp cloth to wipe down the tool. Do not use harsh chemicals or abrasive cleaners.
- Storage: Store the drill, batteries, and charger in a cool, dry place, away from direct sunlight and moisture. Use the provided carrying case for organized storage and protection.
- Battery Care: Store batteries in a partially charged state if not used for extended periods. Do not store fully discharged batteries.
- Inspection: Periodically inspect the power cord of the charger for damage. Check drill bits and accessories for wear and replace as needed.
8. Troubleshooting
This section addresses common issues you might encounter with your Ikaufen drill.
| Problem | Possible Cause | Solution |
|---|---|---|
| Drill does not start. | Battery is not charged or not properly installed. Trigger lock is engaged. | Charge the battery. Ensure the battery is securely clicked into place. Disengage the forward/reverse lever from the center (locked) position. |
| Reduced power or speed. | Battery charge is low. Incorrect speed setting. | Recharge the battery. Select the appropriate speed setting for the task. |
| Bit slips in chuck. | Chuck not tightened sufficiently. Bit shank is dirty or damaged. | Ensure the chuck is tightened firmly. Clean or replace the drill bit. |
| Overheating during use. | Continuous heavy use. Blocked ventilation slots. | Allow the tool to cool down. Clear any debris from the ventilation slots. |
9. Specifications
Technical details for the Ikaufen Cordless Combi Hammer Impact Drill Driver (model model001).
| Feature | Detail |
|---|---|
| Product Name | Impact Drill |
| Model | model001 |
| Color | Orange & Black (Tool body: Yellow) |
| Voltage | 36V (Battery voltage: 36VF) |
| Power Source | Battery Powered |
| Speed Gear | 2 |
| Clutch Setting | 25 + 1 |
| Chuck Size | 3/8" (10mm) |
| Motor Reverse | Available |
| Battery Capacity | 1500mAh (Li-ion) |
| Battery Quantity | 2 PCS |
| Maximum Torque | 38Nm (336.3 Inch Pounds) |
| Idle Speed | 0-1450rpm / 0-550rpm |
| Special Feature | LED Worklight |
| Product Dimensions | 7"L x 4"W x 7"H (approx. 20cm L x 11cm W x 21cm H) |
| Material | Metal |
10. Warranty and Support
For warranty information or technical support, please refer to the documentation provided with your purchase or contact Ikaufen customer service. Keep your purchase receipt as proof of purchase.
You can visit the official Ikaufen store on Amazon for more information: Ikaufen Store