1. Introduction
This manual provides essential information for the safe and efficient installation, operation, and maintenance of your Advance XI040C110V054BST2 LED Driver. Please read these instructions thoroughly before installation and retain this manual for future reference. Proper installation and adherence to these guidelines will ensure optimal performance and longevity of the product.
2. Product Overview
The Advance XI040C110V054BST2 is a 40-watt Xitanium LED driver designed for various lighting applications. It features programmability via SimpleSet technology, allowing for flexible output current settings. The driver supports a wide input voltage range and offers 0-10V dimming capabilities, enabling precise control over light output from 1% to 100%.
- Wattage: 40 Watt
- Output Current: Programmable from 100-1100mA (factory set to 1100mA)
- Input Voltage: 120-277V AC
- Output Voltage Range: 22.5-54V DC
- Dimming: 0-10V Dimmable (1%-100%)
3. Specifications
| Specification | Value |
|---|---|
| Brand | Advance |
| Model | XI040C110V054BST2 |
| Power Source | Corded Electric |
| Product Dimensions (D x W x H) | 14.17" x 1.18" x 1.06" |
| Mounting Type | Rail Mount |
| Current Rating | 1100 Milliamps (Max) |
| Input Voltage | 120-277V |
| Output Voltage | 22.5-54V |
| Specification Met | UL |
| UPC | 781087155226 |
4. Setup and Installation
Important Safety Information: Installation should only be performed by a qualified electrician in accordance with all national and local electrical codes. Disconnect power at the circuit breaker before installation or servicing. Ensure proper grounding.
4.1 Wiring Connections
The LED driver requires connections for AC input power, DC output to the LED load, and 0-10V dimming control. Refer to the wiring diagram provided with the product packaging for specific terminal assignments. Ensure all connections are secure and insulated.
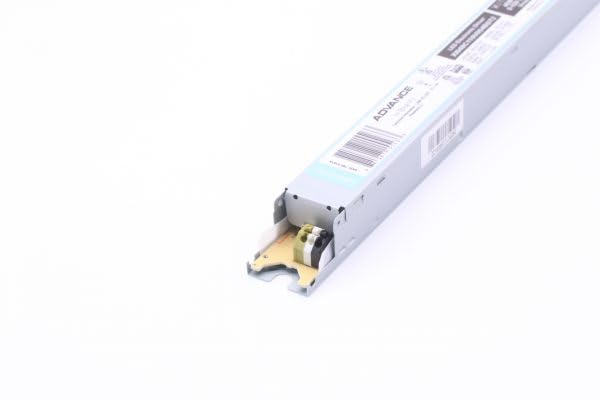
Figure 1: End view of the Advance XI040C110V054BST2 LED Driver, illustrating the input and output terminals for electrical connections. This image shows the physical layout of the connection points on one end of the driver.

Figure 2: Another perspective of the Advance XI040C110V054BST2 LED Driver's end, providing a clearer view of internal components and additional connection points. This image helps in identifying specific wiring locations.
4.2 Output Current Programming
The driver's output current is factory set to 1100mA. If a different output current (between 100mA and 1100mA) is required, the driver can be reprogrammed using Advance's SimpleSet technology. This typically involves a compatible programming device. Consult the SimpleSet documentation or a qualified technician for programming procedures.
5. Operating Instructions
Once properly installed and powered, the LED driver will supply constant current to the connected LED load. The primary operational control is through the 0-10V dimming interface.
5.1 0-10V Dimming
Connect a compatible 0-10V dimmer to the designated dimming control terminals on the driver. Applying a voltage between 0V and 10V to these terminals will adjust the LED output from 1% (at approximately 1V) to 100% (at 10V). A voltage below 1V may turn off the LEDs or dim them to their minimum level. Ensure the dimmer is compatible with 0-10V sinking or sourcing requirements as specified by the driver.
6. Maintenance
The Advance XI040C110V054BST2 LED Driver is designed for long-term, reliable operation with minimal maintenance. However, periodic inspection can help ensure continued performance.
- Cleaning: Ensure the driver's exterior is free from dust and debris to maintain proper heat dissipation. Use a dry, soft cloth for cleaning. Do not use liquid cleaners.
- Inspection: Periodically check all wiring connections for tightness and signs of wear or damage. Ensure the driver is securely mounted.
- Environment: Ensure the operating environment remains within the specified temperature and humidity ranges to prevent premature failure.
Always disconnect power before performing any maintenance or inspection.
7. Troubleshooting
If you encounter issues with your LED driver, refer to the following common troubleshooting steps:
- No Light Output:
- Verify that the AC input power is connected and active.
- Check all wiring connections (input, output, dimming) for proper contact and polarity.
- Ensure the LED load is compatible with the driver's output voltage and current.
- If using dimming, ensure the dimmer is set to maximum output (10V) to rule out dimming issues.
- Flickering or Unstable Light:
- Check for loose wiring connections.
- Verify the compatibility of the LED load and dimming control with the driver.
- Ensure the input voltage is stable and within the specified range.
- Dimming Issues:
- Confirm the 0-10V dimmer is correctly wired and functioning.
- Check the dimmer's output voltage range.
- Ensure the dimming wires are not shorted or open-circuited.
If problems persist after attempting these steps, contact a qualified electrician or Advance customer support for further assistance.
8. Warranty and Support
This Advance LED driver is manufactured to high-quality standards. For specific warranty terms and conditions, please refer to the documentation provided with your purchase or visit the official Advance website. For technical support, product inquiries, or warranty claims, please contact Advance customer service through their official channels.


