1. Introduction
This manual provides comprehensive instructions for the setup, operation, and maintenance of your XREXS Large Digital Wall Clock. This versatile clock features a 17.2-inch LED display, remote control, and multiple functions including a count up/down timer, adjustable brightness, alarm, and displays for day, date, and temperature. It is designed for clear visibility and ease of use in various environments such as homes, gyms, offices, and classrooms.

Image 1.1: The XREXS Large Digital Wall Clock with its remote control, showcasing the ice blue LED display.
2. Package Contents
Please verify that all items are present in the package:
- XREXS Large Digital Wall Clock (Ice Blue LED Display)
- Remote Control
- Power Adapter (6.56ft Power Cord)
- 2 x AAA Batteries (for backup, pre-installed or included)
- User Manual (this document)
3. Setup
3.1 Powering On
- Connect the power adapter to the DC input port on the back of the clock.
- Plug the power adapter into a standard electrical outlet. The clock display will illuminate.
- Ensure the 2 AAA batteries are correctly inserted into the battery compartment on the back of the clock. These batteries serve as a backup to preserve time and date settings during power outages, but the clock requires continuous AC power to operate the display.
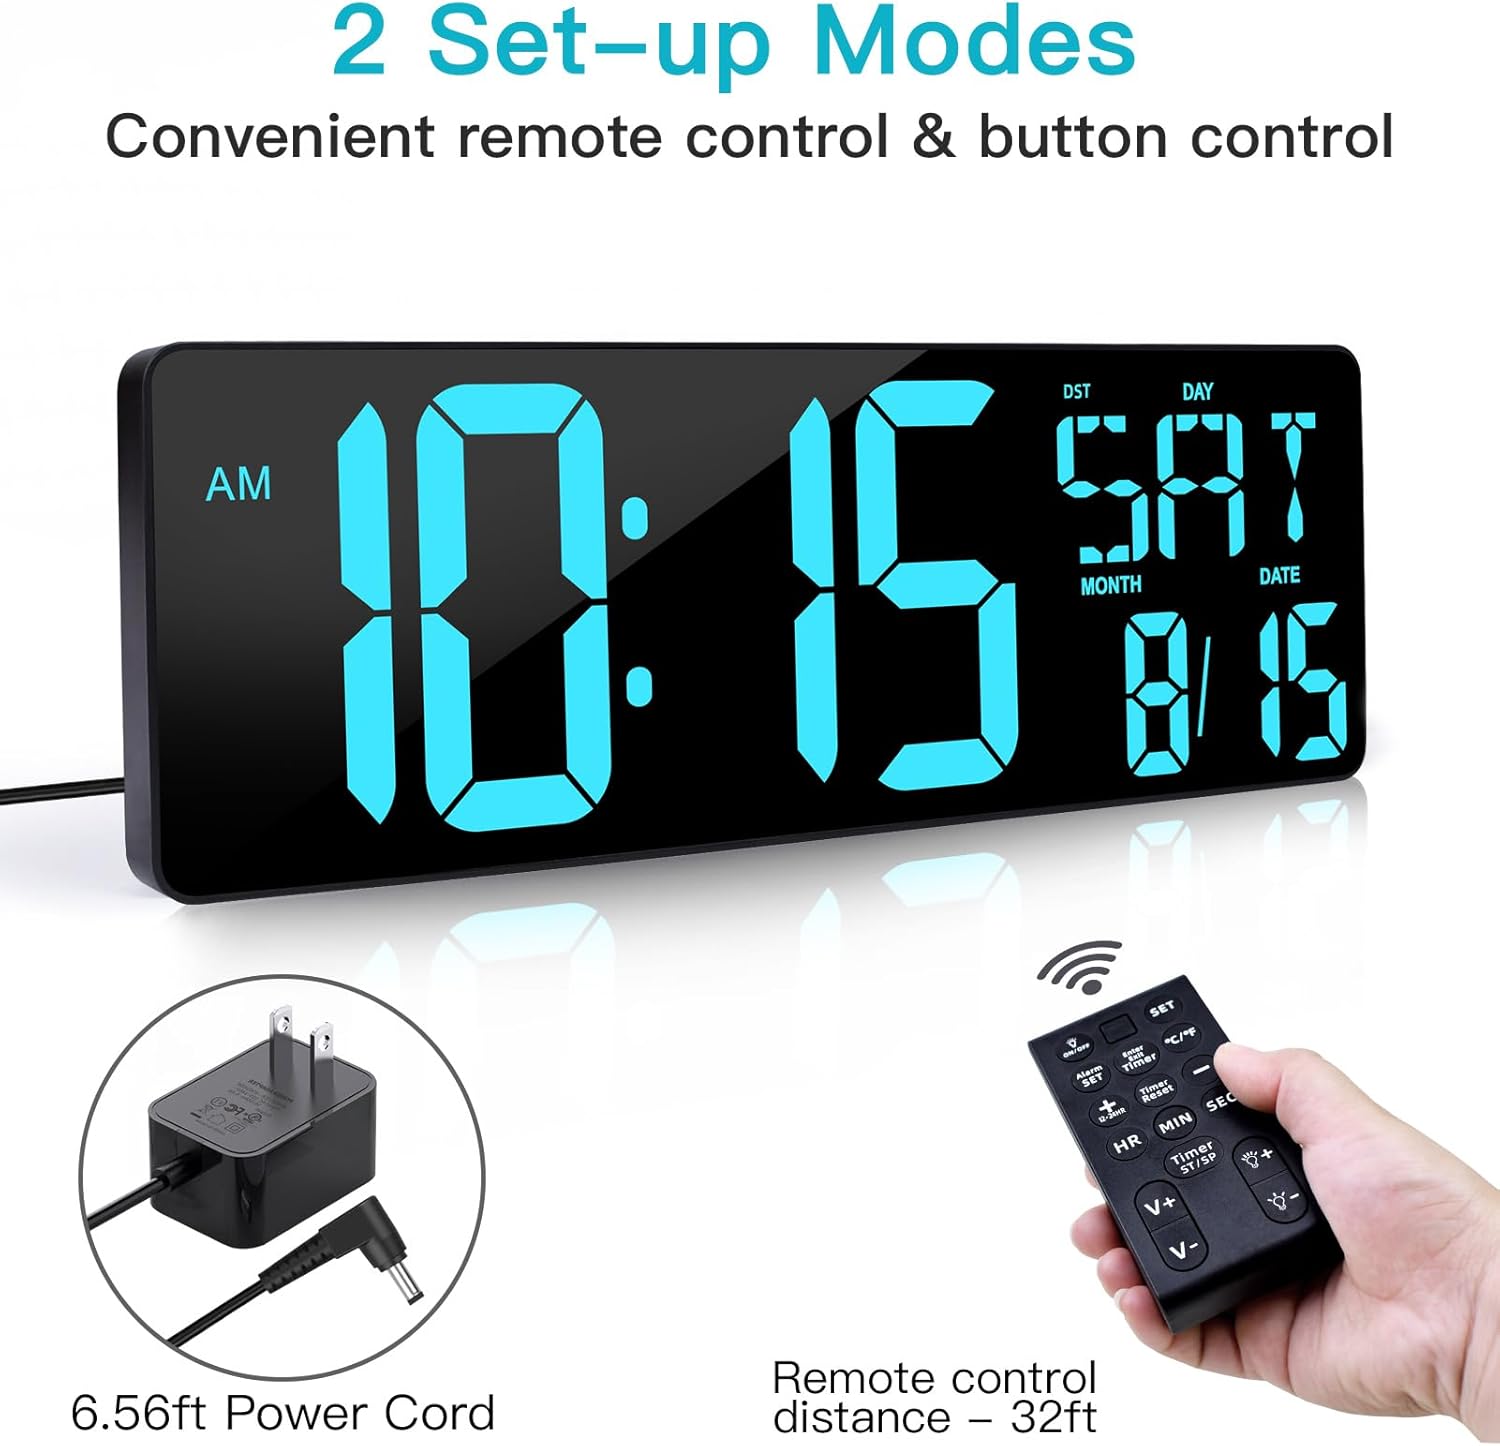
Image 3.1: The clock connected to its power adapter, with the remote control nearby. The power cord is approximately 6.56 feet long.

Image 3.2: Rear view of the clock, highlighting the battery backup compartment for 2 AAA batteries and the mounting holes.
3.2 Mounting and Placement
The clock offers two placement options:
- Wall Mounting: Use the two keyholes located on the back of the clock for easy wall installation. Ensure appropriate wall anchors and screws are used for secure mounting.
- Desk/Table Placement: Utilize the fold-out backstand for stable placement on any flat surface such as a desk, table, or shelf.
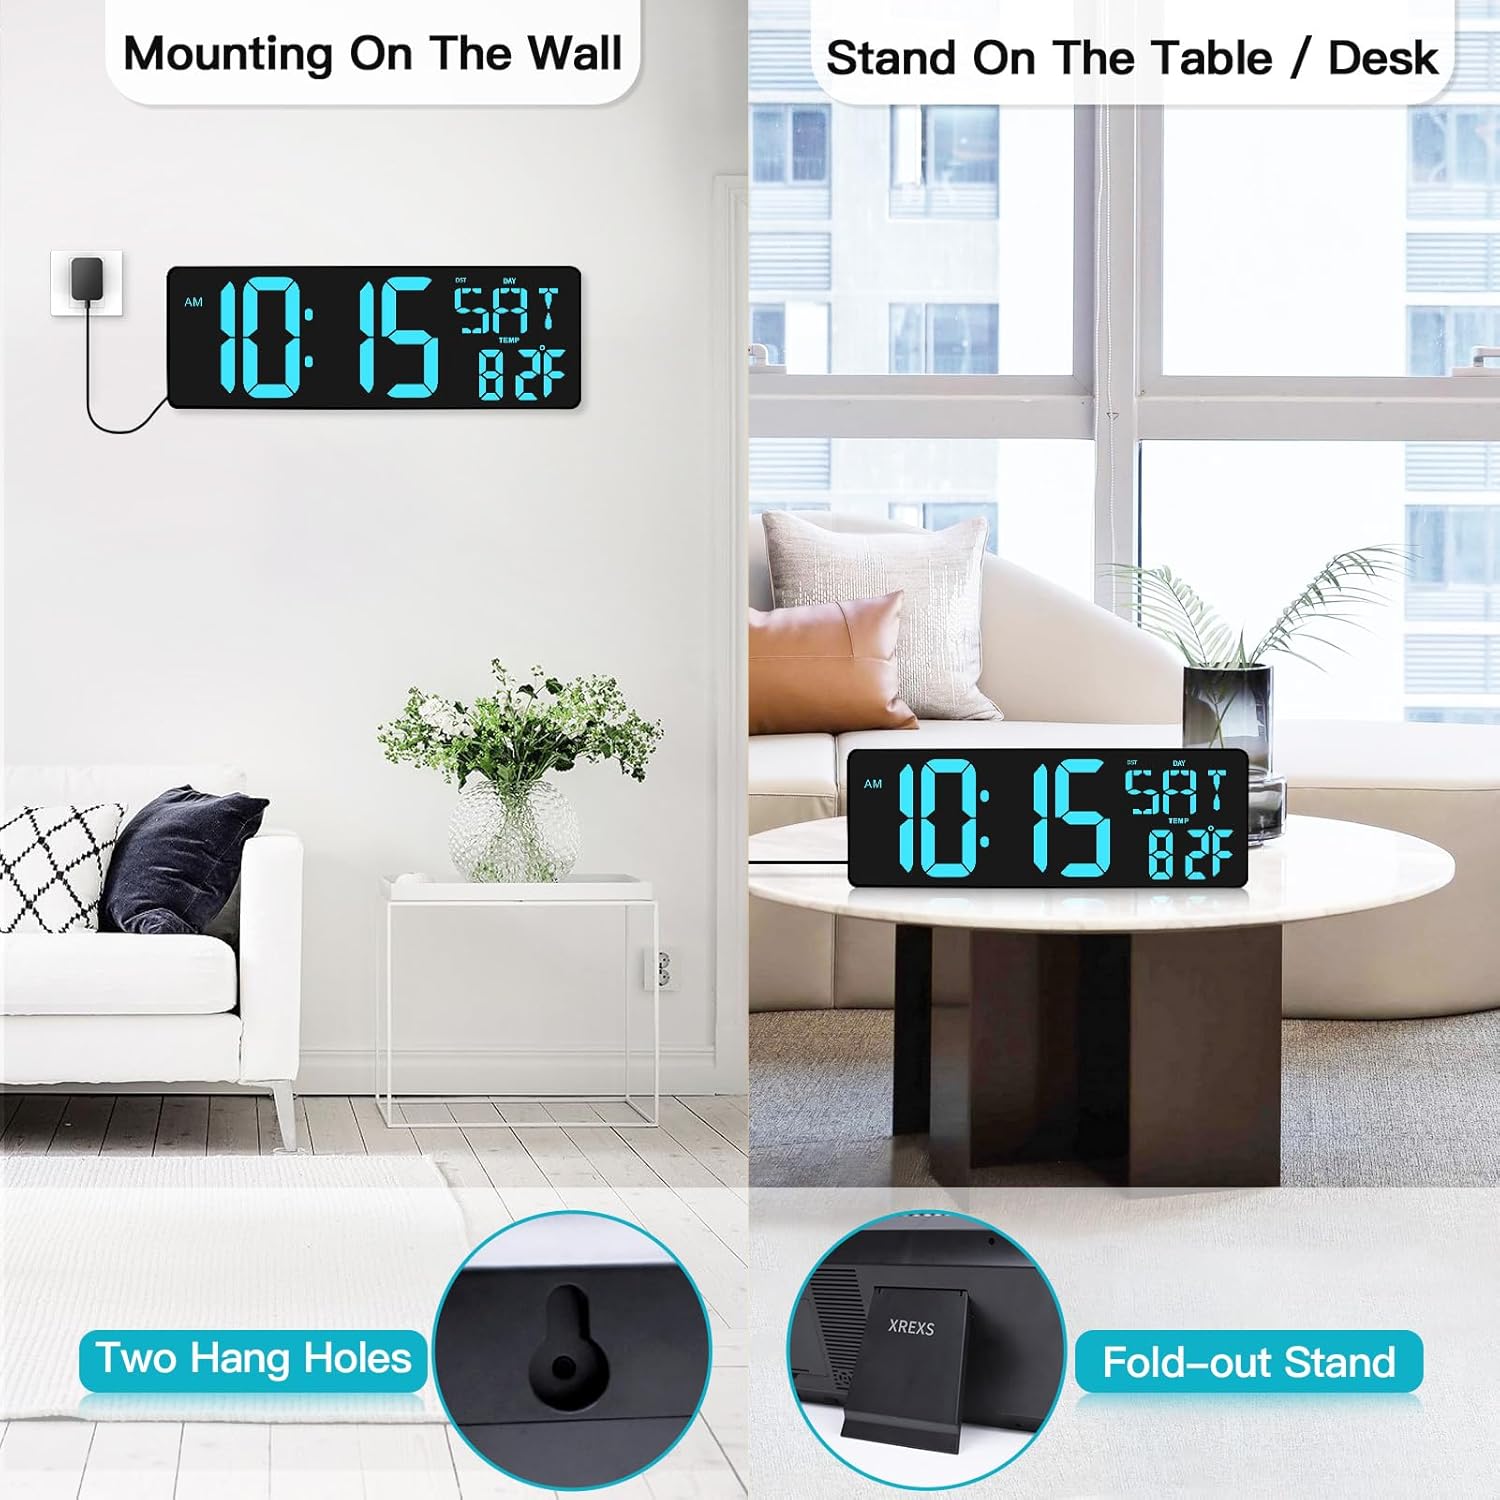
Image 3.3: Demonstrates the clock mounted on a wall and standing on a table, showing its versatility in placement.
4. Operating Instructions
The clock can be operated using either the buttons on the device or the included remote control. The remote control offers convenient operation from a distance of up to 32 feet.
4.1 Remote Control Overview

Image 4.1: Detailed diagram of the remote control, indicating the function of each button.
- ON/OFF: Turn the screen on or off.
- SET: Enter setting mode for Language/DST/Year/Month/Date/Time.
- °C/°F: Toggle between Celsius and Fahrenheit temperature display.
- ALARM SET: Set the alarm clock.
- Enter Timer: Enter or exit timer mode.
- +/-: Increase/decrease displayed value.
- 12/24HR: Toggle between 12-hour and 24-hour display formats.
- HR/MIN/SEC: Used to set hours, minutes, and seconds in timer mode.
- Timer Reset: Reset the timer.
- Timer ST/SP: Start or stop the timer.
- V+/V-: Sound adjustment (only for Hourly Chime function).
- Brightness Adjustment Buttons: Adjust display brightness.
4.2 Setting Time, Date, and Temperature
- Press the SET button on the remote control to enter setting mode.
- Use the +/- buttons to adjust the value for the current setting (e.g., year, month, date, hour, minute).
- Press SET again to move to the next setting.
- Repeat until all desired settings are configured. The clock will automatically exit setting mode after a period of inactivity or after cycling through all settings.
- To switch between Celsius (°C) and Fahrenheit (°F) for temperature display, press the °C/°F button on the remote.
- To switch between 12-hour and 24-hour time format, press the 12/24HR button.

Image 4.2: The clock display showing time, day, month, date, and temperature, highlighting the large digits and clear layout.

Image 4.3: Illustration of the clock display switching between 12-hour and 24-hour time formats.
4.3 Brightness Adjustment
The clock features both automatic and manual brightness adjustment:
- Auto-Dimming: The clock automatically adjusts its brightness based on ambient light conditions. This ensures optimal visibility during the day and a softer glow at night, preventing disturbance during sleep.
- Manual Adjustment: Use the dedicated brightness adjustment buttons on the remote control to cycle through 4 levels of brightness (Lv.1 to Lv.4) or to turn the display completely off. This allows you to set a comfortable brightness level according to your preference.

Image 4.4: Visual representation of the four adjustable brightness levels and the auto-dimming feature.
4.4 Alarm Settings
The clock includes an alarm function with multiple modes:
- Press the ALARM SET button on the remote control.
- Use the +/- buttons to set the desired alarm time (hour and minute).
- Press ALARM SET again to confirm the time and proceed to select the alarm mode (Every Day, Working Day, Weekend).
- Press ALARM SET one more time to activate the alarm.
- When the alarm sounds, press any button to snooze or turn off the alarm.

Image 4.5: The clock's alarm function offers settings for Every Day, Working Day, and Weekend alarms.
4.5 Timer Functions (Count Up/Down)
The clock features both count-up and count-down timer capabilities:
- Entering Timer Mode: Press the Enter Timer button on the remote. The display will show "0:00 00".
- Setting Countdown Timer:
- While in timer mode, use the HR, MIN, and SEC buttons to set the desired countdown duration (0-29 hours, 59 minutes, 59 seconds).
- Press Timer ST/SP to start the countdown.
- When the countdown ends, the clock will emit a "DIDI" ringing sound for 90 seconds.
- Press Timer Reset to clear the timer. The timer has a memory function and will remember the last setting if not turned off.
- Count-Up Timer:
- While in timer mode, ensure the display is at "0:00 00".
- Press Timer ST/SP to start the count-up timer.
- Press Timer ST/SP again to pause/resume.
- Press Timer Reset to reset the count-up timer to zero.

Image 4.6: The clock displaying its three primary modes: Timer, Clock, and Alarm Clock.
5. Maintenance
- Cleaning: To clean the clock, gently wipe the display and casing with a soft, dry, or slightly damp cloth. Avoid using abrasive cleaners, solvents, or spray cleaners directly on the clock, as they may damage the finish or internal components.
- Battery Replacement: The 2 AAA batteries are for backup only. Replace them periodically (e.g., once a year) to ensure time and date retention during power interruptions.
- Storage: If storing the clock for an extended period, disconnect it from power and remove the backup batteries to prevent leakage. Store in a cool, dry place.
6. Troubleshooting
| Problem | Possible Cause | Solution |
|---|---|---|
| Clock display is off. | No power, power adapter disconnected, or display turned off by remote. | Ensure power adapter is securely plugged into the clock and wall outlet. Press the ON/OFF button on the remote control. |
| Remote control not working. | Remote batteries are dead or incorrectly inserted; remote is too far from the clock. | Replace remote batteries. Ensure line of sight and operate within 32 feet. |
| Time/Date is incorrect after power outage. | Backup batteries are dead or not installed. | Replace the 2 AAA backup batteries. Reset time and date manually. |
| Alarm does not sound. | Alarm not set or volume too low. | Verify alarm settings and ensure it is activated. Check sound adjustment (V+/V-) if applicable for hourly chime. |
| Display is too bright/dim. | Brightness setting needs adjustment. | Use the brightness adjustment buttons on the remote to select a comfortable level or enable auto-dimming. |
7. Specifications
| Feature | Detail |
|---|---|
| Brand | XREXS |
| Model Number | Large Digital Wall Clock Ice blue |
| Display Type | Digital LED |
| Display Color | Ice Blue |
| Product Dimensions | 16.5"W x 5.7"H |
| Power Source | Corded Electric |
| Special Features | Adjustable Brightness, Alarm, Large Display, Snooze, Count Up/Down Timer, Day/Date/Temperature Display |
| Frame Material | Acrylonitrile Butadiene Styrene |
| Backup Batteries | 2 x AAA (Included) |
| Mounting Type | Wall Mount, Desk Placement |
| Remote Control Range | Up to 32 feet (approx. 10 meters) |
8. Warranty Information
XREXS products are manufactured to high quality standards. For specific warranty details regarding your Large Digital Wall Clock, please refer to the warranty card included in your product packaging or visit the official XREXS website. Typically, products are covered against defects in materials and workmanship for a specified period from the date of purchase.
Please retain your purchase receipt as proof of purchase for any warranty claims.
9. Customer Support
If you encounter any issues or have questions regarding your XREXS Large Digital Wall Clock that are not covered in this manual, please contact XREXS customer support for assistance.
- Online Support: Visit the official XREXS website for FAQs, support resources, and contact forms.
- Email Support: Refer to your product packaging or the XREXS website for the customer service email address.
When contacting support, please have your product model number (Large Digital Wall Clock Ice blue) and purchase information ready.


