Introduction
Thank you for choosing the vidaXL Galvanized Steel Chicken Cage. This durable and versatile enclosure is designed to provide a secure and comfortable habitat for chickens, hens, and other small animals. Featuring a weather-resistant roof, a lockable door for easy access, and a robust galvanized steel construction, this cage offers excellent ventilation and protection from the elements. Please read this manual carefully before assembly and use to ensure proper installation and safe operation.

Image 1: The vidaXL Galvanized Steel Chicken Cage, showcasing its overall structure and anthracite color.
Safety Information
Always prioritize safety during assembly and use. Failure to follow these instructions may result in injury or damage to the product.
- Read all instructions thoroughly before beginning assembly.
- Wear appropriate personal protective equipment, including work gloves, to protect hands from sharp edges, especially when handling mesh panels.
- Ensure all components are present and undamaged before assembly. Do not use damaged parts.
- Assemble the cage on a flat, stable surface.
- Keep children and pets away from the assembly area.
- Securely fasten all screws, bolts, and connections. Periodically check for loose fasteners.
- Do not overload the cage or allow animals to climb on the roof.
- Ensure the cage is placed in a location that provides adequate drainage and protection from extreme weather.
Package Contents
Please verify that all components listed below are included in your package. If any parts are missing or damaged, contact vidaXL customer support.
- Galvanized Steel Frame Sections (various lengths and shapes)
- Wire Mesh Panels (may require cutting/trimming)
- Roof Panels
- Door Assembly (frame and mesh)
- Lockable Latch Mechanism
- Hardware Kit (screws, bolts, nuts, washers, clips/ties for mesh)
- Assembly Instructions (this manual)
Setup & Assembly
Assembly typically requires two people and can take approximately 2-3 hours. Some steps, particularly mesh installation, may be challenging. Refer to the dimension diagram for clarity.
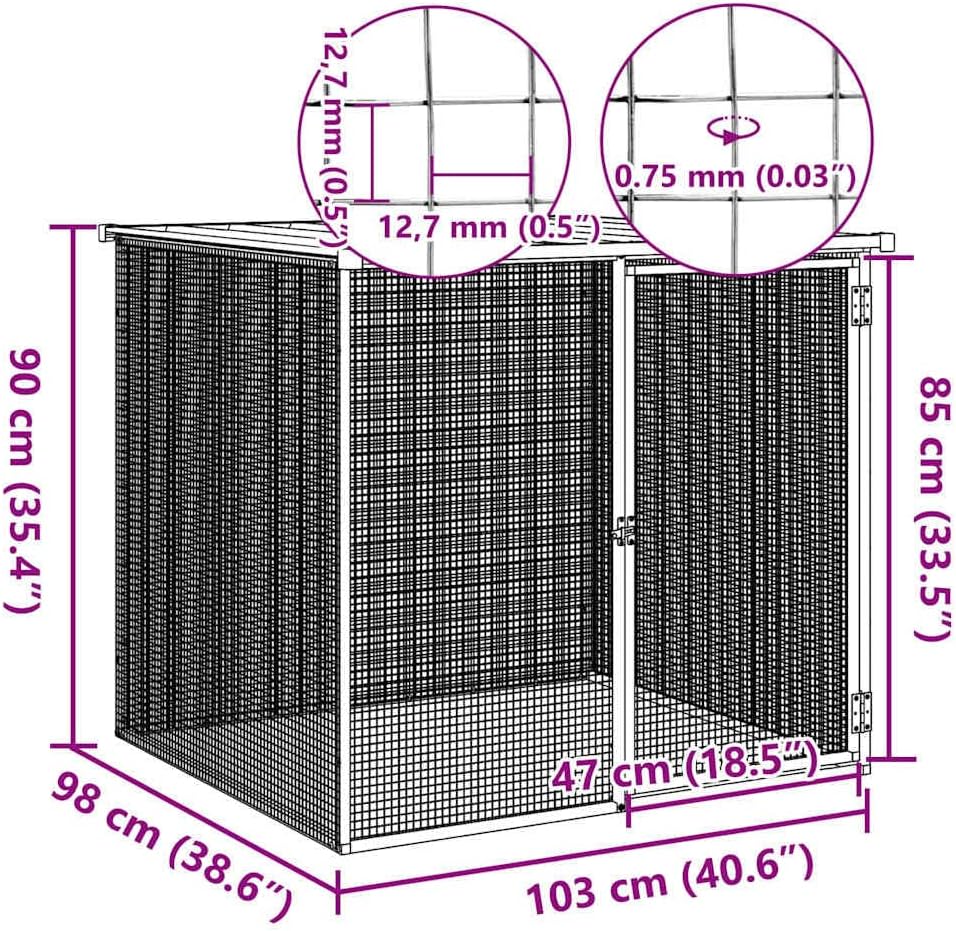
Image 2: Detailed dimension diagram of the chicken cage, indicating length, width, and height measurements.
- Unpack and Identify Parts: Carefully remove all components from the packaging. Lay them out and identify each part using the provided parts list (if applicable) or by matching them to the diagrams. Note that some frame pieces may be numbered.
- Assemble the Base Frame: Connect the bottom horizontal frame sections to form the rectangular base of the cage. Use the appropriate screws and bolts from the hardware kit. Do not fully tighten fasteners until the entire frame is assembled.
- Attach Vertical and Top Frame Sections: Insert the vertical support posts into the corners of the base frame. Then, connect the top horizontal frame sections to the vertical posts, forming the main skeletal structure of the cage.
- Install Mesh Panels: This step requires careful attention. The wire mesh panels may need to be cut to size to fit each section of the frame. Using wire cutters, trim the mesh to the exact dimensions of each side, back, and top section. Secure the mesh to the inside of the frame using the provided clips or wire ties. Ensure the mesh is taut and securely fastened to prevent gaps. Wear protective gloves during this step as wire edges can be sharp.
- Assemble and Attach the Door: Assemble the door frame and attach the mesh panel to it. Once the door is assembled, attach it to the designated opening in the main cage frame using the provided hinges. Ensure the door swings freely.
- Install the Lockable Latch: Mount the lockable latch mechanism onto the door and the adjacent frame post, ensuring it aligns properly and allows the door to be securely closed and locked.
- Install Roof Panels: Place the roof panels onto the top frame of the cage. Secure them using the designated fasteners. Ensure the roof is properly aligned to provide maximum weather protection.
- Final Tightening and Inspection: Once all components are in place, go back and fully tighten all screws, bolts, and fasteners. Inspect the entire cage for stability, ensuring there are no loose parts or sharp edges. Check that the door opens and closes smoothly and latches securely.

Image 3: The assembled chicken cage positioned in an outdoor garden environment.
Operating Instructions
Using your vidaXL chicken cage is straightforward once assembled.
- Door Operation: To open the door, disengage the lockable latch and pull the door outwards. To close, push the door shut and engage the latch securely. Always ensure the door is latched when animals are inside.
- Placement: Position the cage on a level, well-drained surface. Consider placing it in an area that offers some natural shade or additional protection from harsh weather conditions.
- Animal Introduction: Introduce animals to the cage gradually. Ensure they have access to food, water, and any necessary bedding or shelter within the enclosure.
Maintenance
Regular maintenance will extend the lifespan of your chicken cage and ensure a safe environment for your animals.
- Cleaning: Periodically clean the cage to remove animal waste and debris. Use a mild detergent and water, then rinse thoroughly. Ensure the cage is dry before reintroducing animals.
- Inspection: Regularly inspect the frame, mesh, door, and roof for any signs of wear, damage, or rust. Check all fasteners for tightness and re-tighten if necessary.
- Rust Prevention: Although made of galvanized steel, prolonged exposure to moisture or harsh conditions can lead to rust. Address any rust spots promptly with appropriate rust-inhibiting paint or treatment.
- Roof Condition: Ensure the roof remains free of debris (leaves, snow) to maintain its weather-resistant properties and prevent structural strain.
Troubleshooting
Here are some common issues and their potential solutions:
| Problem | Possible Cause | Solution |
|---|---|---|
| Door does not close or latch properly. | Misalignment of hinges or latch; loose fasteners. | Check and adjust hinge alignment. Tighten all door and latch fasteners. |
| Cage feels wobbly or unstable. | Fasteners not fully tightened; uneven ground. | Ensure all frame fasteners are securely tightened. Move the cage to a level surface or use shims to stabilize. |
| Mesh panels are loose or have gaps. | Insufficient clips/ties; improper trimming. | Add more clips or wire ties to secure the mesh. If gaps are large, consider reinforcing with additional mesh or wire. |
| Water pooling on the roof. | Roof panels not properly angled or installed. | Re-check roof panel installation and ensure they are angled correctly for water runoff. Clear any debris from the roof. |
Specifications
| Feature | Detail |
|---|---|
| Model Name | Chicken Cage Anthracite Galvanized Steel Medium Durable vidaXL |
| Model Number | 172337 |
| Dimensions (L x W x H) | 40.6"L x 38.6"W x 35.4"H (103 x 98 x 90 cm) |
| Material | Galvanized Steel |
| Color | Anthracite |
| Item Weight | 20.8 pounds (9.45 Kilograms) |
| Mesh Gap Size | 11 Millimeters |
| Specific Uses | Outdoor, for Chickens, Hens, Small Animals |
Warranty & Support
All products sold by vidaXL are covered by at least a 2-year legal guarantee, ensuring your peace of mind regarding manufacturing defects and material quality.
For technical assistance, missing parts, or warranty claims, please contact vidaXL customer support through their official website or the retailer where the product was purchased. Please have your model number (172337) and proof of purchase ready when contacting support.


