SUNER POWER BC-50W-M PRO
SUNER POWER 12V 50W Solar Battery Charger Maintainer User Manual
Model: BC-50W-M PRO
1. Introduction
This manual provides essential information for the safe and efficient operation of your SUNER POWER 12V 50W Solar Battery Charger Maintainer. Please read these instructions carefully before installation and use. This device is designed to charge and maintain 12-volt batteries using solar power, featuring an Ultra-Smart MPPT controller for optimized performance.
2. Package Contents
Verify that all components are present in the package:
- 1 x 50W Solar Panel with Built-in UltraSmart MPPT Charge Controller
- 1 x Adjustable Mounting Brackets
- 1 x SAE-Alligator Clip Cable
- 1 x SAE-Battery Eyelet Cable
3. Safety Information
Always observe the following safety precautions to prevent injury or damage to the product:
- Do not attempt to disassemble or modify the solar panel or controller.
- Ensure proper polarity when connecting to a battery. Reverse polarity can cause damage.
- Keep the solar panel clean and free from obstructions to ensure optimal performance.
- Avoid direct contact with the solar panel's electrical components.
- The product is waterproof (IP65 rated), but avoid submerging it in water.

Figure 3.1: MPPT Charge Controller Safety Protections. The controller provides comprehensive protection against common electrical faults.
4. Setup and Installation
4.1 Mounting the Solar Panel
The adjustable mounting brackets allow for flexible installation on various surfaces, such as walls or on the ground. For optimal performance, position the panel to receive maximum direct sunlight throughout the day.
- Attach the adjustable mounting brackets to the solar panel using the provided hardware.
- Secure the brackets to your desired surface (wall or ground) ensuring stability.
- Adjust the angle of the solar panel to optimize sun exposure. Angles between 0-60 degrees are typically supported.
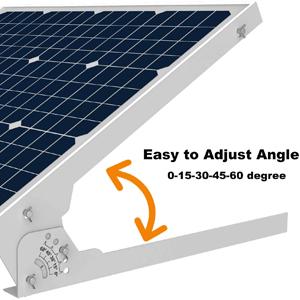

Figure 4.1: Adjustable Mounting Bracket and Wall Installation. The bracket allows for angle adjustment to maximize solar gain.
4.2 Connecting to the Battery
The solar charger is compatible with various 12V battery types. Ensure the battery is clean and terminals are free of corrosion before connecting.
- Connect the appropriate cable (SAE-Alligator Clip or SAE-Battery Eyelet) to the battery terminals. Ensure correct polarity: red to positive (+), black to negative (-).
- Connect the SAE connector from the cable to the SAE connector on the solar panel's MPPT charge controller.
- The MPPT controller will automatically detect the battery and begin the charging process.

Figure 4.2: Battery Compatibility. The charger supports multiple 12V battery chemistries.
5. Operation
5.1 MPPT Charge Controller
The built-in Ultra-Smart MPPT controller optimizes solar power conversion, achieving up to 99% tracking efficiency and 98% peak conversion efficiency. This ensures your battery charges effectively and quickly.

Figure 5.1: MPPT Charge Controller. The controller manages the charging process for optimal battery health.
5.2 Charging Modes
The controller features three selectable charging modes for different 12V battery types:
- 12V: Standard mode for most lead-acid batteries (Flooded, SLA, VRLA).
- 12V AGM: Optimized for Absorbed Glass Mat (AGM) batteries.
- 12V Lithium: Specifically for LiFePO4 lithium batteries.
Press the "MODE" button on the controller to cycle through these options. The selected mode will be indicated by an LED.
5.3 3-Stage Charging Process
The charger utilizes an improved 3-stage charging algorithm to ensure effective and safe battery charging, extending battery life:
- Bulk: Rapidly charges the battery to approximately 80% capacity.
- Absorption: Charges the battery to 100% at a slower rate to prevent overcharging.
- Float: Maintains the battery at full charge, providing a trickle charge as needed. The charger automatically stops when full and resumes if discharge occurs.
5.4 Visual Charging Level Indicators
The controller provides visual feedback on the battery's charge level:
- 25% Charged: Solid Green LED
- 50% Charged: Solid Green LED
- 75% Charged: Solid Green LED
- 100% Fully Charged: All Green LEDs solid
- Maintenance: Slow pulsing Green LED indicates the battery is being maintained.

Figure 5.2: Charge Level Indicators. Monitor your battery's status at a glance.
6. Maintenance
- Cleaning: Regularly clean the solar panel surface with a soft, damp cloth to remove dust, dirt, or debris that may reduce efficiency. Do not use abrasive cleaners.
- Connections: Periodically check all electrical connections to ensure they are secure and free from corrosion.
- Inspection: Inspect the panel and cables for any signs of physical damage.

Figure 6.1: Waterproof Design. The IP65 rating ensures durability against environmental elements.
7. Troubleshooting
| Problem | Possible Cause | Solution |
|---|---|---|
| No charging indication |
|
|
| Slow charging |
|
|
| Controller LEDs not working |
|
|
8. Specifications
| Feature | Detail |
|---|---|
| Model | BC-50W-M PRO |
| Maximum Power | 50 Watts |
| Maximum Voltage | 12 Volts (DC) |
| MPPT Tracking Efficiency | Up to 99% |
| Peak Conversion Efficiency | 98% |
| Charging Stages | 3-Stage (Bulk, Absorption, Float) |
| Supported Battery Types | 12V Flooded, GEL, AGM, SLA, VRLA, LiFePO4 |
| Material | A+ Grade Solar Cell, Aluminum Frame, Tempered Glass |
| Product Dimensions | 22.8"L x 19.3"W x 1"H |
| Item Weight | 5.67 Kilograms (12.47 pounds) |
| Waterproof Rating | IP65 |
| Upper Temperature Rating | 65 Degrees Celsius |

Figure 8.1: Solar Panel Construction. High-quality materials ensure durability and performance.
9. Video Guide
Watch the official product video for a visual guide on setup and features:
Video 9.1: SUNER POWER 50W 12V Solar Panel Battery Charger. This video demonstrates the product's features, installation, and operation.
10. Warranty and Support
For warranty information or technical support, please refer to the contact details provided with your purchase or visit the official SUNER POWER website. Keep your purchase receipt for warranty claims.
Online Support: Visit the SUNER POWER Store on Amazon