1. Introduction
This manual provides essential instructions for the safe and efficient operation of your Heat Press Nation Signature Series 15" x 15" Auto-Open Heat Press. Please read this manual thoroughly before initial use and retain it for future reference. Proper understanding of these instructions will ensure optimal performance and longevity of your heat press.
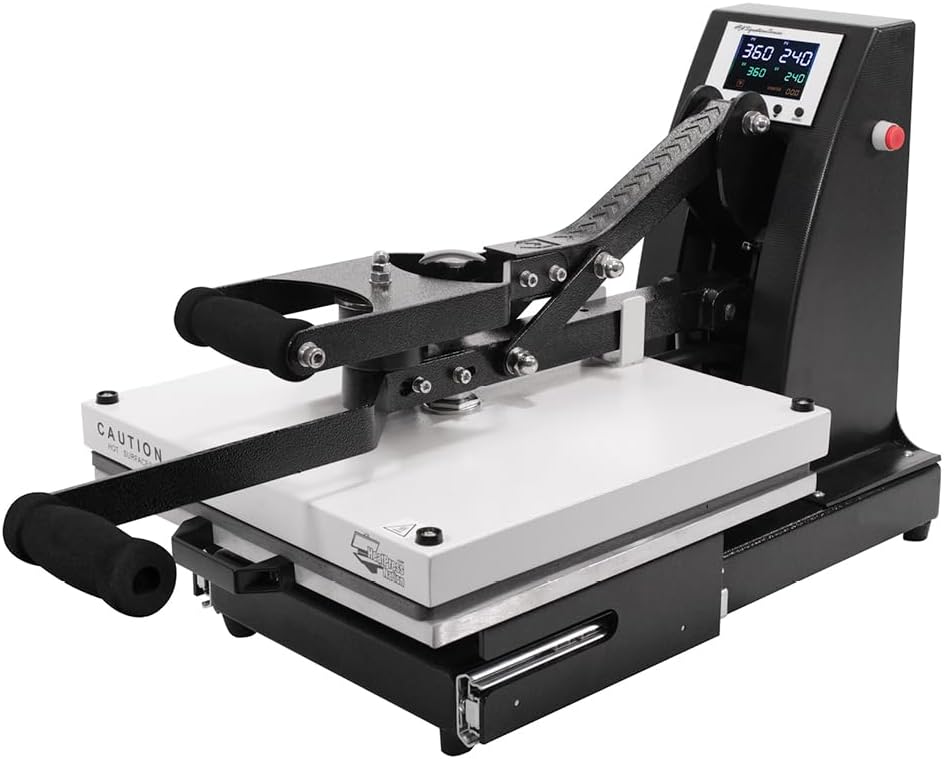
Figure 1.1: Heat Press Nation Signature Series 15" x 15" Auto-Open Heat Press.
2. Safety Information
WARNING: Failure to follow these safety instructions may result in electric shock, fire, or serious injury.
- Always operate the heat press on a stable, heat-resistant surface.
- Keep hands and fingers clear of the heating platen and moving parts during operation to prevent burns or pinching. The heating platen reaches high temperatures.
- Ensure the power cord is properly grounded and connected to an appropriate electrical outlet. Do not use extension cords unless absolutely necessary and ensure they are rated for the appliance's power requirements.
- Do not immerse the heat press in water or other liquids.
- Unplug the heat press from the power outlet when not in use, before cleaning, or before performing any maintenance.
- Do not operate the heat press if the power cord or plug is damaged, or if the machine has been dropped or damaged in any way. Contact customer support for assistance.
- Keep children and pets away from the heat press during operation and when cooling down.
- Ensure adequate ventilation in the work area to dissipate any fumes from heat transfer materials.

Figure 2.1: The heat press utilizes UL-certified components for enhanced safety and quality.
3. Product Overview and Features
The Heat Press Nation Signature Series 15" x 15" Auto-Open Heat Press is designed for efficient and consistent heat transfer applications. Key features include:
- Drawer Style Lower Platen: Facilitates easy loading and unloading of garments, keeping hands away from the heat.
- Gas Shock Opening Mechanism: Provides a smooth and controlled auto-open function after the set time expires.
- Upgraded Time/Temperature Gauge: Digital display for precise control over heat and duration.
- Magnetic Auto-Open Release: Automatically opens the press when the timer completes, preventing over-pressing.
- Dual Circuit Breakers: Offers enhanced electrical safety and protection.
- Floating Platen: Ensures even pressure distribution across the entire pressing area.
- Steel and Aluminum Construction: Provides durability and stability for maximum pressure applications.
- Secondary Leverage Handle: Assists in closing the press with less effort.

Figure 3.1: The convenient slide-out drawer allows for safe and easy placement of materials.

Figure 3.2: Icon representing the slide-out drawer feature.
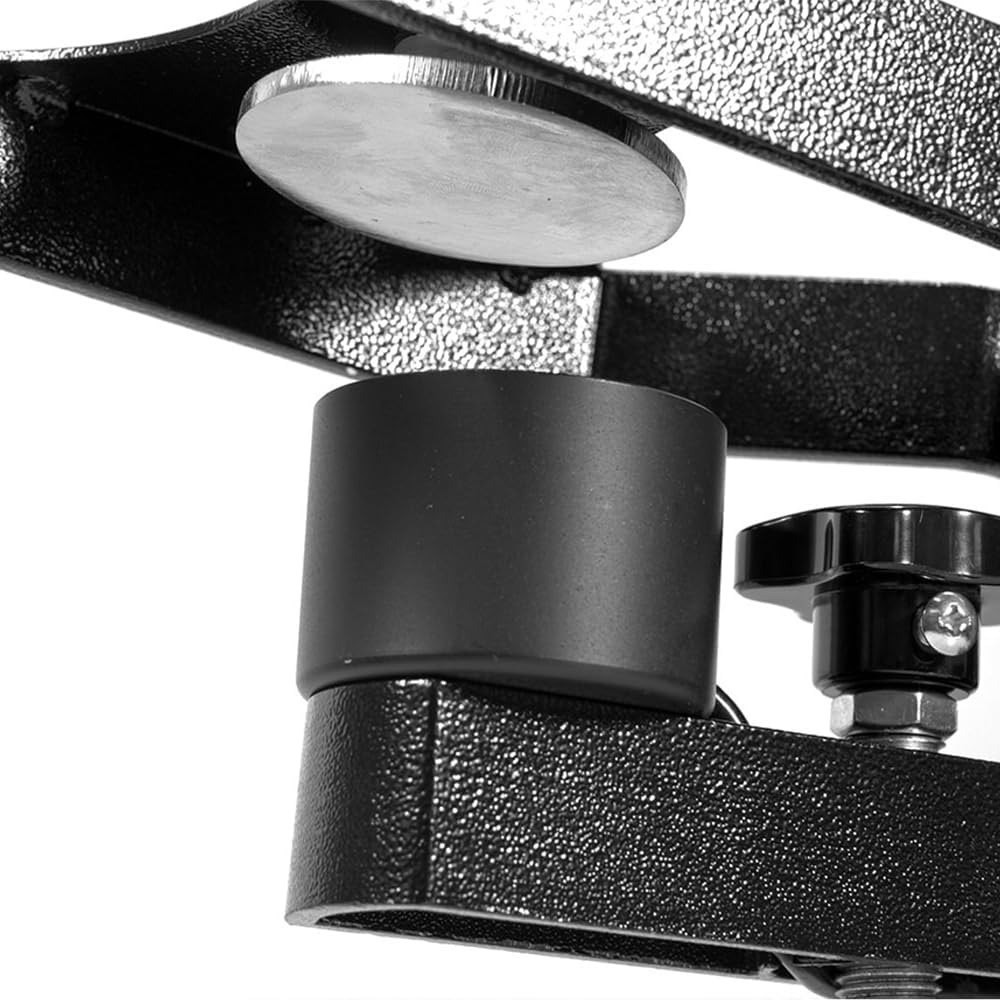
Figure 3.3: Close-up of the magnetic auto-open mechanism, ensuring precise timing.

Figure 3.4: Icon representing the magnetic auto-open feature.

Figure 3.5: The gas shock ensures a smooth and controlled opening of the heat press.

Figure 3.6: Icon representing the gas shock mechanism.

Figure 3.7: The digital control panel for setting precise time and temperature.

Figure 3.8: Rear view showing the dual circuit breakers for electrical protection.
4. Setup
- Unpacking: Carefully remove the heat press from its packaging. Inspect for any shipping damage. Report any damage to the carrier and seller immediately.
- Placement: Place the heat press on a sturdy, level, and heat-resistant workbench or table. Ensure there is adequate space around the machine for ventilation and safe operation.
- Power Connection: Connect the power cord to a grounded electrical outlet that matches the voltage requirements of the machine (typically 120V for US models). Ensure the power switch is in the OFF position before plugging in.
- Initial Power On: Flip the power switch to the ON position. The digital display should illuminate.
5. Operating Instructions
5.1 Setting Temperature and Time
- Power On: Turn on the heat press using the red power switch located at the rear of the machine.
- Set Temperature: Refer to the instructions provided with your heat transfer material for recommended temperature settings. Use the digital control panel to adjust the temperature. Typically, there are buttons (e.g., 'SET', arrow keys) to navigate and change the desired temperature (SV - Set Value). The PV (Process Value) displays the current temperature.
- Set Time: Similarly, adjust the desired pressing time using the control panel. The display will show the set time.
- Preheating: Allow the heat press to preheat until the PV (current temperature) reaches the SV (set temperature). This may take several minutes.
5.2 Adjusting Pressure
The pressure is adjusted by turning the pressure adjustment knob located on top of the heating platen. Turn clockwise for more pressure, counter-clockwise for less. Test the pressure by closing the press on a blank garment; it should require moderate effort to close and hold firmly.
5.3 Heat Transfer Process
- Prepare Garment: Pull out the lower drawer platen. Place your garment or substrate onto the lower platen. Ensure it is flat and smooth.
- Position Transfer: Place your heat transfer material onto the garment in the desired position.
- Close Press: Slide the lower platen back into position. Firmly press down the handle to close the heat press. The magnetic auto-open feature will engage, and the timer will begin counting down.
- Auto-Open: Once the set time expires, the heat press will automatically open, releasing the pressure.
- Remove Item: Carefully slide out the lower platen. Remove the heat transfer material according to its specific instructions (hot peel, warm peel, or cold peel).
- Repeat: For subsequent items, repeat the process.
6. Maintenance
- Cleaning the Platen: Allow the heat press to cool completely. Use a soft, damp cloth to wipe down the heating platen and lower platen. For stubborn residue, specialized heat press platen cleaner may be used, following the product's instructions. Do not use abrasive cleaners or sharp objects that could scratch the platen.
- General Cleaning: Wipe down the exterior of the machine with a dry or slightly damp cloth.
- Storage: When not in use, store the heat press in a clean, dry environment.
- Inspection: Periodically inspect the power cord for any signs of wear or damage. Check all moving parts for smooth operation.
7. Troubleshooting
| Problem | Possible Cause | Solution |
|---|---|---|
| Heat press does not power on. | No power to the outlet; power cord not connected; power switch off; tripped circuit breaker. | Check power outlet; ensure cord is securely plugged in; turn power switch on; reset circuit breaker on the machine or electrical panel. |
| Temperature not reaching set value. | Incorrect temperature setting; faulty heating element or sensor. | Verify temperature setting; allow more time for preheating; contact customer support if issue persists. |
| Uneven heat distribution. | Faulty heating element; uneven pressure. | Ensure pressure is evenly distributed; contact customer support. |
| Press not opening automatically. | Magnetic sensor issue; gas shock malfunction. | Ensure the magnetic auto-open mechanism is clean and unobstructed; contact customer support. |
| Pressure is too loose or too tight. | Pressure adjustment knob needs calibration. | Adjust the pressure knob as described in Section 5.2. |
8. Specifications
| Feature | Detail |
|---|---|
| Product Dimensions | 31 x 16 x 34 inches |
| Item Weight | 106.8 pounds |
| Manufacturer | Heat Press Nation |
| Model Number | Auto-Open |
| Material | Metal Alloy |
| Color | Black, White |
| Recommended Uses | Hat, T-Shirt |
| Date First Available | August 14, 2023 |
9. Warranty & Support
Heat Press Nation is committed to providing quality products and customer satisfaction.
- Returns: This product is eligible for 30-day easy returns. Please refer to the retailer's return policy for detailed information.
- Customer Support: For technical assistance, troubleshooting, or warranty inquiries, please contact Heat Press Nation customer support. You can find contact information on the official Heat Press Nation website or through your purchase platform.
- Protection Plans: Extended protection plans may be available for purchase. Refer to your retailer for details on 3-Year or 4-Year Protection Plans.
For more information, visit the Heat Press Nation Store.