Introduction
Thank you for choosing the TXL 13.7 Inch Large Digital Wall Clock. This versatile LED clock is designed for clear visibility and ease of use in various environments, including bedrooms, classrooms, offices, and gyms. It features a high-definition display, remote control operation, and multiple functions such as time, date, temperature, dual alarms, and a timer. Please read this manual carefully to ensure proper setup and operation of your new clock.
Package Contents
Please verify that all items are present in your package:
- 1 x TXL 13.7 Inch Large Digital Wall Clock
- 1 x Remote Control (with 2 AAA batteries included)
- 1 x Power Adapter
- 1 x 5 ft Power Cable Cord
- 2 x Hanging Nails
- 1 x Mounting Ruler/Template
- 1 x User Manual
Product Overview
Familiarize yourself with the components of your TXL Digital Wall Clock.
Front Display Features
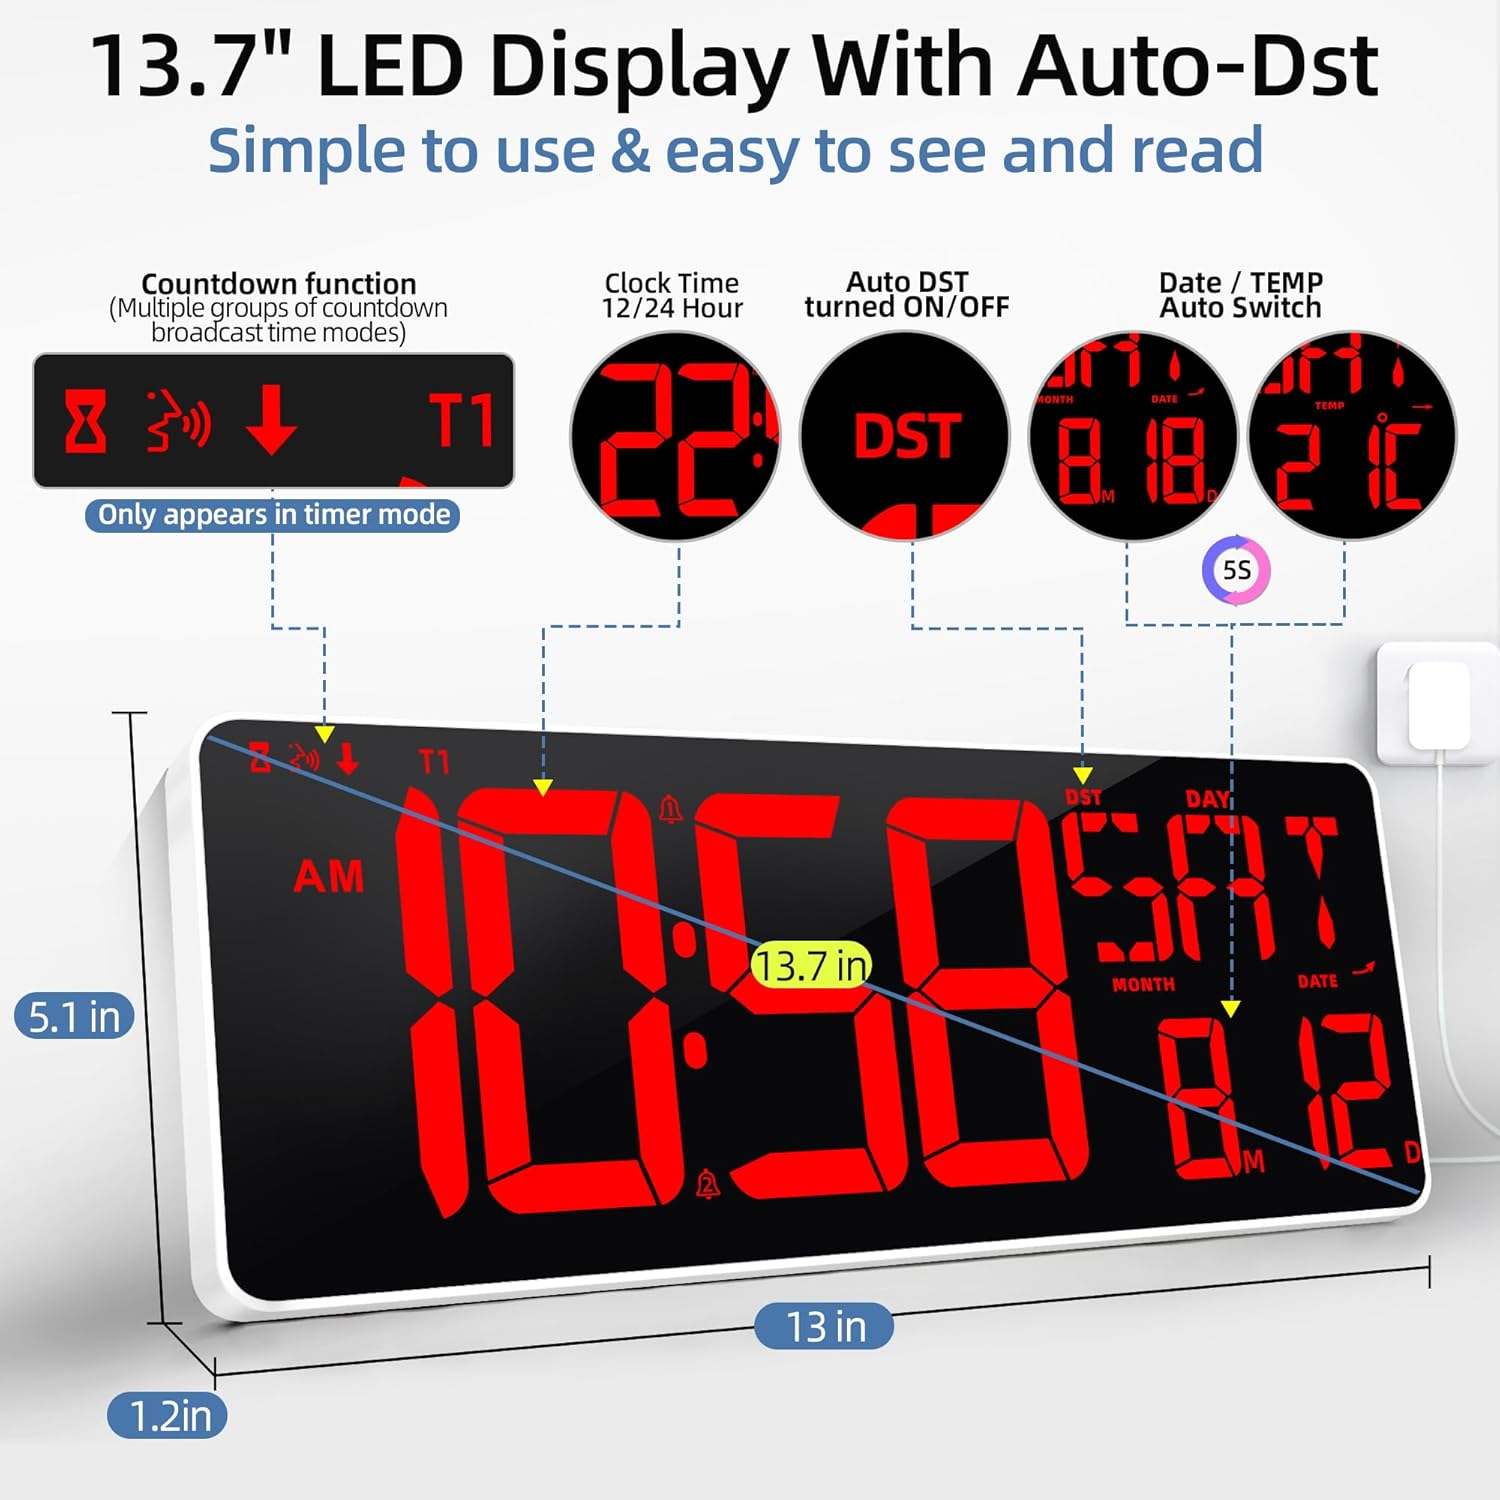
Image: Front view of the TXL 13.7 Inch Large Digital Wall Clock, highlighting the time, date, temperature, and Auto DST indicator.
- Large LED Display: Shows time (12/24H), day of the week, month, date, and indoor temperature (°F/°C).
- Auto DST: Automatically adjusts for Daylight Saving Time.
- Dual Alarm Indicators: Icons to show active alarms.
- Timer Mode Indicator: Appears when the countdown/count-up timer is active.
Back Panel and Mounting Options

Image: Rear view of the clock showing the fold-out stand and two hanging holes for wall mounting.
- Fold-out Stand: For tabletop or desk placement.
- Hanging Holes: Two keyhole slots for secure wall mounting.
- Control Buttons: Manual buttons for basic settings (Snooze, Set, Timer, etc.) located on the side/back.
- Power Input: DC 5V port for the power adapter.
- Battery Compartment: For 2 AAA batteries (backup for settings, not for primary operation).
Remote Control
The included remote control allows for convenient adjustment of all clock functions from a distance of up to 32 feet.
- ON/OFF: Power on/off the display.
- SET: Enter/exit setting mode.
- +/-: Adjust values during setting.
- 12/24H: Switch between 12-hour and 24-hour time formats.
- °C/°F: Toggle temperature unit.
- Alarm SET: Set alarms.
- Timer: Activate and control the timer functions.
- Brightness Control: Adjust display brightness levels.
Setup
1. Power Connection
- Connect the 5 ft power cable to the DC 5V input port on the back of the clock.
- Plug the power adapter into a standard electrical outlet. The clock display will illuminate.
2. Battery Installation (for Memory Backup)
The clock requires 2 AAA batteries (included) for memory backup. These batteries ensure that your time and settings are retained during a power outage. They do not power the main display.
- Open the battery compartment cover on the back of the clock.
- Insert 2 AAA batteries, ensuring correct polarity (+/-).
- Close the battery compartment cover securely.
3. Mounting the Clock
Your clock offers both tabletop and wall-mounted options.
Desktop/Tabletop Placement:
- Locate the fold-out stand on the back of the clock.
- Gently pull out the stand until it locks into place, allowing the clock to stand upright on a flat surface.
Wall Mounting:
- Use the provided mounting ruler/template to mark the desired positions for the two hanging nails on your wall.
- Carefully insert the hanging nails into the marked spots.
- Align the keyhole slots on the back of the clock with the installed nails and gently slide the clock down to secure it.
4. Initial Time and Date Setting
Upon first power-up or after a long power outage, you may need to set the time and date. The remote control simplifies this process.
Video: A demonstration of the easy setup process using the remote control for the TXL Digital Wall Clock.
- Press the SET button on the remote control to enter setting mode. The hour display will start flashing.
- Use the +/- buttons to adjust the hour.
- Press SET again to move to minute setting, then adjust with +/-.
- Continue pressing SET to cycle through year, month, and date settings, adjusting each with +/-.
- After setting the date, press SET one last time to exit setting mode.
Operating Instructions
Time Format (12/24 Hour)
- Press the 12/24H button on the remote control to switch between 12-hour (with AM/PM indicator) and 24-hour formats.
Daylight Saving Time (DST)
- The clock features an Auto DST function. It will automatically adjust for Daylight Saving Time changes.
- To manually toggle DST, press the DST button on the remote control.
Temperature Display (°F/°C)
- The clock displays indoor temperature. Press the °C/°F button on the remote control to switch between Celsius and Fahrenheit units.
Brightness Adjustment

Image: The clock display showing different brightness levels and the auto-dimming feature.
The clock offers both automatic and manual brightness control.
- Auto Dimmer: The clock can automatically adjust its brightness based on ambient light conditions. Activate this feature via the remote.
- Manual Adjustment: Use the dedicated brightness buttons (often represented by a sun icon or +/-) on the remote to cycle through 4 manual brightness levels.
Alarm Clock Function
The clock supports dual alarms.
- Press the Alarm SET button on the remote. The alarm 1 hour will flash.
- Use +/- to set the desired hour for Alarm 1.
- Press Alarm SET again to set the minutes for Alarm 1, then adjust with +/-.
- Repeat the process for Alarm 2.
- To activate/deactivate an alarm, press the Alarm ON/OFF button (or similar) on the remote. An alarm icon will appear on the display when active.
- When an alarm sounds, press any button (except snooze) to stop it, or press the SNOOZE button for a temporary pause.
Timer Function (Count Up/Count Down)

Image: The clock display showing the countdown timer with voice announcement feature.
The clock includes a versatile timer for various needs.
- Press the Timer button on the remote to enter timer mode.
- Setting Countdown Timer: Use the HR, MIN, SEC buttons and +/- to set the desired countdown duration. Press ST/SP to start/pause.
- Count-up Timer: In timer mode, if no duration is set, pressing ST/SP will start a count-up timer from 00:00.
- Voice Announcement: The timer can provide voice announcements for remaining time (e.g., 30, 15, 10, 1 minute remaining, and countdown from 10 seconds).
- Press Timer Reset to clear the timer.
Maintenance
- Cleaning: Wipe the clock's surface with a soft, dry cloth. Avoid abrasive cleaners or solvents.
- Battery Replacement: Replace AAA backup batteries annually or when the clock's settings are not retained during power outages.
- Storage: If storing the clock for an extended period, remove the AAA batteries.
Troubleshooting
| Problem | Possible Solution |
|---|---|
| Clock display is blank. | Ensure the power adapter is securely plugged into both the clock and a working electrical outlet. |
| Settings are lost after power outage. | Check if AAA backup batteries are installed correctly and are not depleted. Replace if necessary. |
| Remote control not working. | Ensure the remote's AAA batteries are correctly installed and not depleted. Point the remote directly at the clock's sensor. |
| Incorrect time/date. | Manually set the time and date using the remote control as described in the 'Setup' section. |
| Temperature reading is inaccurate. | Ensure the clock is not placed near heat sources or in direct sunlight, which can affect sensor accuracy. |
Specifications
- Brand: TXL
- Model: 6656
- Color: Red-classic
- Display Type: Multi Display LED
- Product Dimensions: 13.7"W x 5.1"H
- Power Source: Corded Electric (Adapter included)
- Backup Batteries: 2 AAA batteries (included)
- Mounting Type: Tabletop and Wall Mount
- Material: Plastic
- Special Features: Auto DST, Calendar, Temperature (°F/°C), Timer (Count Up/Down), Dual Alarm, Auto Dimmer, Remote Control
Warranty and Support
For warranty information or technical support, please refer to the contact details provided on the product packaging or visit the official TXL website. Keep your purchase receipt as proof of purchase.