1. Introduction
The FITCAMX 4K Dash Cam is designed to seamlessly integrate into your Honda vehicle's interior, providing high-quality video recording without obstructing your view or requiring visible wiring. This manual provides detailed instructions for installation, operation, and maintenance to ensure optimal performance of your dash cam.
2. Package Contents
Please verify that all items listed below are included in your package:
- FITCAMX 4K Dash Cam Unit
- Removal Pry Tool
- Power Cable (Y-cable)
- User Manual
- SD Card Reader
- 64GB MicroSD Card (pre-installed or included separately)

Image: Contents of the FITCAMX dash cam package.
3. Compatibility
This FITCAMX dash cam model is specifically designed for Honda vehicles manufactured between 2011 and 2024. It is crucial to confirm the shape of your vehicle's dome light before installation to ensure compatibility. This model is for vehicles with a Rhombus Dome Light.

Image: Identify your dome light type. This model requires a Rhombus Dome Light.

Image: Compatible rearview mirror bracket types.
4. Features
- OEM Style Integration: Designed to blend seamlessly with your vehicle's interior, appearing as a factory-installed component.
- 4K UHD Video Quality: Records clear video at 2160P/30fps with an f/1.6 aperture lens and CMOS Sensor, ensuring vivid capture of driving moments.
- Built-in WiFi & App Connectivity: Easily view, download, and manage footage on your smartphone via the dedicated FITCAMX app.
- Loop Recording: Automatically overwrites the oldest footage when the memory card is full, ensuring continuous recording.
- Gravity Sensor (G-Sensor): Detects sudden collisions and automatically locks the relevant footage to prevent it from being overwritten.
- Super Night Vision: Wide dynamic range technology enhances clarity in low-light conditions by balancing exposure.

Image: Overview of key features.
5. Setup and Installation
The FITCAMX dash cam is designed for a plug-and-play installation. Follow these steps carefully:
- Prepare the Installation Area: Ensure your vehicle's engine is off. Locate the overhead console near your rearview mirror.
- Remove the Overhead Console Panel: Depending on your vehicle's specific model and console color (Black or Grey), you may need to remove screws or use the provided pry tool to carefully detach the console panel. Refer to the images below for guidance.
- Connect the Power Cable: Locate the existing power connector within the overhead console. Connect the provided Y-cable from the dash cam to this connector.
- Mount the Dash Cam: Align the dash cam unit with the designated slot in the overhead console. Ensure it clicks securely into place.
- Reinstall the Console Panel: Carefully reattach the overhead console panel, ensuring all clips and screws are secured.

Image: Installation steps for overhead console removal.

Image: Connecting the power cable.
After installation, the dash cam will automatically power on and off with your vehicle's engine. You do not need to manually turn it on or off each time.
6. Operating Instructions
The FITCAMX dash cam operates largely automatically. Key functions are managed via the dedicated smartphone application.
6.1 Initial Setup and WiFi Connection
- Download the FITCAMX App: Search for 'FITCAMX' in your smartphone's App Store (iOS) or Google Play Store (Android) and install it.
- Connect to Dash Cam WiFi: Turn on your vehicle's engine. On your smartphone, go to WiFi settings and connect to the FITCAMX dash cam's WiFi network. The default password is typically '12345678' or found in the app/manual.
- Open the App: Launch the FITCAMX app. You should see a live preview from the dash cam.

Image: Connecting to the FITCAMX app via WiFi.
6.2 Viewing and Downloading Footage
Once connected via WiFi, you can:
- Live Preview: View real-time video from the dash cam.
- Browse Recordings: Access recorded videos and photos stored on the MicroSD card.
- Download Files: Select and download important footage directly to your smartphone's gallery.

Image: Viewing 4K video footage on your smartphone.
6.3 Loop Recording and G-Sensor
The dash cam continuously records video in short segments. When the memory card is full, the oldest non-locked files are automatically overwritten. The built-in G-Sensor detects sudden impacts (e.g., in an accident) and automatically saves the current recording segment to a protected folder, preventing it from being overwritten.

Image: Emergency Accident Locks protect critical footage.
7. Maintenance
To ensure the longevity and optimal performance of your FITCAMX dash cam, follow these maintenance guidelines:
- Clean the Lens: Periodically wipe the dash cam lens with a soft, lint-free cloth to ensure clear video recording. Avoid abrasive materials.
- Check MicroSD Card: Regularly check the MicroSD card for proper function. It is recommended to format the card every few months via the app or on a computer to prevent data corruption and ensure smooth operation.
- Temperature Considerations: The dash cam is designed to operate within a temperature range of -20°C to 85°C (-4°F to 185°F). While it can withstand high temperatures, prolonged exposure to extreme heat (e.g., direct sunlight in a parked car) is normal and does not indicate a malfunction.
8. Troubleshooting
If you encounter any issues with your FITCAMX dash cam, refer to the following common problems and solutions:
| Problem | Possible Cause / Solution |
|---|---|
| Dash cam does not turn on/off automatically with car engine. | The dash cam is designed to automatically turn on/off with your car engine. Ensure the power cable is securely connected. If the issue persists, verify the vehicle's power supply to the overhead console. |
| Cannot connect to WiFi / App. | Ensure the car engine is on and the dash cam is working. Turn off cellular data or Bluetooth on your phone if experiencing preview issues. If still unable to connect, restart both the dash cam (by restarting the car) and your phone. Verify the correct WiFi password. |
| Cannot view video after turning off the car. | The built-in WiFi has a limited range. Download videos to your phone before turning off the engine if you need immediate access. The camera records automatically when the car is on, regardless of WiFi connection. |
| No parking monitoring function. | Parking mode functionality depends on whether your car's power plug supplies continuous electricity when the engine is off. If your car does not provide continuous power, parking mode will not be available without an extra hardwire kit (not included). Note: Parking mode typically records only in case of serious collision, not 24/7. |
| Dash cam gets hot during operation. | This is normal. The dash cam operates within a wide temperature range. The confined space around the camera and its proximity to the windshield (especially under direct sunlight) can cause it to feel warm. This does not affect performance. |
| Cannot add a rear camera to a single front version. | The single front camera version and dual camera versions have different internal PCB boards. It is not possible to add a rear camera to a front-only unit. A new, complete dual-camera set would be required. |
9. Specifications
| Feature | Detail |
|---|---|
| Model Name | FITCAMX Dash Cam for 2011-2024 Honda Vehicle Models (Front 4K Only, Rhombus Dome Light) |
| Video Capture Resolution | 4K (2160P) at 30fps |
| Connectivity Technology | Wi-Fi |
| Special Feature | OEM Style, G-Sensor, Loop Recording, Night Vision |
| Mounting Type | Rearview Mirror Mount |
| Operating Temperature | -20°C to 85°C (-4°F to 185°F) |
| Included MicroSD Card | 64GB (supports up to 128GB) |
| Product Dimensions | Approximately 12 x 9 x 4 inches (packaging) |
| Item Weight | Approximately 1.5 pounds |
| Batteries | 1 Lithium Metal battery required (included) |
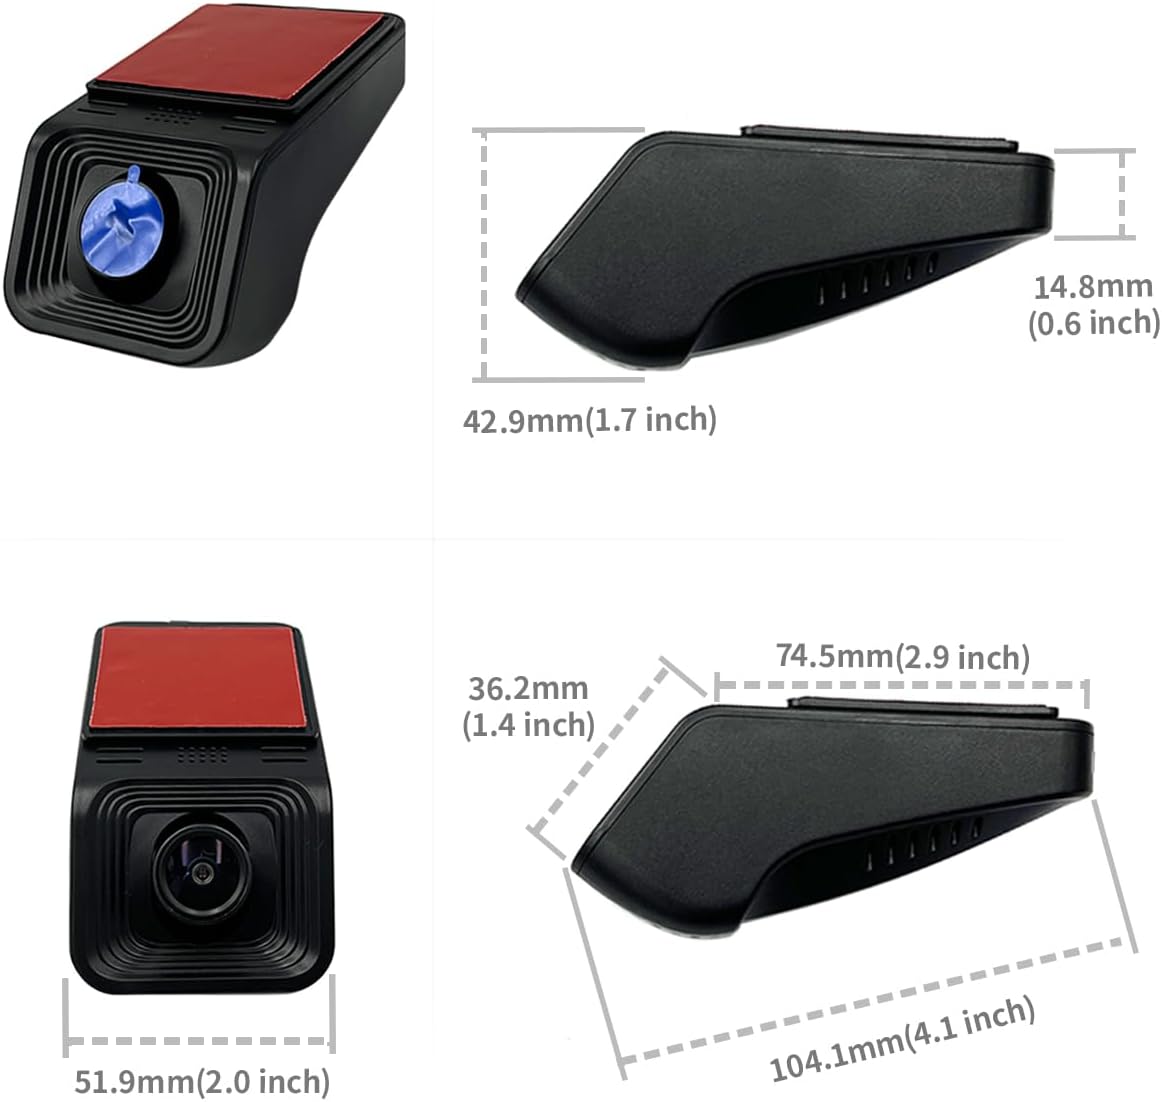
Image: Dash cam dimensions.
10. Warranty and Support
FITCAMX provides prompt technical support for customer inquiries and assistance. For any questions regarding installation, operation, or troubleshooting not covered in this manual, please contact FITCAMX customer service. Specific warranty details may be provided with your purchase documentation.