Introduction
This manual provides essential information for the safe and efficient operation, maintenance, and troubleshooting of your Valgus Dual Tanks Commercial Deep Fryer. Please read all instructions carefully before use to ensure proper functionality and to prevent injury or damage.
The Valgus Dual Tanks Commercial Deep Fryer is designed for both home kitchen and restaurant use, offering a large 26L capacity (13L per tank) for efficient frying. Its stainless steel construction ensures durability and ease of cleaning.
Important Safety Instructions
When using electrical appliances, basic safety precautions should always be followed, including the following:
- Read all instructions before operating the deep fryer.
- Do not touch hot surfaces. Use handles or knobs.
- To protect against electrical shock, do not immerse cord, plugs, or heating elements in water or other liquid.
- Close supervision is necessary when any appliance is used by or near children.
- Unplug from outlet when not in use and before cleaning. Allow to cool before putting on or taking off parts, and before cleaning the appliance.
- Do not operate any appliance with a damaged cord or plug, or after the appliance malfunctions or has been damaged in any manner. Contact Valgus customer support for assistance.
- The use of accessory attachments not recommended by the appliance manufacturer may cause injuries.
- Do not use outdoors.
- Do not let cord hang over edge of table or counter, or touch hot surfaces.
- Do not place on or near a hot gas or electric burner, or in a heated oven.
- Extreme caution must be used when moving an appliance containing hot oil or other hot liquids.
- Always attach plug to appliance first, then plug cord into the wall outlet. To disconnect, turn any control to "off", then remove plug from wall outlet.
- Do not use appliance for other than intended use.
- Ensure the oil level is always between the MIN and MAX marks indicated inside the tank. Overfilling or underfilling can be hazardous.
- The fryer is equipped with overheating protection which automatically cuts off power if the temperature reaches approximately 500°F (260°C). If this occurs, allow the unit to cool down and press the reset button located on the control panel.
Product Components
Familiarize yourself with the main components of your Valgus Deep Fryer:
- Fryer Body: Stainless steel housing containing the oil tanks.
- Oil Tanks (2): Individual 13L capacity tanks for frying.
- Control Panels (2): Separate controls for each tank, including temperature dials and power indicators.
- Heating Elements: Submerged heating coils for rapid oil heating.
- Frying Baskets (2): Stainless steel baskets with heat-resistant handles and hooks for draining.
- Lids (2): Covers for each tank to retain heat and prevent splattering.
- Drain Taps (2): Robust taps at the bottom of each tank for easy oil drainage.
- Reset Buttons: Safety buttons on each control panel for overheating protection.
- Baffle Plates: Located inside the tanks to prevent direct contact of baskets with heating elements and reduce food residue adhesion.

Image: The Valgus Dual Tanks Commercial Deep Fryer, showcasing its dual tank design and capacity for frying different foods simultaneously.
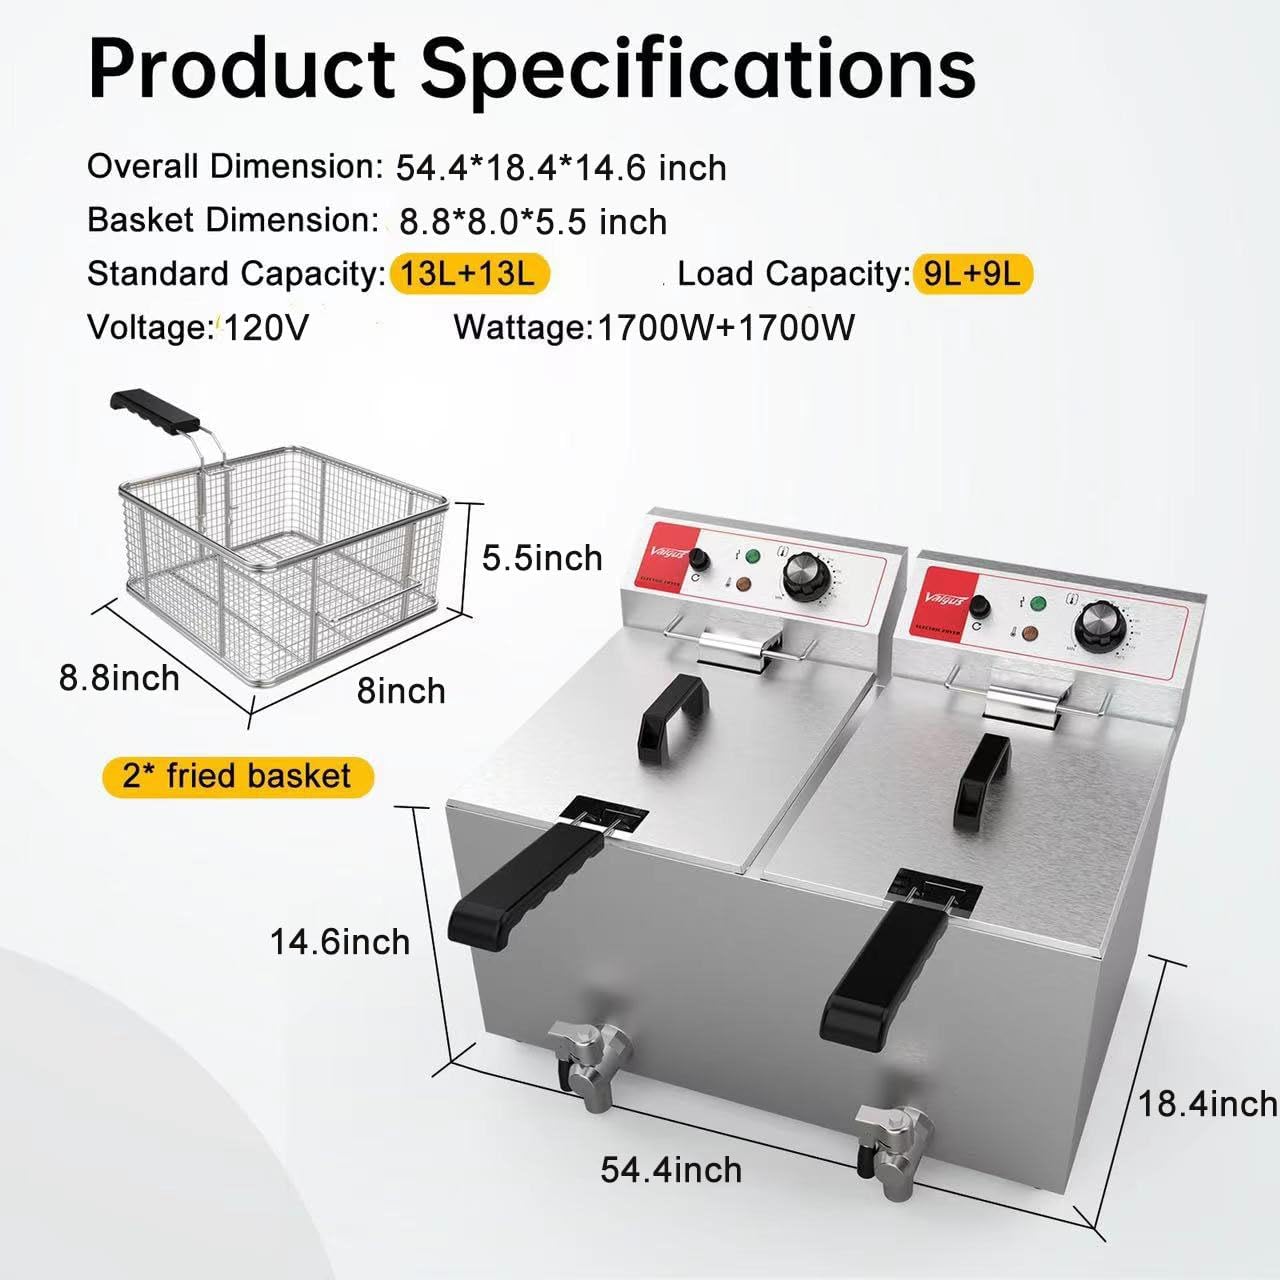
Image: Detailed product specifications and dimensions of the deep fryer and its baskets.

Image: The baffle plate, designed to protect the heating element and reduce food residue.

Image: The frying basket with its convenient front hooks for draining.
Setup
- Unpacking: Carefully remove all components from the packaging. Retain packaging for future storage or transport.
- Placement: Place the deep fryer on a stable, heat-resistant, and level surface. Ensure there is adequate ventilation around the unit. Keep it away from walls and other appliances to allow for heat dissipation.
- Initial Cleaning: Before first use, clean the oil tanks, baskets, and lids with warm, soapy water. Rinse thoroughly and dry completely. Ensure no water remains in the tanks before adding oil.
- Oil Filling: Close the drain taps securely. Pour cooking oil into each tank, ensuring the oil level is between the MIN and MAX marks indicated inside the tank. Do not overfill or underfill. Recommended maximum oil volume is 9L per tank.
- Power Connection: Ensure the temperature dials are set to "OFF". Plug each power cord into a dedicated 120V electrical outlet. The fryer requires two separate 1700W connections.
Operating Instructions
- Preheating Oil:
- Turn the temperature dial for the desired tank to the required frying temperature (range: 125°F - 375°F / 50°C - 190°C).
- The power indicator light will illuminate, indicating that the heating element is active.
- Allow the oil to preheat. This typically takes 15-20 minutes depending on the oil volume and desired temperature. The indicator light will turn off once the set temperature is reached and cycle on/off to maintain it.

Image: The robust 304 stainless steel heating pipes with double temperature probes for accurate temperature control.
- Frying Food:
- Carefully place food into the frying basket. Do not overload the basket, as this can lower oil temperature and result in soggy food. Fry in small batches if necessary.
- Slowly lower the basket into the hot oil. Avoid splashing.
- Fry until food is golden brown and cooked through. Cooking times vary based on food type and quantity.
- Once cooked, carefully lift the basket and hook it onto the rim of the tank to allow excess oil to drain back into the tank.

Image: The frying basket with its integrated hook for convenient oil drainage.

Image: Examples of foods that can be prepared with the deep fryer, such as fried chicken, french fries, fried shrimp, and fried fish.
- After Frying:
- Turn the temperature dial to "OFF".
- Unplug the fryer from the wall outlet.
- Allow the oil to cool completely before handling or cleaning. This may take several hours.
Maintenance and Cleaning
Regular cleaning and maintenance will extend the life of your deep fryer and ensure optimal performance.
- Oil Drainage:
- Ensure the oil has cooled completely.
- Place a suitable container under the drain tap of the tank you wish to empty.
- Open the drain tap to release the oil. Filter and store the oil for reuse if desired, or dispose of it properly according to local regulations.
- Close the drain tap securely once the tank is empty.

Image: The robust drain tap for easy and convenient oil release.
- Cleaning Tanks and Components:
- Once the oil is drained, wipe down the inside of the tanks with a paper towel to remove excess oil and food particles.
- The removable baskets and lids are dishwasher safe. For the tanks, use warm, soapy water and a non-abrasive sponge or cloth.
- Rinse all components thoroughly with clean water.
- Dry all parts completely before reassembly or storage to prevent rust and ensure electrical safety.
- Exterior Cleaning:
- Wipe the exterior of the fryer body with a damp cloth and mild detergent.
- Do not use abrasive cleaners or scouring pads, as they can damage the stainless steel finish.
- Ensure the control panel and electrical components do not get wet.
Troubleshooting
Refer to the following table for common issues and their solutions:
| Problem | Possible Cause | Solution |
|---|---|---|
| Fryer does not heat up. |
|
 Image: Location of the Reset Button. |
| Oil not reaching desired temperature. |
|
|
| Excessive smoking. |
|
|
If the problem persists after attempting these solutions, please contact Valgus customer support.
Specifications
| Feature | Detail |
|---|---|
| Model Number | DF-2 |
| Product Dimensions | 18.39"D x 54.33"W x 14.57"H (46.7 x 138 x 37 cm) |
| Item Weight | 31 pounds (14.06 kg) |
| Material | Stainless Steel |
| Color | Stainless Steel |
| Total Capacity | 26 Liters (13L per tank) |
| Recommended Max Oil Volume | 9 Liters per tank |
| Wattage | 1700W per tank (3400W total) |
| Voltage | 120V |
| Temperature Range | 125°F - 375°F (50°C - 190°C) |
Warranty and Support
For warranty information or technical support, please contact Valgus customer service. Details regarding specific warranty periods and terms are typically provided with your purchase documentation or can be found on the official Valgus website.
You can visit the Valgus store for more information: Valgus Store on Amazon.