1. Introduction
Welcome to your Kensaker K255-S Tall Drafting Chair. This manual provides detailed instructions for assembly, operation, and maintenance to ensure optimal performance and longevity of your chair. Please read this manual thoroughly before assembly and use.
2. Safety Information
- Maximum Weight Recommendation: 300 Pounds. Exceeding this limit may cause damage to the chair or potential injury.
- Ensure all screws and bolts are securely tightened before initial use. Periodically check and re-tighten all fasteners as necessary to maintain stability.
- Keep hands and fingers clear of moving parts, such as the gas lift and adjustment mechanisms, during operation.
- Use the chair on a stable, level surface to prevent tipping.
- Do not stand on the chair.
- Avoid exposing the chair to direct sunlight or extreme temperatures for prolonged periods, as this may damage materials.
3. Package Contents
Verify that all components are present and undamaged before beginning assembly. If any parts are missing or damaged, please contact customer support.
- Backrest Assembly (1)
- Seat Cushion Assembly (1)
- Armrests (2)
- Gas Lift Cylinder (1)
- 5-Star Base (1)
- Casters (5)
- Footrest Ring (1)
- Hardware Pack (screws, washers, Allen wrench) (1)
- Instruction Manual (1)
4. Assembly Instructions
Estimated assembly time: 15-20 minutes. Follow these steps carefully for proper assembly.
- Attach Casters to Base: Insert each caster stem into the holes at the end of the 5-star base until it clicks securely into place. Ensure all five casters are firmly seated.
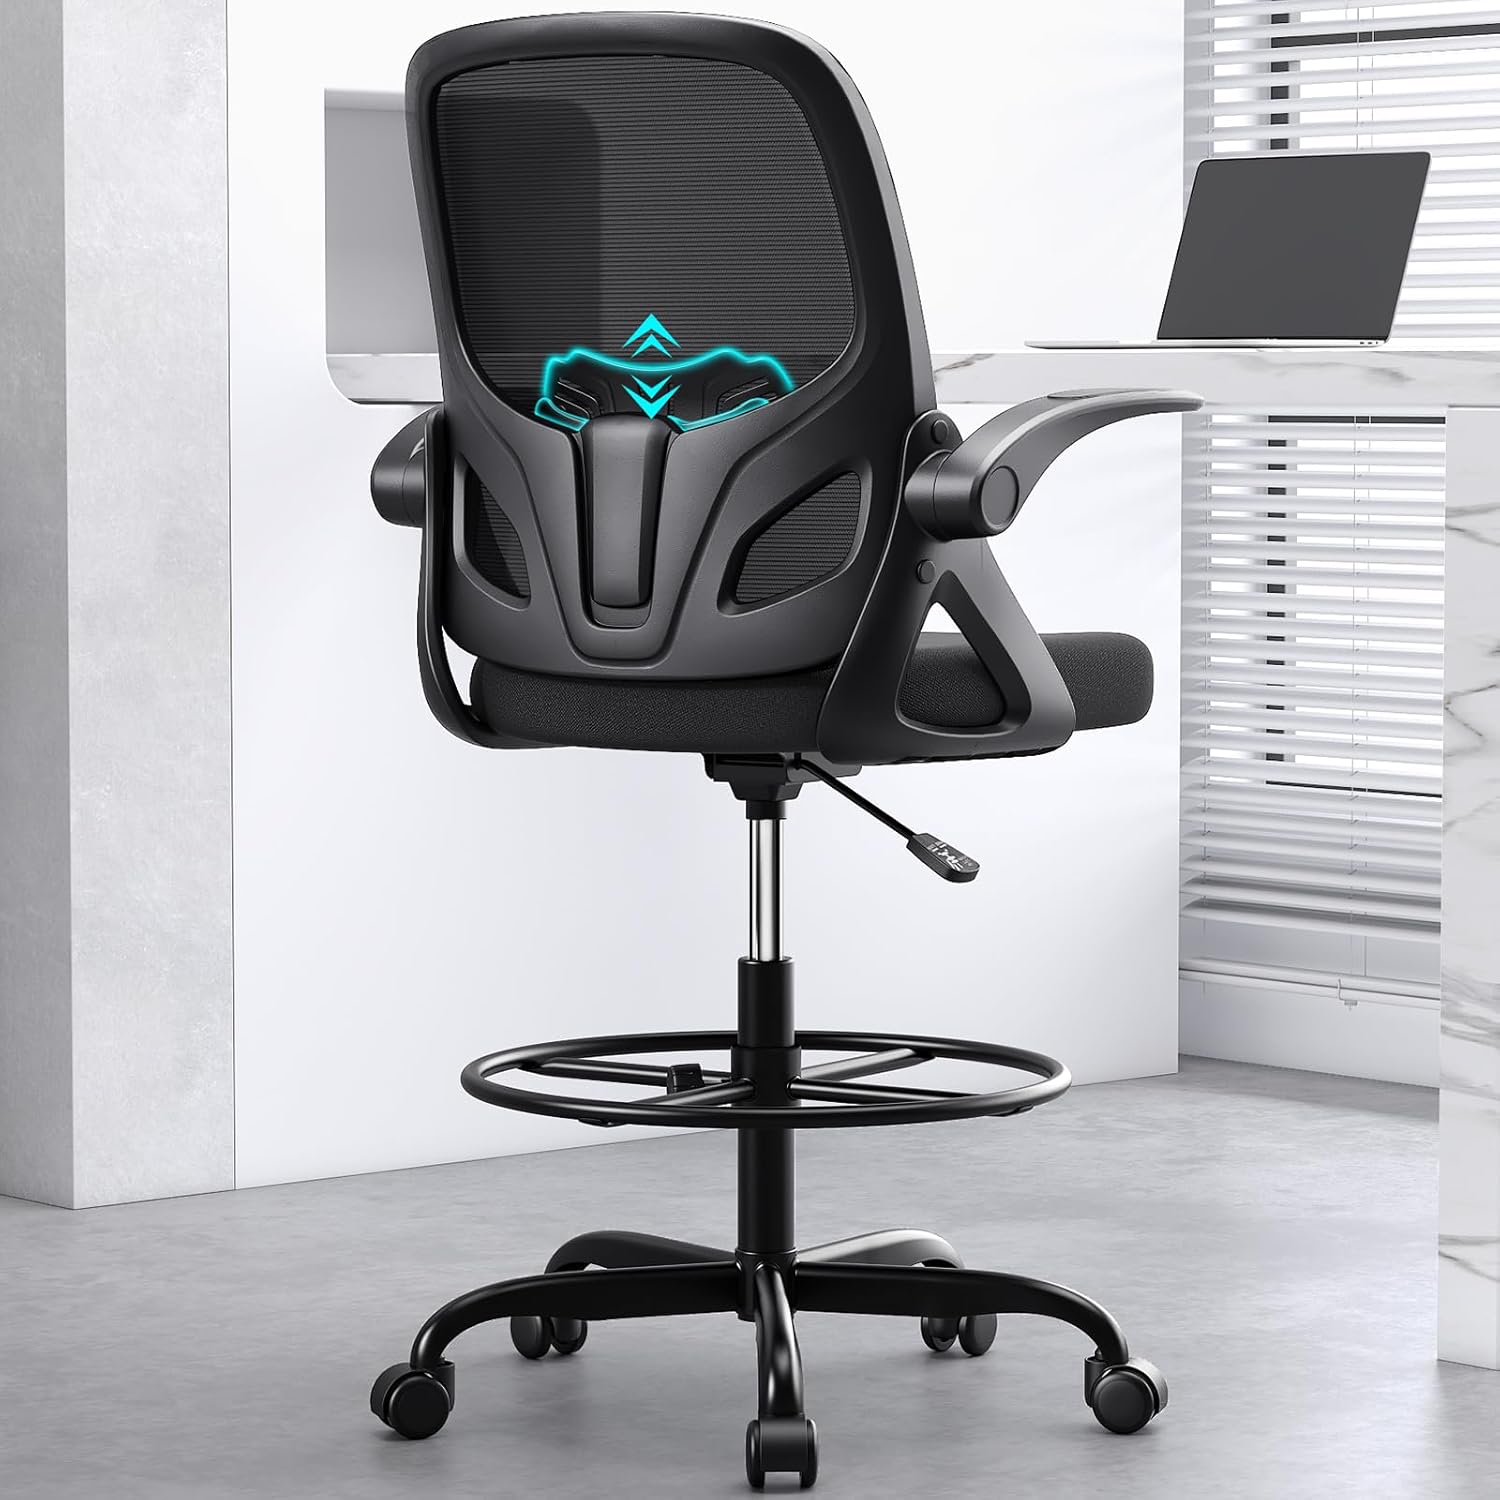
Image: Casters are pressed into the openings on the chair's five-star base.
- Insert Gas Lift: Place the gas lift cylinder into the center hole of the assembled 5-star base. Important: Remove the red or black plastic cap from the top of the gas lift cylinder before proceeding.
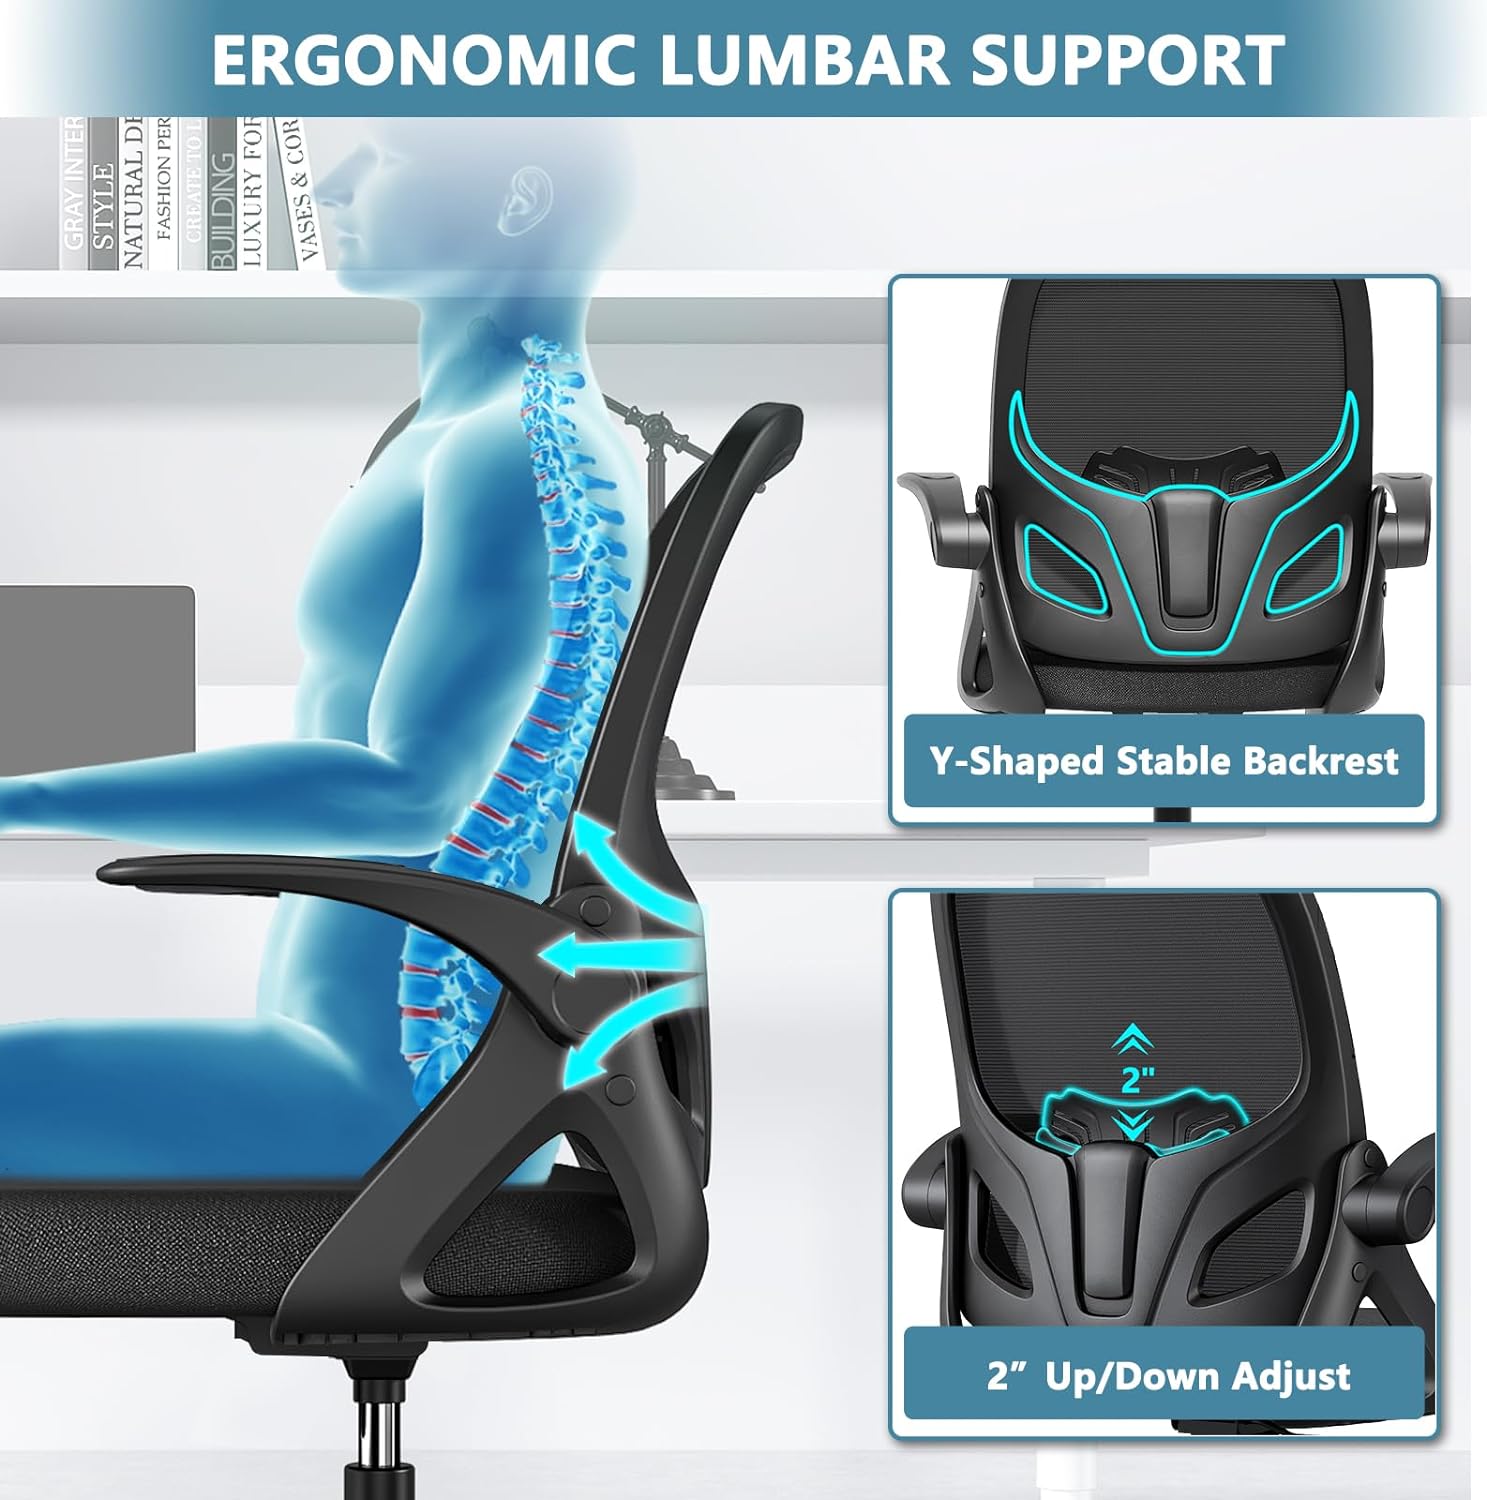
Image: The gas lift cylinder is placed vertically into the central opening of the chair base.
- Attach Footrest Ring: Slide the footrest ring over the gas lift cylinder. Position it at your desired height and tighten the adjustment knob on the side of the ring to secure it.

Image: The footrest ring is positioned around the gas lift cylinder and secured.
- Attach Armrests to Seat Cushion: Align the armrests with the pre-drilled holes on the underside of the seat cushion. Use the provided screws and Allen wrench to secure them. Ensure the flip-up mechanism is oriented correctly towards the back of the chair.
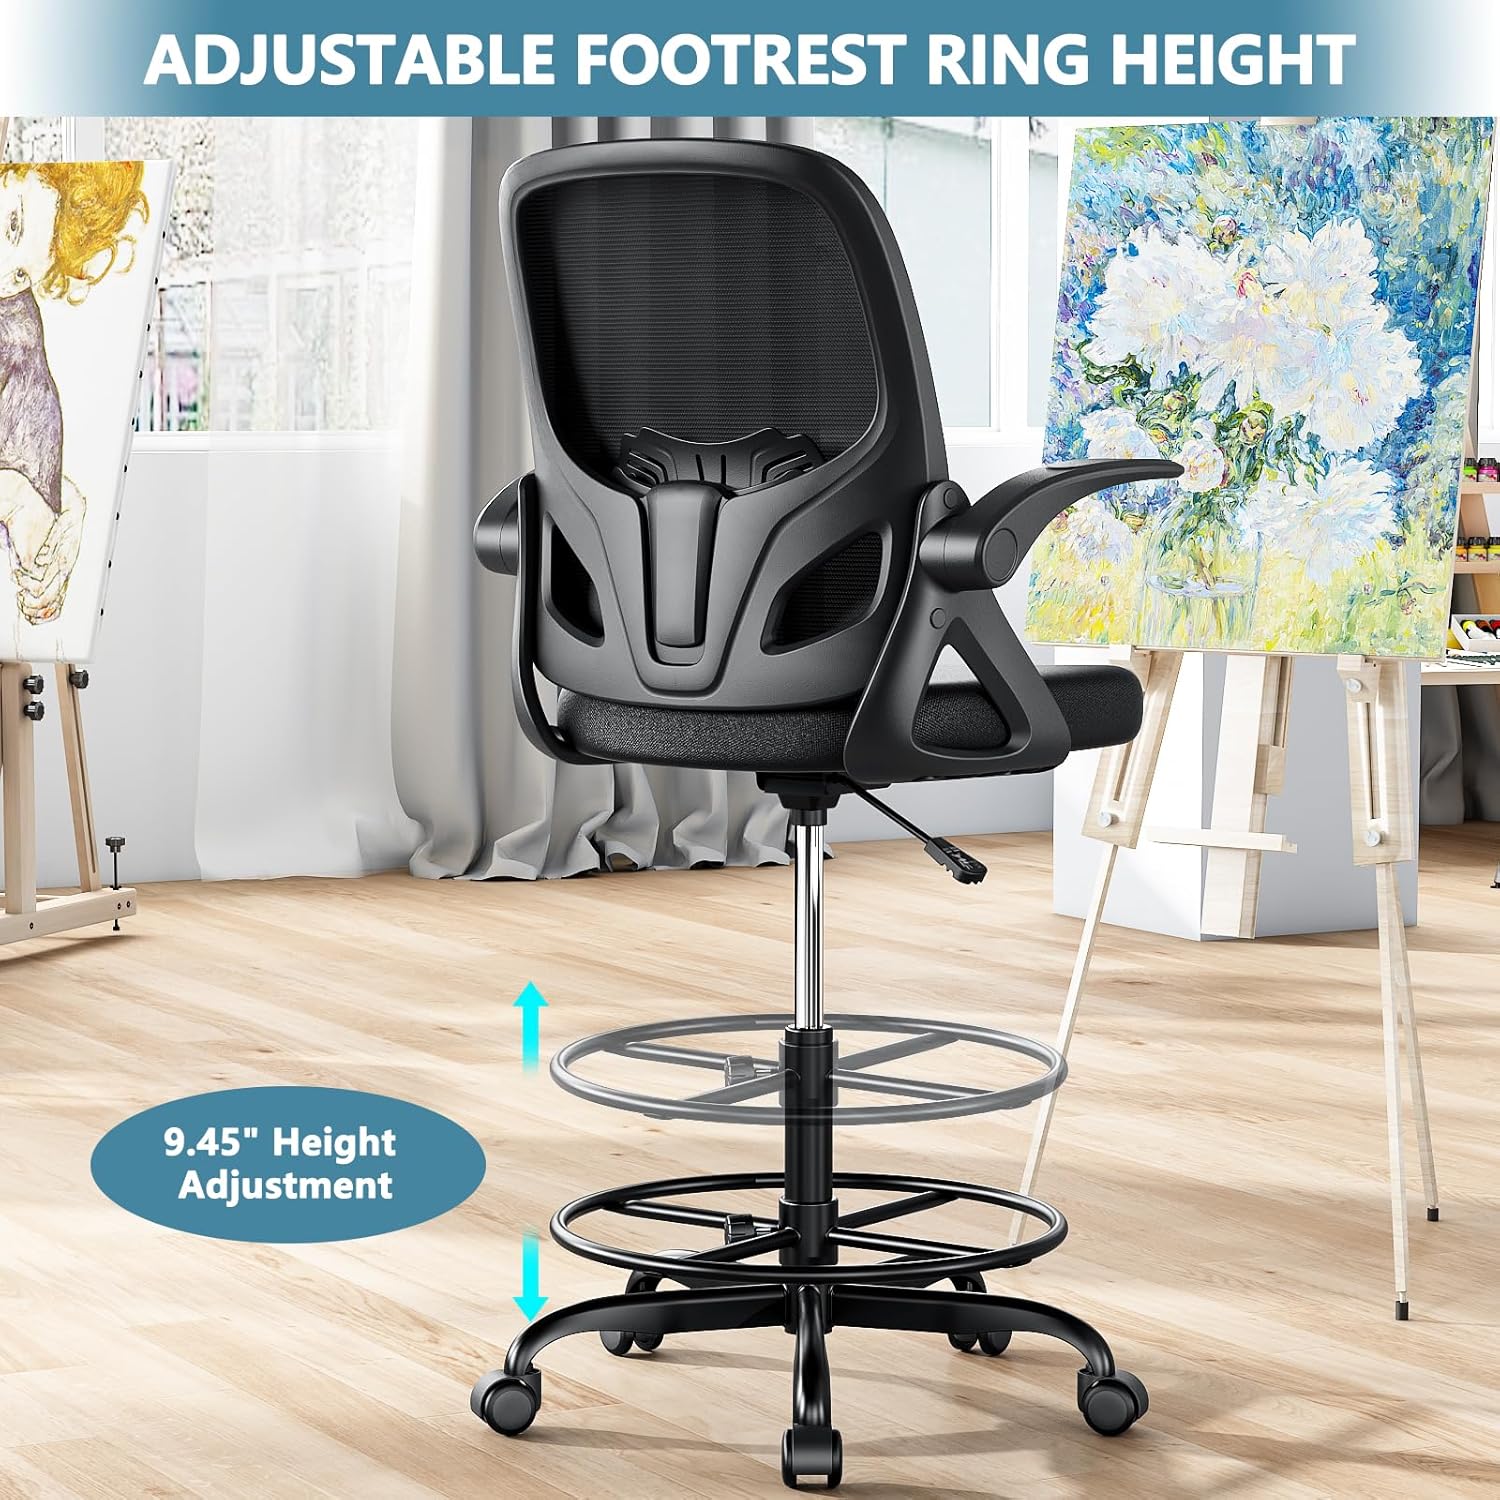
Image: The armrests are fastened to the bottom of the seat cushion.
- Attach Backrest to Seat Cushion: Connect the backrest to the seat cushion assembly using the remaining screws. Ensure a firm and stable connection. Do not overtighten.

Image: The backrest is secured to the seat cushion assembly.
- Place Seat Assembly onto Gas Lift: Carefully place the assembled seat and backrest onto the gas lift cylinder, ensuring it is centered and fully seated. Apply gentle downward pressure to secure the connection.
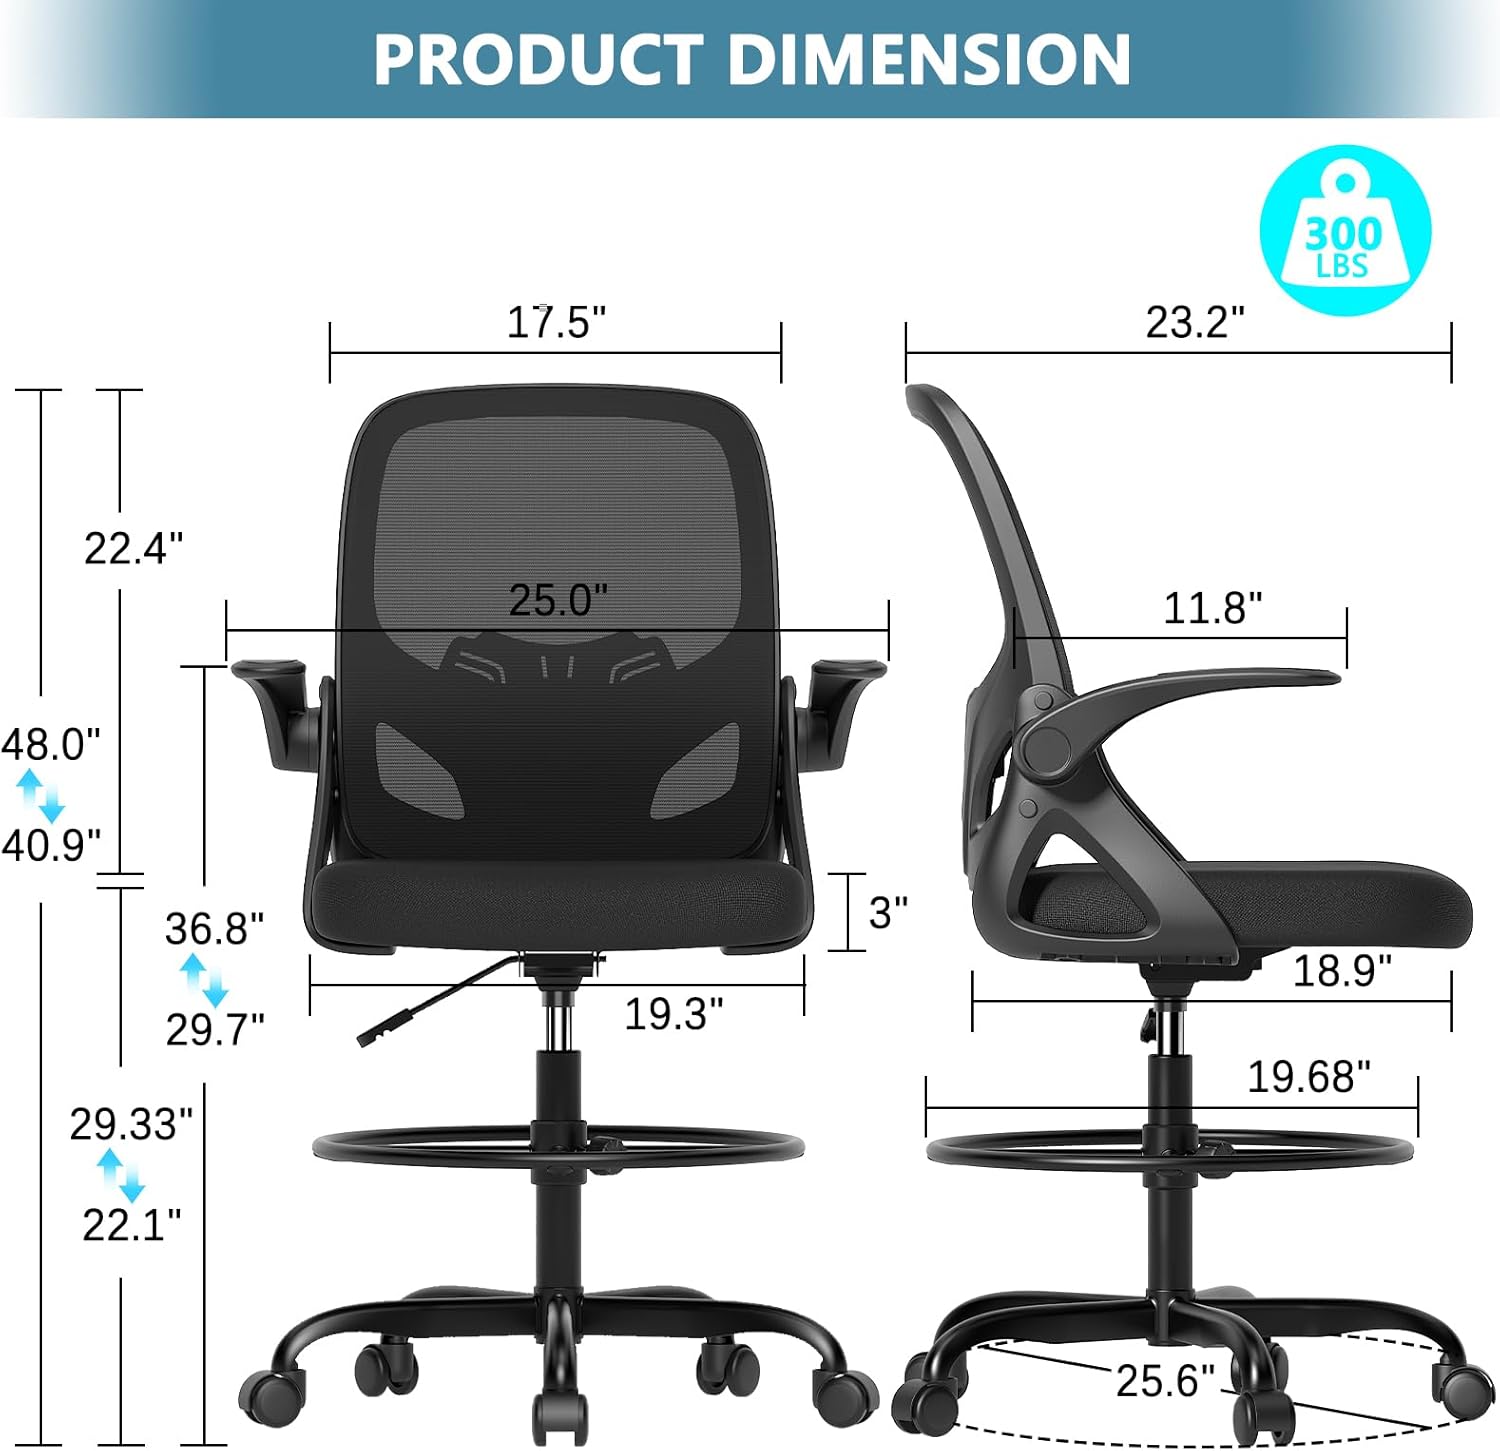
Image: The fully assembled seat and backrest are lowered onto the gas lift and base.
5. Operating Instructions
5.1. Height Adjustment
To adjust the chair's height, locate the lever under the right side of the seat. To lower the chair, sit on it and lift the lever. To raise the chair, lift the lever while standing or with minimal weight on the seat. Release the lever at your desired height to lock it in place.

Image: The lever for adjusting chair height is shown, with arrows indicating upward and downward movement.
5.2. Lumbar Support Adjustment
The Kensaker K255-S features a 2-inch adjustable lumbar support panel. To adjust, gently push or pull the lumbar support panel on the backrest to find your preferred position for optimal lower back comfort.
Image: A close-up of the chair's backrest highlights the adjustable lumbar support mechanism.
5.3. Flip-Up Armrests
The armrests can be flipped up 90 degrees to allow the chair to be pushed closer to a desk or for easier entry/exit. Simply lift the armrests upwards until they lock into the vertical position. To return them to the horizontal position, gently pull them down.

Image: The chair is shown with armrests in both the standard and 90-degree flipped-up positions.
5.4. Footrest Ring Adjustment
The footrest ring height can be adjusted to suit your preference. Loosen the knob on the side of the footrest ring, slide it to the desired height on the gas lift, and then re-tighten the knob securely to prevent slippage.
Image: The footrest ring is shown with arrows indicating its adjustable height range.
5.5. Tilt Lock Function
The chair features a supportive tilt lock function. To allow the chair to recline, pull the height adjustment lever outwards. To lock the chair in an upright position, push the lever inwards.
5.6. 360-Degree Swivel and Casters
The chair is designed for smooth 360-degree rotation and effortless movement on its solid casters. Ensure the casters are clean and free of obstructions for optimal performance.
6. Maintenance
- Cleaning: Wipe the chair surfaces with a soft, damp cloth. For mesh areas, a gentle brush can be used to remove dust. Avoid using harsh chemicals, abrasive cleaners, or solvents, as these can damage the materials.
- Inspection: Periodically (e.g., every 3-6 months) inspect all bolts, screws, and connections to ensure they are tight. Re-tighten if necessary to maintain the chair's stability and safety.
- Caster Care: Regularly check the caster wheels for accumulated hair, dust, or debris. Remove any obstructions to ensure smooth and unrestricted rolling.
7. Troubleshooting
7.1. Chair does not adjust height
- Ensure the plastic cap on the gas lift cylinder was removed during assembly.
- Check if the height adjustment lever is fully engaged and operating correctly.
- Verify the gas lift cylinder is properly seated in both the base and the seat mechanism.
7.2. Chair wobbles or feels unstable
- Re-tighten all assembly screws, especially those connecting the seat to the mechanism and the backrest.
- Ensure all five casters are fully inserted into the 5-star base.
- Verify the gas lift is securely seated in the base.
7.3. Casters do not roll smoothly
- Check for debris (such as hair or lint) wrapped around the caster wheels and remove it.
- Ensure casters are fully inserted into the base.
8. Specifications
| Feature | Detail |
|---|---|
| Brand | Kensaker |
| Model Name | KBGY255BSJ (K255-S) |
| Color | Black |
| Product Dimensions (D x W x H) | 18.9"D x 19.3"W x 37.18"H |
| Maximum Weight Recommendation | 300 Pounds |
| Adjustable Seat Height | 20" - 28" (approximate range, 29.33" max listed) |
| Seat Depth | 19 inches |
| Back Style | Solid Back with Breathable Mesh |
| Arm Style | Flip-up Arms (90-degree) |
| Fill Material | High Resilience Foam |
| Special Features | Space Saving, Ergonomic Lumbar Support, Adjustable Footrest Ring, Tilt Lock Function, 360-degree Swivel |
| Assembly Required | Yes |
| Item Weight | 29.8 pounds |
| Recommended Uses | Drafting, Office, Home Office |
9. Warranty and Support
Kensaker is committed to providing high-quality products and ensuring customer satisfaction. If you have any questions, encounter issues, or require support regarding your Kensaker K255-S Tall Drafting Chair, please do not hesitate to contact our professional customer service team.
For specific warranty details, return policies, and the most current contact information, please refer to your purchase documentation or visit the official Kensaker website. Our team is ready to assist you with any concerns.