1. Introduction
This manual provides comprehensive instructions for the installation, operation, and maintenance of your Hikity 8-Core Android Autoradio. Please read this manual thoroughly before using the product to ensure proper function and safety. Keep this manual for future reference.
2. Product Overview
The Hikity 8-Core Android Autoradio is an advanced car multimedia system designed to enhance your driving experience. It features a 9-inch IPS touchscreen, an 8-core processor, and 4GB RAM with 64GB ROM for smooth performance. Key functionalities include wireless CarPlay, Android Auto, Bluetooth 5.0, FM/RDS/DAB+ radio, GPS navigation, and DSP audio processing.

Image 2.1: Overview of the Hikity 8-Core Android Autoradio and its key accessories.
2.1 Key Features
- Upgraded Android System: Powered by Android 13 with an 8-core processor, 4GB RAM, and 64GB ROM for high performance.
- 9-inch IPS Touchscreen: Supports triple split-screen display for multitasking.
- Wireless Connectivity: Supports wireless CarPlay and Android Auto for seamless smartphone integration.
- Mirror Link: Wired/wireless Mirror Link functionality for iOS and Android devices.
- Bluetooth 5.0: For hands-free calling and Bluetooth music streaming.
- FM/RDS/DAB+ Radio: High-quality radio reception with a built-in DAB+ module for European stations.
- 36-Band DSP: Digital Signal Processing for enhanced sound quality, reduced noise, and distortion.
- GPS Navigation: Integrated APK supports offline and online maps.
- WiFi/Hotspot Connection: Easy internet access and app downloads.
- Rear Camera Input: Includes a rear camera for parking assistance.
- Steering Wheel Control: Supports integration with vehicle steering wheel controls.
2.2 Package Contents
Please verify that all components are present in the package:

Image 2.2: Contents of the product package, including the head unit and various cables and accessories.
- Hikity 9-inch Android Autoradio Head Unit
- Power Cable (Universal 16-pin adapter)
- DAB+ Module
- RCA Cable
- Camera Input Cable
- GPS Antenna
- USB Cable (Double USB cable)
- Mounting Bracket
- User Manual (This document)
- AHD Rear Camera
3. Setup and Installation
Professional installation is recommended for this product. Ensure the vehicle's power is disconnected before beginning installation. Refer to your vehicle's specific wiring diagram and the provided universal 16-pin adapter for correct connections.
3.1 Wiring Connections
- Power Connection: Connect the universal 16-pin power cable to the vehicle's wiring harness. Ensure ACC, B+, and Ground wires are correctly matched.
- GPS Antenna: Connect the GPS antenna and position it in a location with a clear view of the sky for optimal signal reception.
- USB Cables: Connect the double USB cables for external device connectivity.
- Rear Camera: Connect the included AHD rear camera to the camera input cable. Ensure the reverse trigger wire is connected to the vehicle's reverse light circuit.
- DAB+ Module: Connect the DAB+ module to the designated USB port or input.
- RCA Cables: Connect any external amplifiers or audio/video devices using the RCA cables.

Image 3.1: Illustrative comparison of an older car stereo unit with the Hikity 9-inch Android Autoradio, highlighting the installation process.
3.2 Mounting
Use the provided mounting brackets to secure the autoradio in the vehicle's double DIN slot. Ensure the unit is firmly seated and does not obstruct any vehicle controls.
4. Operating Instructions
4.1 Wireless CarPlay and Android Auto
The autoradio supports both wireless CarPlay for iOS devices and wireless Android Auto for Android devices. This allows for seamless integration of your smartphone's features, including navigation, calls, messages, and music, directly on the head unit's screen.
- Ensure your phone's Bluetooth and Wi-Fi are enabled.
- On the autoradio, open the 'CarbitLink' or similar application.
- Follow the on-screen instructions to pair your phone via Bluetooth.
- Once paired, the system will automatically connect to CarPlay or Android Auto via Wi-Fi.

Image 4.1: Display of the main interface with various applications and indicators for wireless CarPlay and Android Auto.
4.2 Mirror Link
Mirror Link allows you to display your smartphone's screen directly onto the autoradio. This feature supports both wired and wireless connections for iOS and Android devices.
- For wired connection, connect your phone via a USB cable.
- For wireless connection, ensure your phone is connected to the autoradio's Wi-Fi hotspot or vice versa.
- Open the Mirror Link application on the autoradio and follow the pairing instructions.

Image 4.2: Visual representation of Wireless CarPlay, Android Auto, and Mirror Link capabilities.
4.3 Bluetooth Functionality
The built-in Bluetooth 5.0 module enables hands-free calling and audio streaming.
- Go to the Bluetooth menu on the autoradio.
- Enable Bluetooth on your smartphone and search for available devices.
- Select the autoradio's Bluetooth name (e.g., 'Hikity Car BT') from your phone's list and pair.
- Once connected, you can make/receive calls and play music wirelessly.

Image 4.3: Bluetooth interface for hands-free communication and audio streaming.
4.4 FM/RDS/DAB+ Radio
Access a wide range of radio stations with the integrated FM/RDS/DAB+ tuner.
- Select the 'Radio' application from the main menu.
- Choose between FM or DAB+ mode.
- Perform an automatic scan to find available stations.
- Save your favorite stations for quick access.

Image 4.4: FM/RDS/DAB+ radio interface.
4.5 GPS Navigation
The autoradio comes with a pre-installed navigation APK that supports both offline and online maps.
- Ensure the GPS antenna is properly connected and positioned.
- Open the 'Navigation' application.
- Download offline maps for your region if desired, or use online maps with a Wi-Fi connection.
- Enter your destination to start navigation.
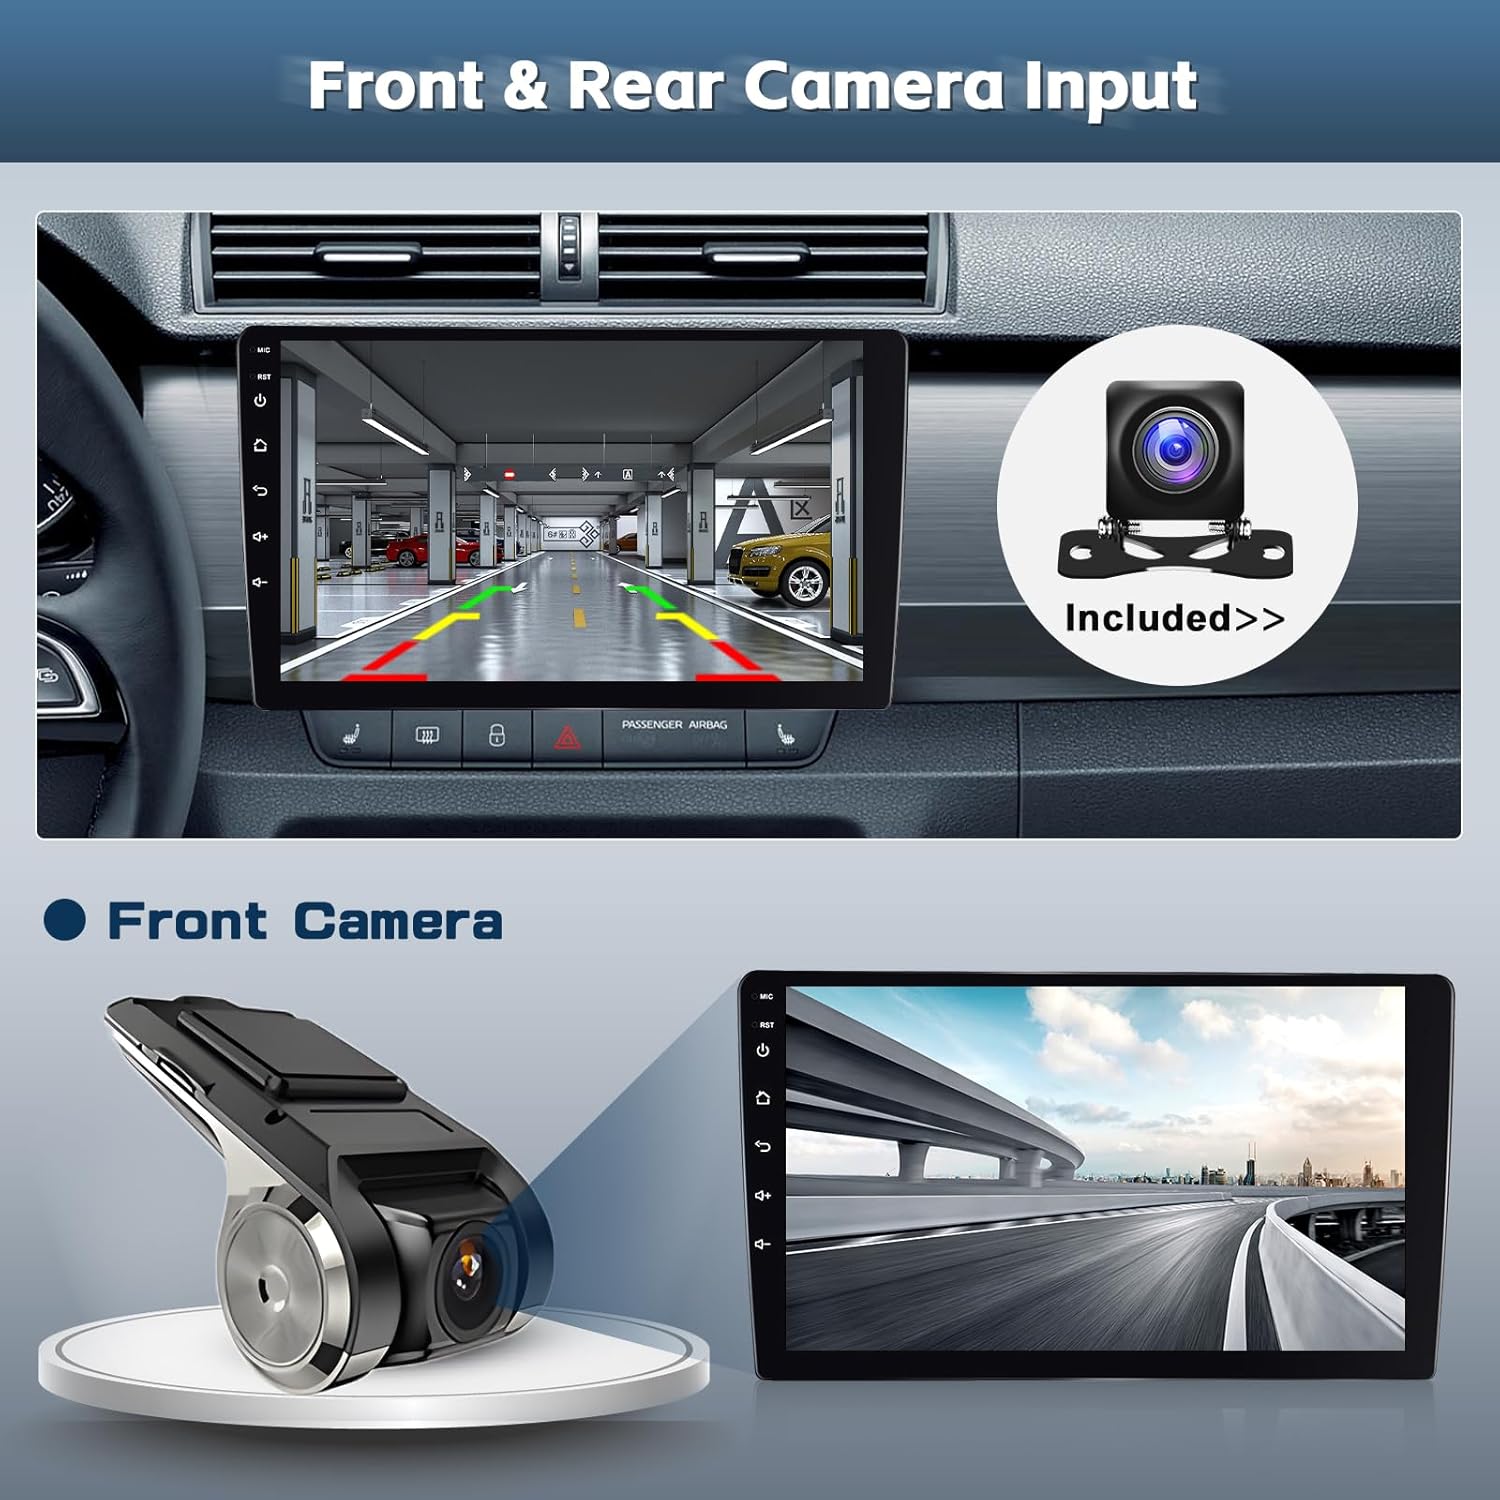
Image 4.5: GPS navigation interface displaying a route and travel information.
4.6 WiFi Connection
Connect the autoradio to the internet via Wi-Fi or a mobile hotspot to access online services and download applications.
- Go to 'Settings' and then 'Wi-Fi'.
- Turn on Wi-Fi and select your desired network.
- Enter the password if prompted.
- Once connected, you can browse the web, stream content, and download apps from the Google Play Store.

Image 4.6: WiFi connection enabling access to online content and applications.
4.7 Steering Wheel Control
The autoradio supports learning and mapping your vehicle's steering wheel controls for convenient operation.
- Go to 'Settings' and then 'Steering Wheel Control'.
- Follow the on-screen instructions to assign functions to your steering wheel buttons.
- Press a button on your steering wheel, then select the corresponding function on the screen.

Image 4.7: Steering wheel control configuration interface.
4.8 Split Screen Functionality
The 9-inch IPS screen supports a triple split-screen display, allowing you to run multiple applications simultaneously.
- To activate split screen, long-press the recent apps button or drag an app to one side of the screen.
- Select another app to occupy the remaining screen space.

Image 4.8: Triple split-screen display for enhanced multitasking.
4.9 Rear Camera Input
The included rear camera provides a clear view of the area behind your vehicle when reversing.
- When the vehicle is shifted into reverse gear, the autoradio will automatically display the rear camera feed.
- Ensure the camera is installed correctly and the reverse trigger wire is connected.

Image 4.9: Rear camera display for parking assistance.
5. Maintenance
To ensure the longevity and optimal performance of your Hikity Autoradio, follow these maintenance guidelines:
- Cleaning: Use a soft, dry cloth to clean the screen and exterior. Avoid abrasive cleaners or solvents.
- Software Updates: Periodically check for software updates provided by Hikity to ensure the system runs efficiently and has the latest features.
- Environmental Conditions: Avoid exposing the unit to extreme temperatures, direct sunlight for prolonged periods, or excessive moisture.
- Cable Connections: Ensure all cables are securely connected and free from damage.
6. Troubleshooting
If you encounter issues with your Hikity Autoradio, refer to the following common troubleshooting steps:
| Problem | Possible Cause | Solution |
|---|---|---|
| No power | Incorrect wiring; Blown fuse | Check power connections (ACC, B+, Ground). Inspect vehicle's fuse box and the unit's fuse. |
| No sound | Speaker wires disconnected; Volume too low; Mute activated | Verify speaker wiring. Increase volume. Check if mute is active. |
| GPS signal lost | GPS antenna obstructed or disconnected | Ensure GPS antenna has a clear view of the sky and is securely connected. |
| CarPlay/Android Auto not connecting | Bluetooth/Wi-Fi off; Phone not paired; App issues | Ensure phone's Bluetooth/Wi-Fi is on. Re-pair the phone. Restart both phone and autoradio. |
| Rear camera not displaying | Camera cable loose; Reverse trigger wire not connected | Check camera input cable connection. Verify reverse trigger wire is correctly connected to the vehicle's reverse light. |
If the problem persists after attempting these solutions, please contact Hikity customer support for further assistance.
7. Specifications
Detailed technical specifications for the Hikity 8-Core Android Autoradio:
- Brand: Hikity
- Vehicle Service Type: Car
- Screen Size: 9 Inches
- Special Features: CarPlay, Android Auto, Built-in WiFi, GPS Navigation, RDS, DAB+, Equalizer (36-band DSP)
- Connectivity Technology: Bluetooth, USB, Wireless
- Included Components: Autoradio head unit, Rear Camera, DAB+ module, Cables, GPS Antenna, Mounting Bracket, User Manual
- Audio Output Mode: Stereo
- Resolution: 1280*720
- Memory Storage Capacity: 64 GB (ROM)
- RAM: 4 GB
- Processor: 8-Core
- Item Weight: 1.5 Kilograms
8. Warranty and Support
Hikity is committed to providing high-quality automotive electronics. For warranty information, product support, or technical assistance, please refer to the contact details provided with your purchase or visit the official Hikity website.

Image 8.1: Hikity customer support is available to assist you.
When contacting support, please have your product model and purchase details ready to facilitate a quicker resolution.