1. Introduction
This manual provides detailed instructions for the setup, operation, and maintenance of your LUCKY TIME Race Clock with Tripod. This versatile LED digital display functions as both a precise timer and a reliable counter, suitable for various applications including sports events, production lines, and educational settings. Please read this manual thoroughly before using the product to ensure correct operation and to maximize its lifespan.

2. Safety Information
- Ensure the power adapter is connected to a compatible power source.
- Do not expose the device to extreme temperatures, direct sunlight for prolonged periods, or moisture.
- Avoid dropping or subjecting the device to strong impacts.
- Keep the device away from children.
- Do not attempt to disassemble or repair the device yourself. Contact customer support for assistance.
- When using the tripod, ensure it is placed on a stable, level surface to prevent tipping.
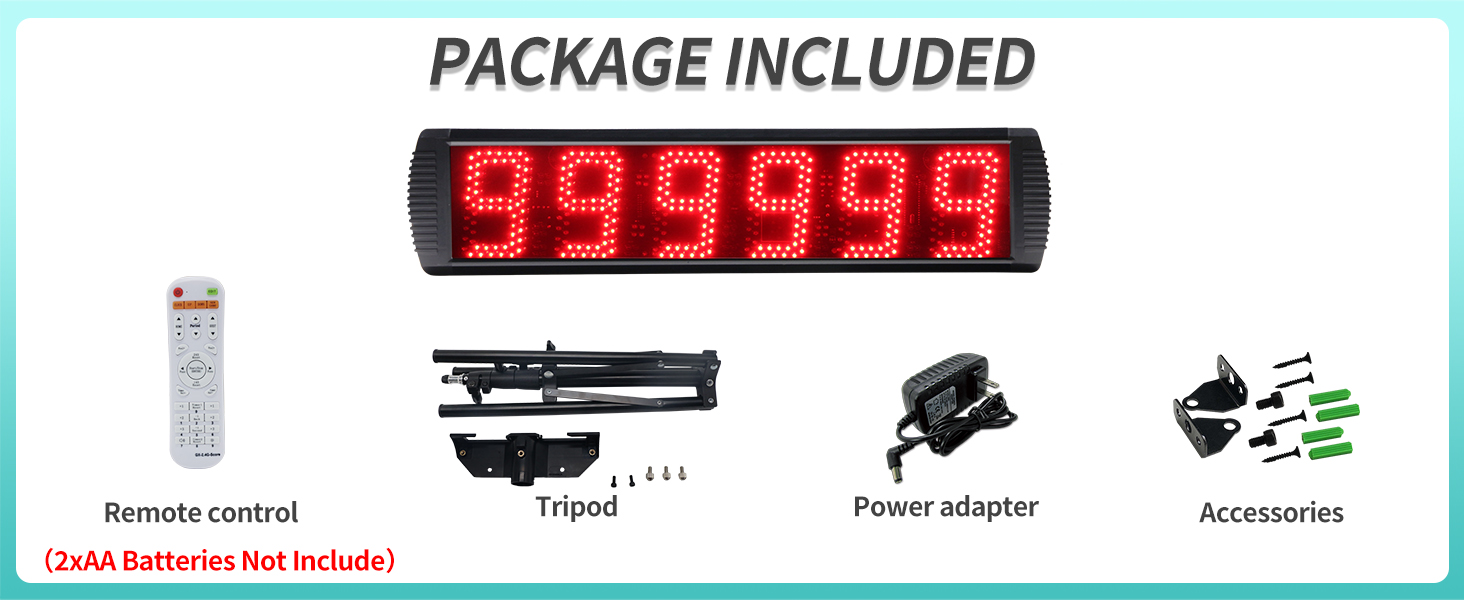
3. Package Contents
Verify that all items listed below are present in your package:
- LED Digital Display Race Clock
- Remote Control (2xAA batteries not included)
- Tripod
- Power Adapter
- Wall Mounting Accessories (screws, wall anchors)
4. Product Overview
The LUCKY TIME Race Clock features a large, clear LED display designed for high visibility and durability.
- Display Dimensions: Approximately 26 inches (66 cm) wide, 6.3 inches (16 cm) high, and 1.6 inches (4 cm) deep.
- Digit Height: Each of the 6 digits is 5 inches (12.7 cm) high.
- Visibility: Digits are clearly visible from up to 124 feet (37.8 meters).
- Brightness: Adjustable brightness levels to suit various lighting conditions.
- Material: Durable aluminum alloy casing, resistant to heat and scratches.
- Buzzer: Built-in buzzer with 3 adjustable sound levels, can be switched off. Activates when time reaches 0 or count changes.
- Control: Remote control effective within 40 feet (12.2 meters) with 360° flexible control.
- Optional Wired Buttons: Supports external wired buttons for faster operation (sold separately).


5. Setup
5.1 Power Connection
Connect the provided power adapter to the clock's power input port and then plug it into a standard electrical outlet. The clock will power on automatically.
5.2 Remote Control Setup
Insert two AA batteries (not included) into the remote control, observing the correct polarity.
5.3 Mounting Methods
The race clock offers three primary mounting options:
- Tripod Stand:
Assemble the tripod by extending its legs and securing the clock to the tripod mount. Adjust the height as needed. Ensure the tripod is stable on a flat surface.
- Wall Hanging:
Use the provided wall mounting accessories (screws and anchors) to securely attach the clock to a wall. Ensure the wall can support the weight of the clock.
- Desktop Stand:
The clock can be placed on a flat surface using its integrated stand or by simply resting it securely.

6. Operating Instructions
The LUCKY TIME Race Clock offers both timing and counting functionalities, controlled via the remote.
6.1 Timer Functions
The timer mode includes a 12/24H clock, countdown, count-up, and stopwatch with millisecond precision.
- 12/24H Clock: Displays current time in either 12-hour or 24-hour format. Use the remote to switch between modes and set the time.
- Countdown Timer: Set a specific duration, and the clock will count down to zero. The buzzer will sound upon reaching zero.
- Count-Up Timer: Starts from zero and counts upwards.
- Stopwatch: Measures elapsed time with millisecond accuracy. Features start, stop, and reset functions.

6.2 Counter Functions
The counter mode allows for both counting up and counting down, with a range up to 999,999.
- Count Up: Starts from 0 and counts up to 999,999.
- Count Down: Starts from 999,999 and counts down to 0.


6.3 Remote Control Operation
The remote control allows full access to all clock functions. Refer to the remote's button layout for specific controls. Key functions include:
- Mode Selection: Switch between clock, timer, and counter modes.
- Start/Stop/Reset: Control timing and counting operations.
- Set: Enter setting mode for time, countdown values, etc.
- Brightness Adjustment: Increase or decrease display brightness.
- Buzzer Control: Adjust buzzer volume or turn it off.
For faster and easier use of various functions, especially in high-speed environments, optional wired buttons can be connected (purchased separately). Button 1 is recommended for timing functions, and Button 2 for counting functions.
7. Maintenance
- Cleaning: Wipe the display and casing with a soft, dry cloth. Do not use abrasive cleaners or solvents.
- Storage: When not in use for extended periods, store the clock in a cool, dry place. Remove batteries from the remote control to prevent leakage.
- Inspection: Periodically check the power cord and connections for any signs of damage.
8. Troubleshooting
| Problem | Possible Cause | Solution |
|---|---|---|
| Display is blank. | No power or power adapter issue. | Check power connection. Ensure adapter is securely plugged in and outlet is functional. |
| Remote control not working. | Dead batteries or remote out of range. | Replace remote batteries. Ensure you are within 40 feet (12.2 meters) of the clock and pointing the remote towards it. |
| Buzzer not sounding. | Buzzer volume set to off or too low. | Adjust buzzer volume using the remote control. |
| Incorrect time displayed. | Time not set correctly. | Use the remote control to enter setting mode and adjust the time. |
9. Specifications
| Feature | Detail |
|---|---|
| Brand | LUCKY TIME |
| Model | B0CFVJB7L4 |
| Material | Aluminum Alloy |
| Product Dimensions (W x H x D) | 26" x 6.3" x 1.6" (approx. 66cm x 16cm x 4cm) |
| Screen Size | 27 Inches (diagonal) |
| Digit Height | 5 Inches (12.7 cm) |
| Item Weight | 5.6 Pounds (approx. 2.54 kg) |
| Remote Control Range | Up to 40 feet (12.2 meters) |
| Buzzer Levels | 3 levels (including off) |
| Power Source | AC Adapter |
10. Warranty and Support
For warranty information or technical support, please contact LUCKY TIME customer service through the retailer where the product was purchased. Please have your product model number (B0CFVJB7L4) and purchase date available when contacting support.
For additional resources and product information, you may visit the LUCKY TIME Store on Amazon.