Amesias W11552018
Amesias W11552018 Whirlpool Control Board Instruction Manual
Model: W11552018
Introduction
This manual provides essential information for the installation and use of the Amesias W11552018 Control Board, an updated replacement part for specific Whirlpool microwave models. Please read these instructions carefully before proceeding with installation to ensure proper function and safety.
Important Compatibility Information
This control board is NOT universal. It is compatible only with specific Whirlpool microwave models. Using an incorrect part may lead to improper fit, malfunction, or damage to your appliance.
Always verify compatibility with your appliance's model number before installation. Parts may appear similar, but internal differences can prevent proper operation.

Image: A red stop sign with text emphasizing the importance of checking model numbers for compatibility.
Compatible Models:
- UMV1160CB3-WPL, UMV1160CB4-WPL, UMV1160CB5-WPL, UMV1160CB6-WPL, UMV1160CB7-WPL, UMV1160CB8-WPL
- UMV1160CS3-WPL, UMV1160CS4-WPL, UMV1160CS5-WPL, UMV1160CS6-WPL, UMV1160CS7-WPL, UMV1160CS8-WPL, UMV1160CS9-WPL
- UMV1160CW3-WPL, UMV1160CW4-WPL, UMV1160CW5-WPL, UMV1160CW6-WPL, UMV1160CW7-WPL, UMV1160CW8-WPL
- UMV1170LB0-WPL, UMV1170LB00-WPL, UMV1170LS0-WPL, UMV1170LS00-WPL, UMV1170LW0-WPL, UMV1170LW00-WPL
- WMH31017AB5-WPL, WMH31017AD5-WPL, WMH31017AS5-WPL, WMH31017AW5-WPL
- WMH31017FB0-WPL, WMH31017FB1-WPL, WMH31017FB2-WPL, WMH31017FD0-WPL, WMH31017FD1-WPL, WMH31017FD2-WPL, WMH31017FS0-WPL, WMH31017FS1-WPL, WMH31017FS2-WPL, WMH31017FW0-WPL, WMH31017FW1-WPL, WMH31017FW2-WPL
- WMH31017HB0-WPL, WMH31017HB1-WPL, WMH31017HB2-WPL, WMH31017HB3-WPL, WMH31017HB4-WPL, WMH31017HB5-WPL, WMH31017HB6-WPL, WMH31017HB7-WPL
- WMH31017HS0-WPL, WMH31017HS09-WPL, WMH31017HS1-WPL, WMH31017HS2-WPL, WMH31017HS3-WPL, WMH31017HS4-WPL, WMH31017HS5-WPL, WMH31017HS6-WPL, WMH31017HS7-WPL, WMH31017HS8-WPL, WMH31017HS9-WPL
- WMH31017HW0-WPL, WMH31017HW1-WPL, WMH31017HW2-WPL, WMH31017HW3-WPL, WMH31017HW4-WPL, WMH31017HW5-WPL, WMH31017HW6-WPL, WMH31017HW7-WPL, WMH31017HW8-WPL
- WMH31017HZ0-WPL, WMH31017HZ08-WPL, WMH31017HZ1-WPL, WMH31017HZ2-WPL, WMH31017HZ3-WPL, WMH31017HZ4-WPL, WMH31017HZ5-WPL, WMH31017HZ6-WPL, WMH31017HZ7-WPL, WMH31017HZ8-WPL
This part number W11552018 (AP7175756) replaces W10892389, W10831030, W10849829, W10886650, W11106356.
Product Features and Design
The Amesias W11552018 control board is an updated version designed for specific Whirlpool microwave models. Key design changes include:
- Integrated Thermistor: The new control board features an integrated thermistor. This means the board will not have a P4 electric plug for an external thermistor. You do not need to remove the existing thermistor from the microwave oven cavity; it can remain in place.
- New Style Micro Computer: This updated board may appear different from older versions like W10849829 due to its new micro-computer design.

Image: Text explaining the integrated thermistor feature and the absence of a P4 electric plug.

Image: Front view of the W11552018 Control Board.
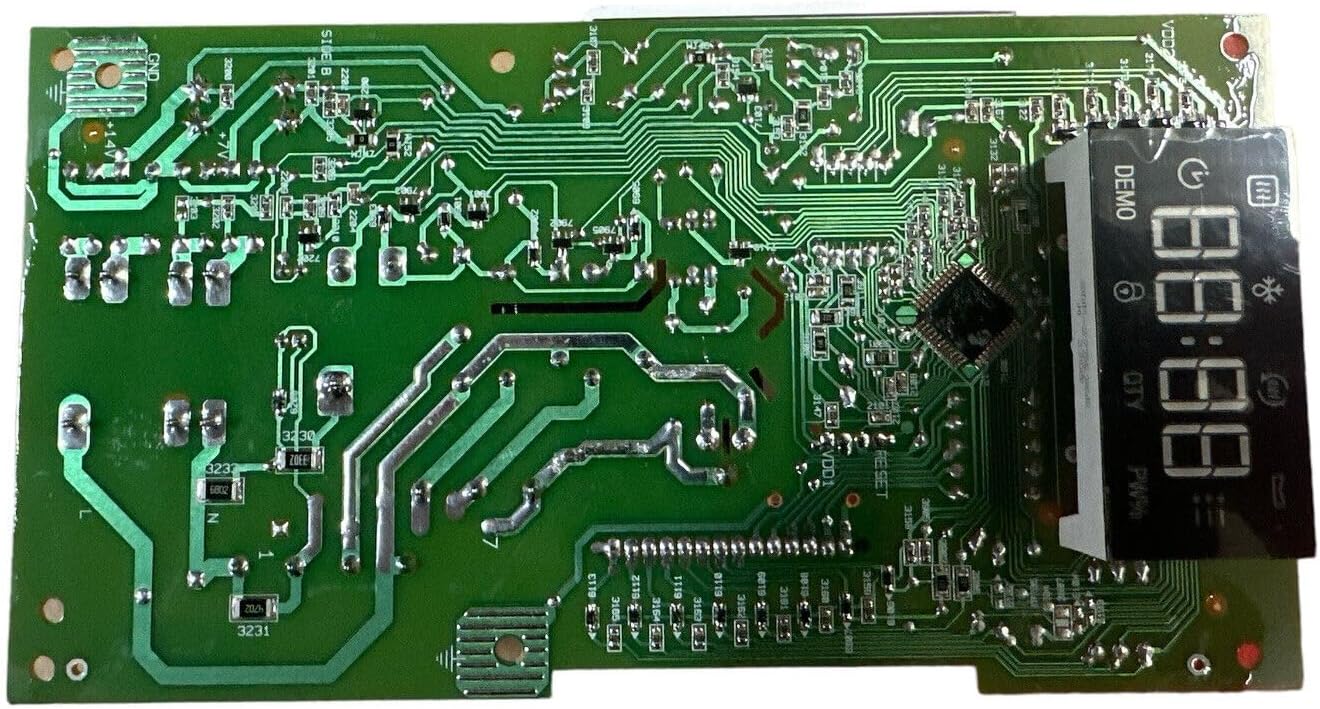
Image: Rear view of the W11552018 Control Board, showing the circuitry and display.
Installation Guidelines
Safety First: Before attempting any installation or repair, ensure the microwave oven is completely unplugged from its power source to prevent electrical shock.
- Preparation: Disconnect the microwave oven from the electrical outlet. It is recommended to place the microwave on a stable, clear surface.
- Accessing the Control Board: Typically, the control board is located behind the control panel. Access usually involves removing one or more screws securing the control panel. Refer to your specific microwave model's service manual or online resources for precise access instructions.
- Disconnecting Old Board: Carefully disconnect all wiring harnesses and ribbon cables from the old control board. Pay close attention to the orientation and connection points for reassembly. It can be helpful to take photos before disconnecting.
- Removing Old Board: Unscrew or unclip the old control board from its mounting.
- Installing New Board: Position the new W11552018 control board and secure it with the screws or clips.
- Connecting Wires: Reconnect all wiring harnesses and ribbon cables to the new board. Ensure all connections are firm and correctly oriented. Handle ribbon cables with care to avoid damage.
- Reassembly: Reattach the control panel and any other components removed during access.
- Testing: Plug the microwave oven back into the electrical outlet and test its functions to ensure the new control board is operating correctly.
For visual guidance, many users find instructional videos on platforms like YouTube helpful for specific microwave models. Search for "[Your Microwave Model] control board replacement" for detailed visual steps.
Troubleshooting Common Issues
If you encounter issues after installing the W11552018 control board, consider the following:
- Non-responsive Buttons or Display:
- Check all ribbon cable connections to ensure they are fully seated and not damaged.
- Verify that all wiring harnesses are securely connected.
- Light Stays On/Off or Malfunctions:
- Ensure all light-related connections are correct.
- Confirm the new board is fully compatible with your specific model, as some older models might have different light control mechanisms.
- Microwave Not Functioning:
- Double-check all electrical connections.
- Ensure the microwave is receiving power.
- Re-verify that the installed board is the correct part number for your specific microwave model.
If problems persist, consult a qualified appliance technician or contact customer support.
Specifications
| Part Number | W11552018 (AP7175756) |
| Replaces Part Numbers | W10892389, W10831030, W10849829, W10886650, W11106356 |
| Item Weight | 10.9 ounces |
| Package Dimensions | 10.12 x 6.81 x 2.76 inches |
| Batteries Required | No |
| Manufacturer | OEM |
Support and Contact
For further assistance, technical support, or warranty inquiries, please contact the seller or manufacturer directly through your purchase platform.
Always refer to your original appliance's user manual for specific disassembly and reassembly instructions, as this manual provides general guidance for the replacement part.
Ask a question about this manual
Ask about setup, troubleshooting, compatibility, parts, safety, or missing instructions. Manuals+ will review the question and use this page’s manual context to help answer it.