Introduction
This manual provides comprehensive instructions for the installation, maintenance, and safe operation of the AP202 Tandem Axle Equalizer Kit. This kit is designed to facilitate smooth load distribution between tandem axles, enhancing trailer stability and ride comfort. Please read this manual thoroughly before beginning installation to ensure proper setup and long-term performance.
Safety Information
Always prioritize safety during installation and maintenance. Failure to follow these guidelines may result in injury or damage to property.
- Wear appropriate personal protective equipment (PPE), including safety glasses, gloves, and sturdy footwear.
- Ensure the trailer is securely supported on jack stands and the wheels are chocked before working underneath.
- Do not exceed the weight capacity of your trailer or the components.
- Use only tools in good condition and suitable for the task.
- If you are unsure about any step, consult a qualified mechanic.
Package Contents
Verify that all components listed below are present in your kit before beginning installation.
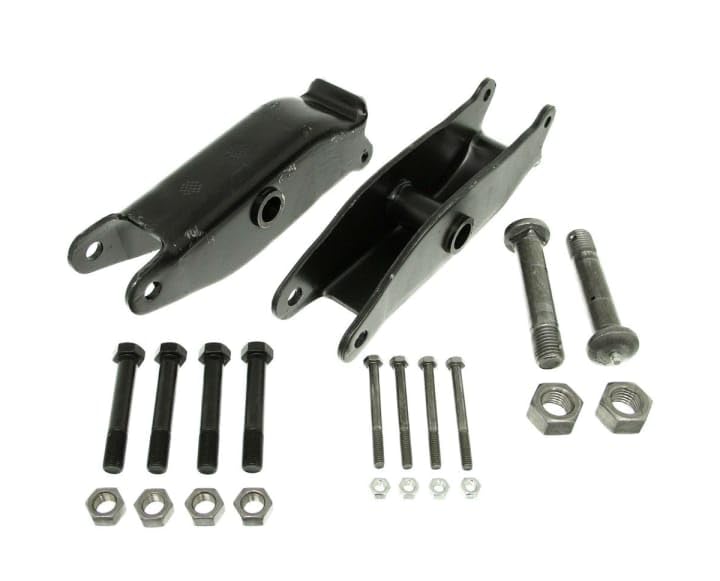
Figure 1: AP202 Tandem Axle Equalizer Kit components. This image displays two black, heavy-duty equalizer bars, along with a collection of bolts and nuts of various sizes, essential for assembly and installation.
- 2 x Equalizer Bars (AP202-33 Inch Spacing)
- 4 x Slipper Spring Bolts
- 4 x Slipper Spring Nuts
- 2 x Center Hanger Bolts
- 2 x Center Hanger Nuts
- (Note: Specific bolt and nut sizes will vary based on application and are designed for 2-inch slipper springs.)
Setup and Installation
Follow these steps carefully for proper installation of the AP202 Tandem Axle Equalizer Kit.
- Prepare the Trailer: Park the trailer on a level, firm surface. Chock the wheels and use a jack to lift the trailer frame, then secure it with appropriate jack stands. Ensure the axles are free to move.
- Remove Old Components (if applicable): If replacing existing equalizers, carefully remove the old bolts, nuts, and equalizer bars. Note the orientation of the existing components.
- Position the Equalizer: Place the new AP202 equalizer bar between the two slipper springs. The equalizer should pivot freely on the center hanger.
- Install Slipper Spring Bolts: Insert the slipper spring bolts through the eyes of the slipper springs and the corresponding holes in the equalizer bar. Secure with the provided nuts. Do not fully tighten at this stage.
- Install Center Hanger Bolt: Insert the center hanger bolt through the trailer frame hanger and the central pivot point of the equalizer bar. Secure with the provided nut.
- Tighten All Fasteners: Once all components are in place and aligned, progressively tighten all bolts and nuts to the manufacturer's specified torque settings. Refer to your trailer's specific torque specifications for suspension components. Ensure all connections are secure.
- Lower the Trailer: Carefully lower the trailer from the jack stands.
- Final Inspection: Visually inspect all installed components to ensure proper alignment and secure fastening. Check for any obstructions or binding.
Note: It is recommended to re-check torque settings after the first 50-100 miles of travel and periodically thereafter.
Functionality and Operation
The AP202 Tandem Axle Equalizer Kit is a passive mechanical component designed to distribute weight evenly between the two axles of a tandem axle trailer. When one wheel encounters an obstacle or a dip, the equalizer pivots, allowing the springs to compress or extend independently, thereby maintaining consistent ground contact for both axles. This action helps to:
- Improve ride quality and stability.
- Reduce stress on individual suspension components.
- Enhance tire wear by maintaining better contact with the road surface.
No active operation is required from the user once installed. The system functions automatically as the trailer moves.
Maintenance
Regular maintenance ensures the longevity and safe operation of your equalizer kit.
- Periodic Inspection: Annually, or every 10,000 miles, inspect the equalizer bars, bolts, and nuts for signs of wear, corrosion, or damage.
- Lubrication: If your equalizer bars have grease zerks (fittings), lubricate them periodically with appropriate chassis grease. The AP202 kit typically uses dry bolts, but always check for lubrication points.
- Fastener Torque: Re-check the torque of all mounting bolts and nuts periodically, especially after heavy use or off-road travel. Loose fasteners can lead to premature wear or failure.
- Cleaning: Keep the area around the equalizer free from excessive dirt, mud, and debris, which can accelerate wear.
Troubleshooting
This section addresses common issues you might encounter.
| Problem | Possible Cause | Solution |
|---|---|---|
| Excessive trailer sway or instability | Loose equalizer bolts or worn components. | Inspect and re-torque all bolts. Replace worn equalizer bars or bushings. |
| Uneven tire wear on tandem axles | Equalizer not functioning correctly or improper installation. | Verify equalizer pivots freely. Check for bent or damaged components. Ensure correct spring alignment. |
| Squeaking or grinding noises from suspension | Lack of lubrication (if applicable) or worn bushings. | Lubricate grease zerks if present. Inspect and replace worn bushings. |
Specifications
- Model: AP202
- Type: Tandem Axle Equalizer Kit
- Spacing: 33 Inch (center-to-center of spring eyes)
- Spring Compatibility: Designed for 2 Inch Slipper Springs
- Material: Heavy-duty steel construction
- Manufacturer: PartSt (as per product specifications)
Warranty and Support
For specific warranty information, please refer to the documentation provided with your purchase or contact the manufacturer directly. For technical support or inquiries regarding the AP202 Tandem Axle Equalizer Kit, please reach out to the product manufacturer or your authorized dealer.
Manufacturer: GENERIC (as per product brand)
ASIN: B0CFRK51PQ