Xprinter XP-Q801K
Xprinter XP-Q801K Thermal Receipt Printer User Manual
Model: XP-Q801K
1. Introduction
This manual provides comprehensive instructions for the setup, operation, and maintenance of your Xprinter XP-Q801K Thermal Receipt Printer. This printer is designed for efficient and reliable receipt printing in various business environments, featuring high-speed direct thermal printing and a USB interface for easy connectivity.

Figure 1: Front view of the Xprinter XP-Q801K Thermal Receipt Printer, showing the paper output slot and control buttons.
2. Setup
2.1 Unpacking
Carefully remove the printer and all accessories from the packaging. Verify that all components are present:
- Xprinter XP-Q801K Thermal Receipt Printer
- Power Adapter
- USB Cable
- Paper Roll (starter)
- User Manual (this document)
2.2 Connecting the Printer
Before connecting, ensure the printer is powered off. Locate the ports on the rear of the printer.
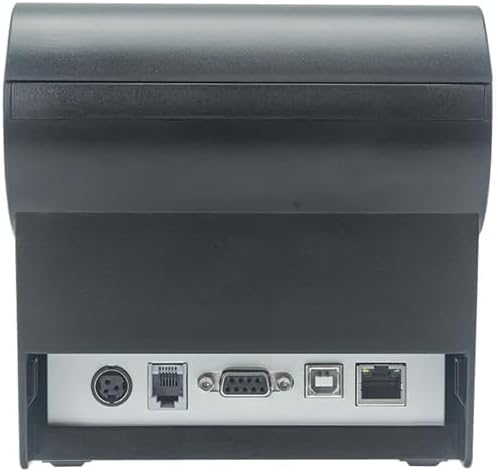
Figure 2: Rear view of the printer, highlighting the power, USB, and other interface ports.
- Connect Power: Insert the power adapter cable into the printer's power input port (DC 24V/2.5A) and plug the adapter into a suitable electrical outlet (AC 100-240V, 50-60Hz).
- Connect USB: Connect one end of the provided USB cable to the USB port on the printer and the other end to an available USB port on your computer.
- Cash Drawer (Optional): If using a cash drawer, connect its cable to the cash drawer port (DC 24V/1A) on the printer.
2.3 Loading the Paper Roll
The printer uses 80mm wide thermal paper rolls.
- Open the paper cover by pushing the cover open button (usually located on the side or front).
- Insert the thermal paper roll with the printing surface facing the print head. Ensure the roll is seated correctly in the paper compartment.
- Pull a small amount of paper out past the cutter.
- Close the paper cover firmly until it clicks into place.
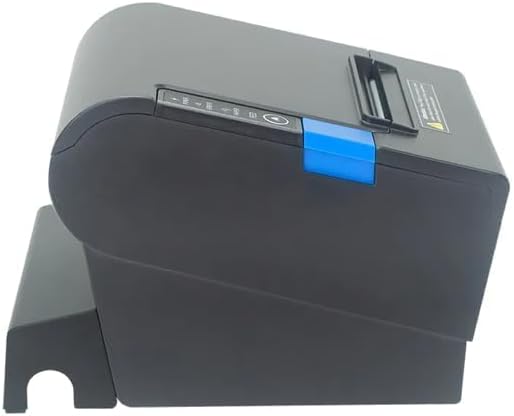
Figure 3: Side view of the printer, illustrating the paper cover mechanism.
2.4 Driver Installation
The printer requires a driver to communicate with your computer. Drivers are typically available for Windows, Linux, Android, and Mac operating systems.
- For Windows users, the printer often supports plug-and-play installation or requires a specific Windows driver.
- For Linux, Android, and Mac, SDKs (Software Development Kits) are usually provided for integration.
Refer to the manufacturer's website or the included driver CD/USB drive for the latest drivers and installation instructions specific to your operating system.
3. Operating the Printer
3.1 Powering On/Off
Locate the power switch on the side or rear of the printer. Flip the switch to the 'ON' position to power on the printer. The 'POWER' indicator light will illuminate. Flip to 'OFF' to power down.
3.2 Indicator Lights and Buttons
The front panel typically features several indicator lights and buttons:
- POWER: Indicates the printer is powered on.
- ERROR: Illuminates or flashes to indicate an error condition (e.g., paper out, print head overheating, cutter error).
- PAPER: Indicates that the paper roll is low or out.
- FEED Button: Press to manually feed paper. Hold to perform a self-test print (if supported by model).
3.3 Basic Printing
Once the printer is connected and drivers are installed, you can print receipts from your POS software or application. Ensure the printer is selected as the default or active printer in your system settings.
The printer supports various print speeds up to 300 mm/s and automatic paper cutting after each print job.
4. Maintenance
Regular maintenance ensures optimal performance and extends the life of your printer.
4.1 Cleaning the Print Head
The print head should be cleaned regularly, especially if print quality degrades.
- Turn off the printer and disconnect the power cable.
- Open the paper cover.
- Use a cotton swab lightly dampened with isopropyl alcohol (ethanol) to gently wipe the thermal elements of the print head.
- Allow the print head to dry completely before closing the cover and reconnecting power.
4.2 Cleaning the Cutter
Paper dust can accumulate around the cutter blade, affecting its performance.
- Turn off the printer and disconnect the power cable.
- Carefully remove any visible paper dust or debris from around the cutter blade using a soft brush or compressed air.
- Do not use liquids on the cutter.
4.3 General Cleaning
Wipe the exterior of the printer with a soft, damp cloth. Avoid using harsh chemicals or abrasive cleaners.
5. Troubleshooting
This section addresses common issues you might encounter with your printer.
| Problem | Possible Cause | Solution |
|---|---|---|
| Printer does not power on. | Power cable not connected; Power outlet faulty; Power switch off. | Ensure power cable is securely connected. Test power outlet. Turn power switch to 'ON'. |
| No printing. | Paper out; Paper loaded incorrectly; Driver not installed or incorrect; USB cable loose; Printer not selected. | Load new paper roll. Re-load paper correctly. Install/reinstall correct driver. Check USB connection. Select printer in software. |
| ERROR light is on/flashing. | Paper out; Paper jam; Print head overheating; Cutter error. | Load paper. Clear paper jam. Allow printer to cool down. Check cutter for obstructions. |
| Poor print quality. | Dirty print head; Low quality paper; Old paper roll. | Clean the print head (see Section 4.1). Use high-quality thermal paper. Replace old paper rolls. |
If the problem persists after attempting these solutions, please contact customer support.
6. Specifications
| Feature | Detail |
|---|---|
| Printing Method | Direct Thermal |
| Paper Width | 80 mm |
| Print Speed | 230 mm/s, 260 mm/s, 300 mm/s |
| Interface | USB |
| Line Spacing | 3.75 mm (adjustable by commands) |
| Character Size (ANK) | Font A: 1.5 × 3.0 mm (12 × 24 dots) Font B: 1.1 × 2.1 mm (9 × 17 dots) |
| Character Size (Chinese/Traditional Chinese) | 3.0 × 3.0 mm (24 × 24 dots) |
| Barcode Types | UPC-A / UPC-E / JAN13 (EAN13) / JAN8 (EAN8) / CODE39 / ITF / CODABAR / CODE93 / CODE128 |
| 2D Barcode | QR Code / PDF417 |
| NV Flash Memory | 256 KB |
| Input Power | AC 100-240V, 50-60Hz |
| Output Power | DC 24V/2.5A |
| Cash Drawer Output | DC 24V/1A |
| Weight | 1.0 kg |
| Dimensions (D × W × H) | 194.5 × 145 × 146.4 mm |
| Operating Temperature | 0~45°C |
| Operating Humidity | 10~80% RH |
| Cutter Life | 1.5 million cuts |
| Print Head Life | 150 km |
| OS Compatibility | Windows, Linux, Android, Mac |
Ask a question about this manual
Ask about setup, troubleshooting, compatibility, parts, safety, or missing instructions. Manuals+ will review the question and use this page’s manual context to help answer it.