Introduction
This manual provides detailed instructions for the setup, operation, and maintenance of the HUIOP FanJu FJ3356 Wireless Temperature and Humidity Monitor. Please read this manual thoroughly before using the device to ensure proper function and longevity.
Product Overview
The FanJu FJ3356 is a digital hygrothermograph designed to monitor both indoor and outdoor temperature and humidity. It features a clear LCD display, a perpetual calendar, and a wireless outdoor sensor for remote measurements.
Key Features:
- Indoor and outdoor temperature and humidity measurement.
- Comfort level indicator for indoor climate.
- Perpetual calendar up to year 2099 with day of the week in 8 languages.
- 12/24 hour time format selection.
- Temperature and humidity trend display.
- Max/Min humidity and temperature value display.
- Wireless outdoor sensor with 433.92 MHz RF transmission, up to 60m range in open areas.
- Optional DCF time control (for Germany only).

Figure 1: HUIOP FanJu FJ3356 Digital Hygrothermograph main unit. This image shows the front view of the white main unit with its display showing indoor and outdoor temperature/humidity, time, and date, along with a comfort indicator.
Components and Parts
The FanJu FJ3356 system consists of a main display unit and a wireless outdoor sensor. Familiarize yourself with the different parts and their functions.

Figure 2: Diagram illustrating the components and buttons of the FanJu FJ3356. This image details the LCD display sections (A1-A10), control buttons (B1-B5), and battery compartments (C1-C2) for both the main unit and the wireless outdoor sensor.
Part A - LCD Display:
- A1: Comfort Indicator (DRY, COMFORT, WET)
- A2: Indoor Temperature
- A3: Outdoor Temperature
- A4: Alarm Icon
- A5: Time
- A6: Indoor Humidity
- A7: Outdoor Humidity
- A8: Week (Day of the week)
- A9: Date
- A10: Radio Controlled Icon (for DCF signal)
Part B - Buttons (located on the back of the main unit):
- B1: "MODE" button
- B2: "ALERT" button
- B3: "UP" button
- B4: "DOWN" button
- B5: "MEM" button
Part C - Structure:
- C1: Main unit battery compartment
- C2: Wireless Outdoor Sensor battery compartment
Setup
1. Battery Installation:
The main unit and the wireless outdoor sensor each require 2 x LR03 AAA batteries (not included).
- Open the battery compartment (C1 for main unit, C2 for outdoor sensor) on the back of each device.
- Insert 2 x LR03 AAA batteries into each compartment, ensuring correct polarity (+/-).
- Close the battery compartments securely.
Note: It is recommended to insert batteries into the outdoor sensor first, then the main unit, to ensure proper pairing.
2. Initial Pairing and Placement:
Once batteries are installed, the main unit will automatically attempt to connect with the outdoor sensor. The outdoor sensor has a transmission range of up to 60 meters in an open area.
- Main Unit Placement: The main unit can be placed on a flat surface using its integrated stand or mounted on a wall. Choose a central location indoors for optimal indoor temperature and humidity readings.
- Outdoor Sensor Placement: Place the outdoor sensor in a sheltered location outdoors, away from direct sunlight and rain, to ensure accurate readings and prolong its lifespan. Ensure it is within the 60-meter transmission range of the main unit.

Figure 3: The FanJu FJ3356 main unit can be used with its stand on a flat surface or hung on a wall. This image shows the device in both configurations within a home environment.

Figure 4: The FanJu FJ3356 outdoor sensor mounted on an exterior wall. This image illustrates the recommended placement for the outdoor sensor, showing it attached to a brick wall.
3. Setting Time, Date, and Language:
After power-on, you may need to set the time, date, and preferred language for the day of the week display.
- Press and hold the "MODE" button (B1) for a few seconds to enter time setting mode.
- Use the "UP" (B3) and "DOWN" (B4) buttons to adjust the flashing value (e.g., hour, minute, year).
- Press "MODE" again to confirm the setting and move to the next value.
- Continue until all settings (time, 12/24 hour format, year, month, day, day of week language) are configured.
- The day of the week can be displayed in English, German, Italian, French, Russian, Spanish, Dutch, or Danish.
- Press "MODE" one last time or wait for 15 seconds for the settings to be saved automatically.
Note: The device supports DCF time control for Germany. If you are in Germany, the time will automatically synchronize with the DCF signal. For other regions, manual time setting is required.
Operating Instructions
Display Information:
- Temperature & Humidity: The display shows current indoor (A2, A6) and outdoor (A3, A7) temperature and humidity readings.
- Indoor Temperature Range: -9.9°C to +50°C (15°F to 122°F)
- Outdoor Temperature Range: -20°C to +60°C (-4°F to 140°F)
- Humidity Range (Indoor & Outdoor): 20% RH to 95% RH
- Comfort Indicator (A1): This icon indicates the indoor climate comfort level:
- DRY: Humidity is low.
- COMFORT: Humidity and temperature are at optimal levels.
- WET: Humidity is high.
- Trend Display: Small arrows next to temperature and humidity readings indicate whether the values are rising, falling, or stable.
- Time & Date (A5, A9, A8): Displays the current time, date, and day of the week.
Button Functions:
- MODE (B1):
- Short press: Toggle between different display modes (e.g., current time, alarm time).
- Long press: Enter setting mode for time, date, and other parameters.
- ALERT (B2):
- Short press: Activate/deactivate alarm.
- Long press: Enter alarm setting mode.
- UP (B3):
- In setting mode: Increase the value.
- Outside setting mode: Toggle temperature unit between Celsius (°C) and Fahrenheit (°F).
- DOWN (B4):
- In setting mode: Decrease the value.
- Outside setting mode: Manually search for outdoor sensor signal.
- MEM (B5):
- Short press: Display MAX/MIN temperature and humidity readings.
- Long press: Clear MAX/MIN readings.
Maintenance
- Cleaning: Wipe the device with a soft, dry cloth. Do not use abrasive cleaners or immerse the device in water.
- Battery Replacement: Replace batteries in both the main unit and the outdoor sensor when the low battery indicator appears on the display. Always replace all batteries at the same time to ensure optimal performance.
- Storage: If storing the device for an extended period, remove the batteries to prevent leakage.
- Outdoor Sensor Care: Ensure the outdoor sensor is protected from extreme weather conditions (e.g., heavy rain, direct prolonged sunlight, snow) to maintain accuracy and extend its lifespan.
Troubleshooting
| Problem | Possible Cause | Solution |
|---|---|---|
| No display on main unit. | Batteries are dead or incorrectly inserted. | Check battery polarity and replace with new LR03 AAA batteries. |
| Outdoor temperature/humidity not displayed or flashing. | No connection to outdoor sensor; sensor batteries low; sensor out of range; interference. |
|
| Incorrect temperature/humidity readings. | Sensor exposed to direct sunlight, heat sources, or moisture. | Relocate the sensor to a sheltered area, away from direct elements and heat/cold sources. Allow time for readings to stabilize. |
| Time is incorrect (outside Germany). | Time was not set manually or reset after power loss. | Manually set the time and date using the "MODE" button as described in the Setup section. |
Specifications
| Feature | Detail |
|---|---|
| Brand | HUIOP (FanJu) |
| Model | FJ3356 |
| Indoor Temperature Range | -9.9°C to +50°C (15°F to 122°F) |
| Outdoor Temperature Range | -20°C to +60°C (-4°F to 140°F) |
| Temperature Accuracy | 0.1°C / 0.1°F |
| Humidity Range (Indoor & Outdoor) | 20% RH to 95% RH |
| Humidity Accuracy | 1% RH |
| Wireless Transmission Frequency | 433.92 MHz |
| Wireless Transmission Range | Up to 60 meters (open area) |
| Main Unit Power | 2 x LR03 AAA batteries (not included) |
| Outdoor Sensor Power | 2 x LR03 AAA batteries (not included) |
| Main Unit Dimensions | 16.5 x 5.5 x 12.5 cm (6.5 x 2.2 x 4.9 inches) |
| Outdoor Sensor Dimensions | 9.6 x 3.4 x 5 cm (3.8 x 1.3 x 2 inches) |
| Package Dimensions | 14.5 x 9 x 5.5 cm (5.7 x 3.5 x 2.2 inches) |
| Package Weight | 241g |
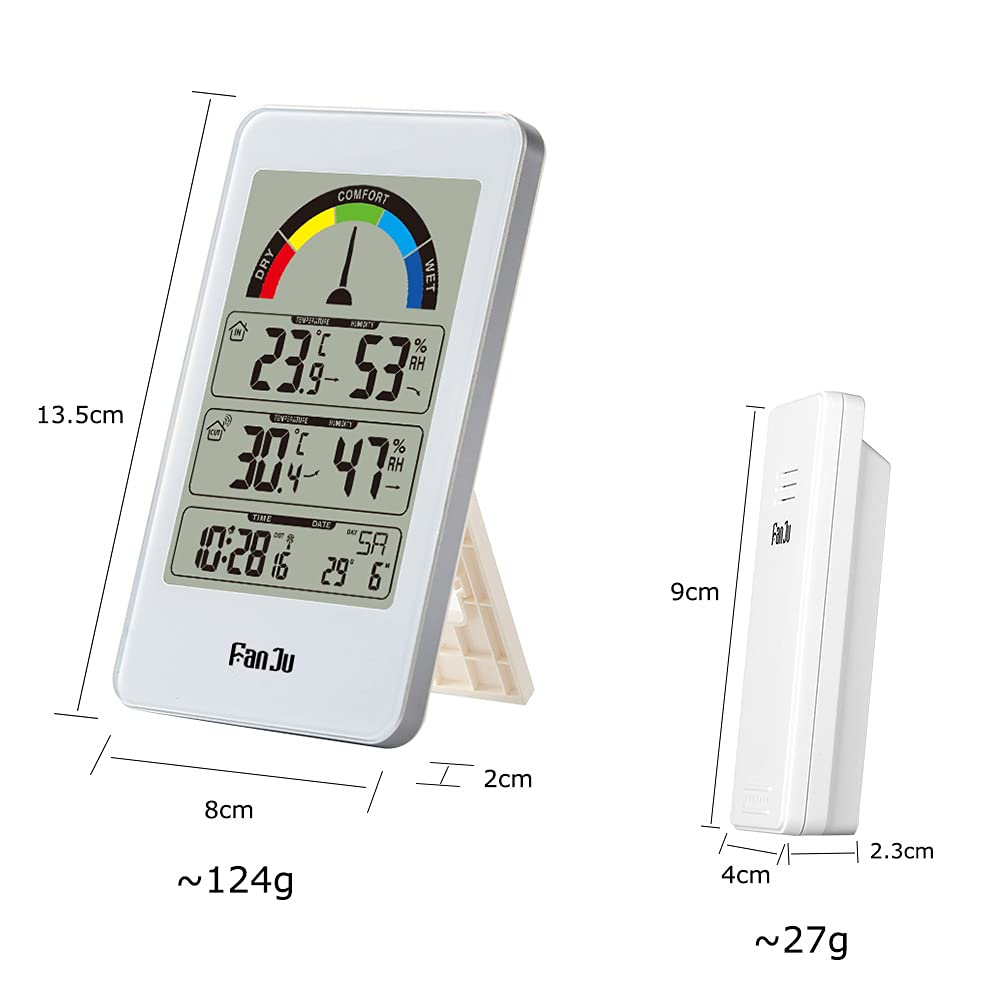
Figure 5: Detailed dimensions of the FanJu FJ3356 main unit and its wireless outdoor sensor. This image provides measurements in centimeters and approximate weights in grams for both components.
Warranty and Support
Specific warranty information and direct customer support contact details were not provided in the product data. Please refer to the retailer or manufacturer's official website for warranty terms and support options.
For general inquiries or troubleshooting not covered in this manual, please consult the product listing page or contact the seller directly.