1. Important Safety Information
Read this entire manual before operating the HYPER GOGO Cruiser 12 Plus electric motorbike. Failure to follow instructions can result in serious injury or property damage. Always prioritize safety.
- Recommended Age: This product is designed for riders 6 years and older.
- Weight Limit: Do not exceed the maximum load capacity of 145 lbs (65 kg).
- Protective Gear: Always wear a helmet, knee pads, elbow pads, and appropriate footwear when riding.
- Adult Supervision: Constant adult supervision is required for all riders, especially young children.
- Riding Environment: Ride in safe, open areas away from traffic, pedestrians, and obstacles. Avoid riding on uneven terrain, steep inclines, or wet surfaces.
- Braking: Familiarize yourself with the rear hub brake system before riding. Test brakes at low speed.
- Battery Safety: Only use the provided charger. Do not modify the battery or charging system. Keep away from water and extreme temperatures.

Image 1.1: Always wear a helmet and protective gear when operating the motorbike.
2. Package Contents
Carefully unpack all items and check against the list below. If any parts are missing or damaged, contact customer support immediately.

Image 2.1: Components included in the HYPER GOGO Cruiser 12 Plus package.
- Semi-assembled Mini Bike (x1)
- Charger (x1)
- Pedals (x2)
- Cover (x1)
- Wheel (x1)
- Fender (x1)
- Handlebar Clamp (x4)
- Kickstand (x1)
- Wheel Hardware
- Fender Hardware (Bolts x2)
- Handlebar Hardware (Medium Bolts x4)
- Axle & Nuts
- Bolts (x2)
- Tools (4mm, 6mm, 8mm Allen wrenches, 16mm wrench)
3. Setup and Assembly
Follow these steps to assemble your HYPER GOGO Cruiser 12 Plus. It is recommended to have an adult perform the assembly.
3.1 Initial Charging
- Before first use, fully charge the motorbike's battery.
- Locate the charging port on the motorbike.
- Connect the charger to the port, then plug the charger into a standard wall outlet.
- Allow approximately 4-6 hours for a full charge. The indicator light on the charger will change when charging is complete.
3.2 Assembly Steps
- Install Front Wheel and Fender: Attach the front wheel and fender using the provided hardware. Ensure all bolts are securely tightened.
- Attach Handlebars: Secure the handlebars to the bike frame using the handlebar clamps and medium bolts. Important: When routing the electrical harness wires, ensure they are fed underneath the handlebars, not over the top, to prevent damage and ensure proper function.
- Install Pedals: Screw the pedals into their respective cranks. Note that pedals are typically marked 'L' for left and 'R' for right.
- Attach Kickstand: Mount the kickstand to the designated area on the frame.
- Place Cover: Position the decorative cover over the battery compartment.
- Final Check: Before riding, double-check all connections, bolts, and moving parts to ensure they are secure.
Video 3.1: General assembly guide for the HYPER GOGO Cruiser 12 Plus electric motorbike. (Duration: 1:58)
4. Operating Instructions
Learn how to safely operate your HYPER GOGO Cruiser 12 Plus and utilize its features.
4.1 Power On/Off and Speed Modes
- Power On: Press and hold the power button on the handlebar display until the screen illuminates.
- Speed Selection: The motorbike features 3 adjustable speed levels:
- L Mode (Low): Max Speed 5 MPH
- N Mode (Normal): Max Speed 8 MPH
- S Mode (Sport): Max Speed 10 MPH
- Acceleration: Gently twist the throttle on the right handlebar to accelerate.
- Braking: Squeeze the brake lever on the left handlebar to engage the rear hub brake.
- Power Off: Press and hold the power button until the display turns off.
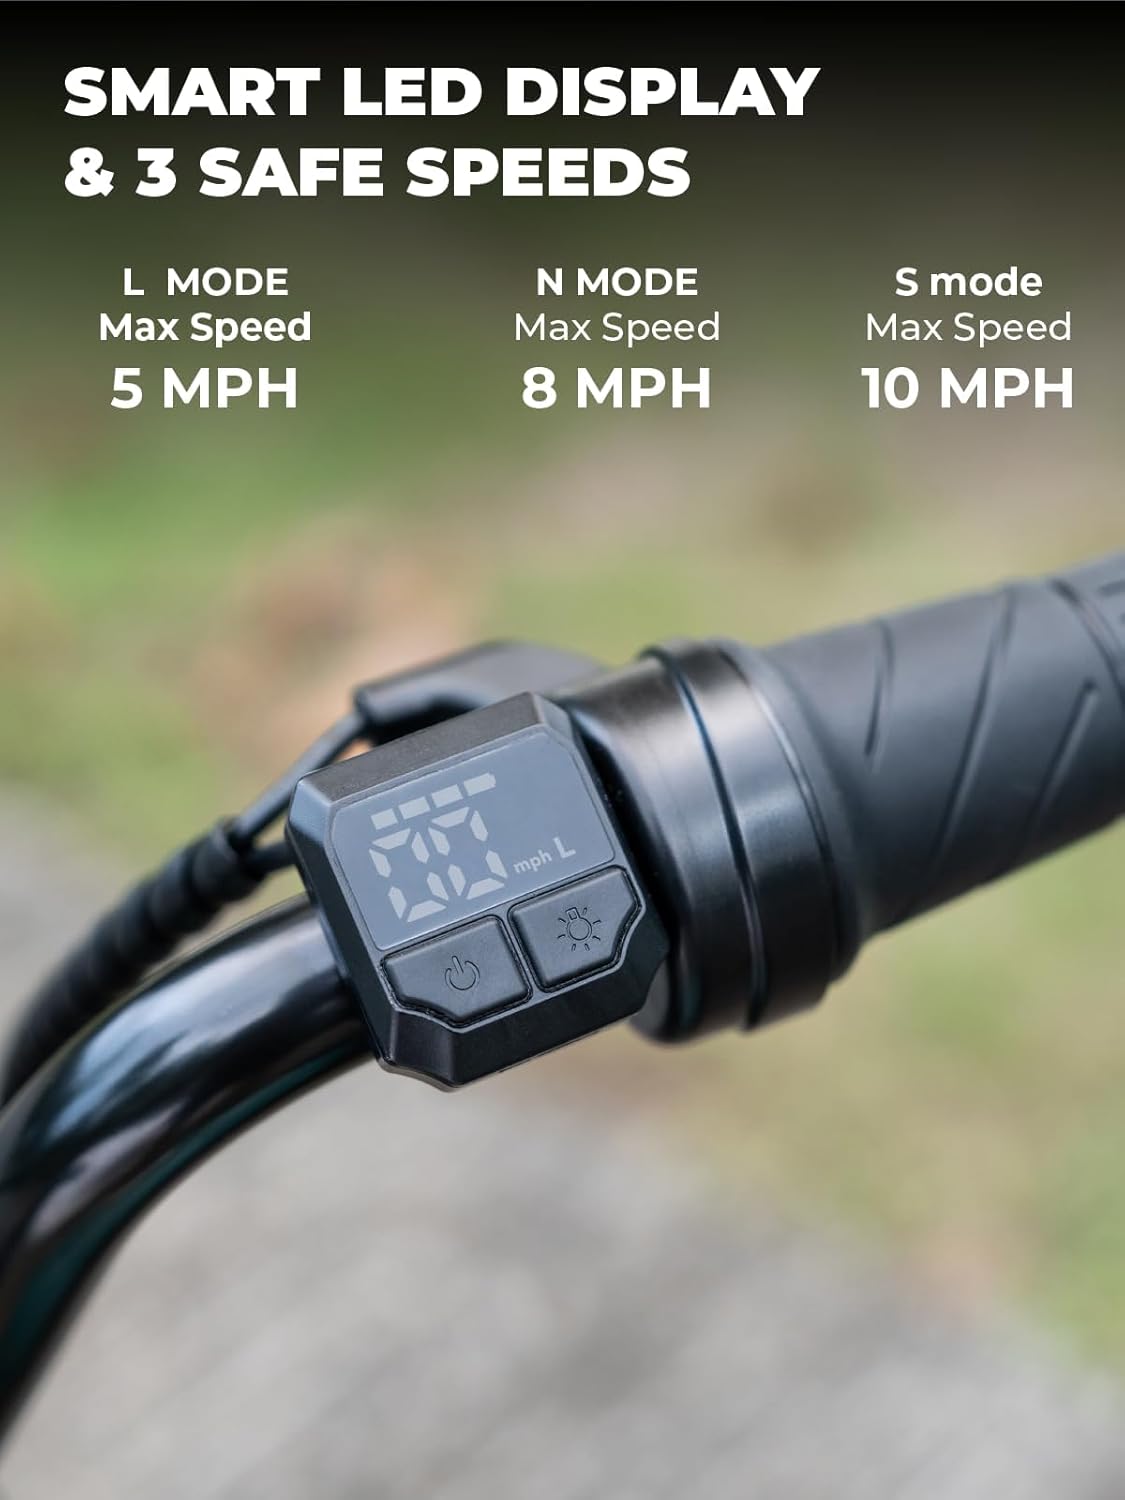
Image 4.1: Smart LED display and speed selection controls.
4.2 Special Features
- Fog Effect: Activate the simulated fog feature for an enhanced riding experience. Refer to the display controls for activation.
- Dynamic Ambient Light: The motorbike includes dynamic lighting for visibility and style.
- Built-in Bluetooth Speaker: Connect your mobile device via Bluetooth to play music through the integrated speaker.
- Ensure the motorbike is powered on.
- Enable Bluetooth on your mobile device and search for 'HYPER GOGO' or similar.
- Pair the devices. You can now play audio through the motorbike's speaker.
- LED Headlight: For enhanced visibility, especially in low-light conditions.

Image 4.2: Overview of special features including fog effect, ambient light, and Bluetooth speaker.
5. Maintenance
Regular maintenance ensures the longevity and safe operation of your HYPER GOGO Cruiser 12 Plus.
- Battery Care:
- Charge the battery fully after each use.
- If storing for extended periods, charge the battery at least once every 30 days to maintain battery health.
- Do not expose the battery to extreme temperatures or direct sunlight.
- Cleaning: The motorbike has an IP4 water resistance rating, protecting against heavy splashing. Clean with a damp cloth. Do not use high-pressure washers or submerge the unit.
- Tire Pressure: Regularly check tire pressure. Maintain recommended pressure for optimal performance and safety. (Specific pressure not provided, refer to tire sidewall if available).
- General Inspection: Periodically check all bolts, nuts, and connections for tightness. Inspect tires for wear and tear. Ensure brake system is functioning correctly.
6. Troubleshooting
Refer to this section for common issues and their solutions.
| Problem | Possible Cause | Solution |
|---|---|---|
| Motorbike does not power on or move. | Battery is not charged. Electrical harness wires are improperly routed. | Ensure battery is fully charged. Check that electrical harness wires are fed underneath the handlebars, not over the top, during assembly. |
| Tire loses air or cannot be inflated. | Punctured tire. Tire air valve is blocked or damaged. | Inspect tire for punctures and repair or replace as needed. If the air valve is blocked by internal components, contact customer support for assistance. |
| Reduced range or power. | Battery not fully charged. Battery degradation. | Ensure battery is fully charged before each ride. If battery life significantly decreases over time, consider battery replacement. |
| Bluetooth speaker not connecting. | Bluetooth on device is off. Motorbike is not in pairing mode. | Ensure Bluetooth is enabled on your mobile device. Power cycle the motorbike. Try re-pairing. |
7. Specifications
Detailed technical specifications for the HYPER GOGO Cruiser 12 Plus.
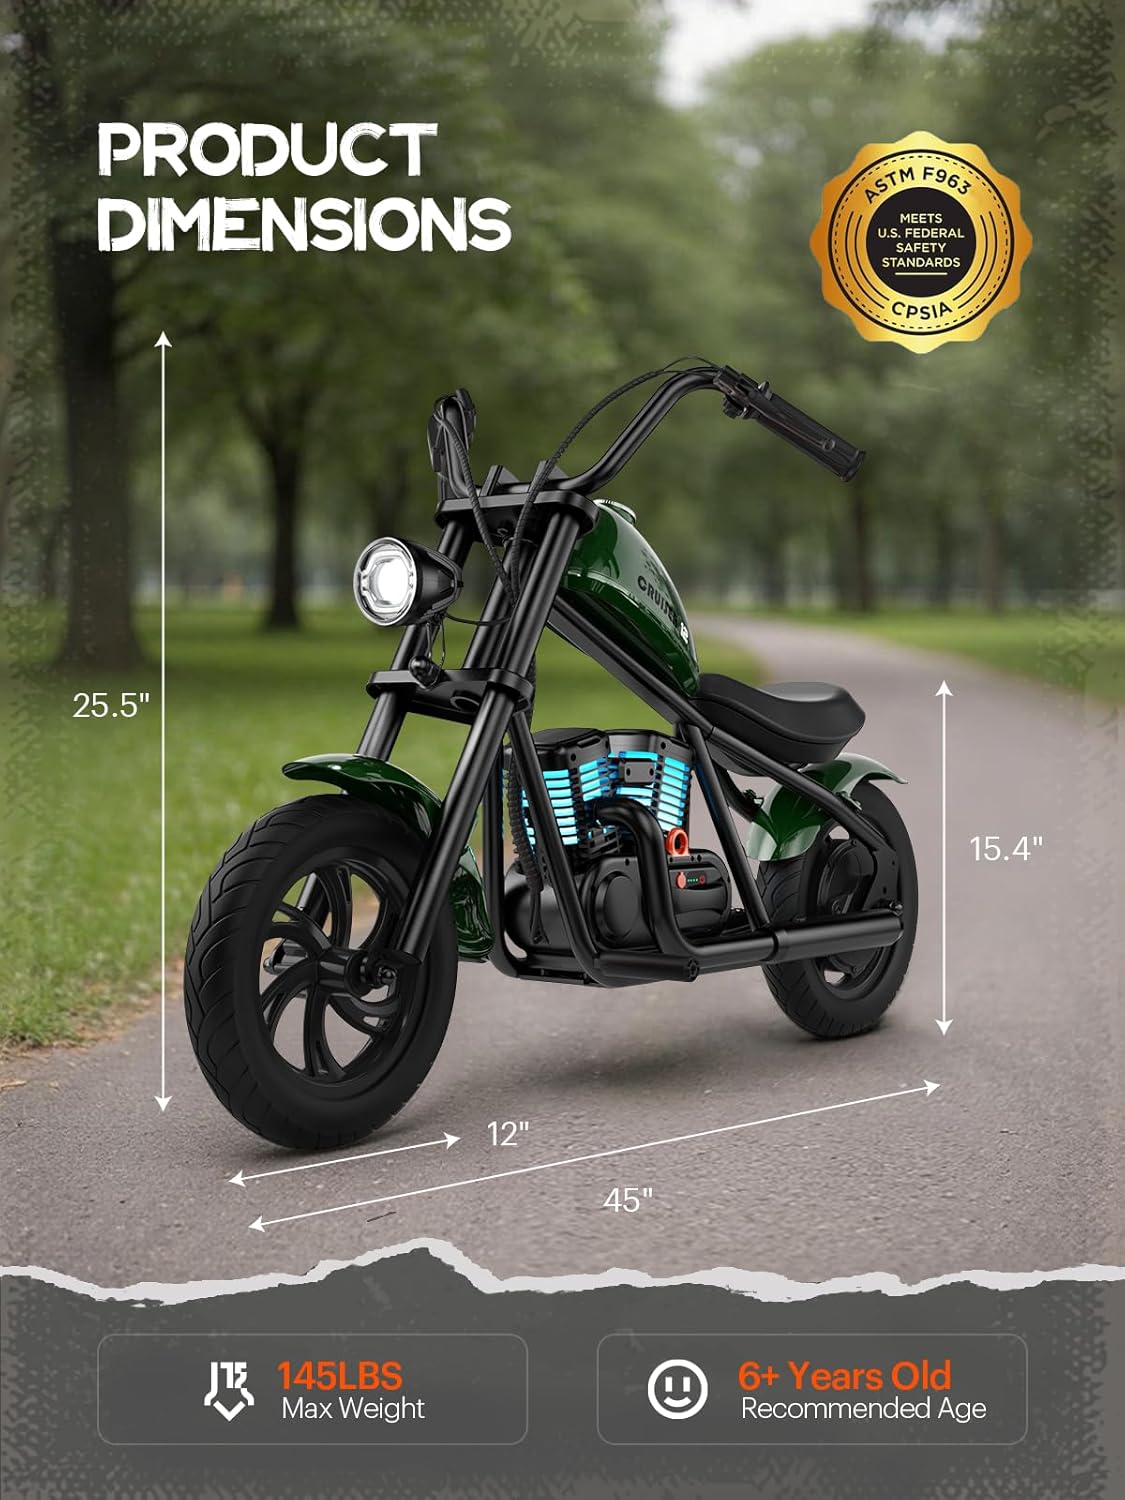
Image 7.1: Product dimensions of the HYPER GOGO Cruiser 12 Plus.
- Model: Cruiser 12 Plus
- Product Dimensions: 45.3 x 19.6 x 28.5 inches (115 x 50 x 72.5 cm)
- Item Weight: 33 lbs (15 kg)
- Motor: 24V 160W
- Battery: Li-ion 21.9V 5.2A (1 Lithium Ion battery included)
- Charger: DC24V 1.5A
- Max Speed: Up to 10 MPH (3 adjustable speed levels: 5 MPH, 8 MPH, 10 MPH)
- Range: Approximately 7.5 miles (12 km) on a single charge
- Brake System: Rear Hub Brake
- Max Uphill Capability: 10°
- Load Capacity: Up to 145 lbs (65 kg)
- Tires: 12x3 inches, all-terrain
- Water Resistance Rating: IP4 (protection against heavy splashing)
- Recommended Age: 6+ Years Old
- Manufacturer: E-LINK TECHNOLOGY CO LTD Dongguan Asiwo Technology Co., Ltd
8. Warranty and Support
For warranty information, technical support, or to inquire about replacement parts, please contact HYPER GOGO customer service directly. Refer to your purchase documentation or the official HYPER GOGO website for contact details.
Manufacturer: E-LINK TECHNOLOGY CO LTD Dongguan Asiwo Technology Co., Ltd