1. Introduction
Thank you for choosing the FEKOTS Universal Ceiling Fan Remote Control Kit. This kit is designed to provide convenient control over your 3-speed AC ceiling fan, including fan speed adjustment, light on/off, and dimming functions. It is compatible with most 110V 3-speed AC ceiling fans from brands such as Hampton Bay, Home Decorators Collection, Harbor Breeze, Hunter, and Honeywell. Please read this manual thoroughly before installation and operation to ensure proper use and safety.
2. Product Features
- Universal Compatibility: Works with most 110V 3-speed AC ceiling fans, including popular brands.
- 3-Speed Fan Control: Adjust fan speed to Low, Medium, or High.
- Light Control with Dimming: Turn lights on/off and dim compatible bulbs.
- Time Delay Function: Features a 30-second delayed light-off setting for convenience.
- Compact Receiver Design: The receiver (4.7in 2.1in) is designed for easy embedding within the ceiling fan canopy, supporting tilted ceiling fans.
- Ergonomic Remote: Comfortable to hold and easy to operate.

Image: The remote control in use, demonstrating wind speed control, light control, and blue indicator lights.
3. Package Contents
Please verify that all items are included in your package:
- 1 x Receiver (Model: RC-72R)
- 1 x Remote Control (Model: RC-72T)
- 1 x Wall Mount Holder
- 2 x Expansion Screws
- 6 x Wire Connectors (Wire Caps)
- 1 x User Manual

Image: A visual representation of all components included in the product package.
4. Specifications
| Feature | Detail |
|---|---|
| Product Dimensions | 3.54 x 1.38 x 0.59 inches (Remote) / 4.7 x 2.1 inches (Receiver) |
| Item Weight | 6.4 ounces |
| Model Numbers | RC-72T (Remote) & RC-72R (Receiver) |
| Batteries Required | 1 x 12V battery (not included) |
| Transmitter Frequency | 304.25Mhz |
| Max Supported Devices | 10 |
| Compatible Devices | Most 110V 3-speed AC ceiling fans (e.g., Hampton Bay, Harbor Breeze, Hunter, Home Decorators Collection, Honeywell) |
| Special Features | Delay lights off, Universal, Dimmable, Ergonomic |
| Color | Black |
5. Setup and Installation
Follow these steps carefully for proper installation. It is recommended to consult a qualified electrician if you are unsure about any steps.
5.1. Safety Precautions
- ALWAYS TURN OFF POWER at the circuit breaker or fuse box before beginning installation to prevent electric shock.
- Ensure the ceiling fan is securely mounted and capable of supporting the additional weight of the receiver.
- Do not use this kit with standing fans or DC ceiling fans with 5 or more wind speeds.

Image: Step 1 - Turn off power to the fan at the circuit breaker.
5.2. Receiver Installation Steps
- Turn Off Power: Ensure power to the ceiling fan is completely off at the main circuit breaker.
- Orient Receiver: Orient the receiver with the flat side facing up.
- Insert Receiver: Carefully insert the receiver into the bracket cavity of the ceiling fan.
- Match Black, Blue & White Wires: Connect the black, blue, and white wires from the fan to the corresponding wires on the receiver. Use wire caps to secure connections.
- Combine Wires: Use wire caps to combine all necessary wires as per the wiring diagram.
- Match Wire Colors from Ceiling: Connect the wires from the ceiling to the receiver, matching colors (e.g., black to black, white to white).
- Use Wire Caps: Secure all wire connections with wire caps.
- Connect Ground Wire: Connect the copper ground wire from the ceiling to the green ground wire from the ceiling fan bracket.
- Place Receiver in Canopy: Carefully tuck all wires and the receiver into the ceiling fan canopy.

Image: Step-by-step visual guide for receiver installation.
5.3. Remote Control Setting (DIP Switches)
The remote control and receiver communicate via DIP switches. Both the remote (transmitter) and receiver must have their DIP switches set to the same position for proper function.
- Locate the DIP switches on both the remote control and the receiver.
- Set the switches (labeled 1, 2, 3, 4) on both devices to an identical pattern (e.g., all ON, or a specific combination of ON/OFF).
- For dimmable bulbs, set the separate 'D/0' switch on the remote to 'D'. If using non-dimmable bulbs, set it to '0' to prevent flickering. The default setting for switches 1-4 is 0000, but it is not recommended.

Image: Setting the DIP switches on the remote and receiver to match.
5.4. Battery Installation
The remote control requires one 12V battery (not included). Open the battery compartment on the back of the remote and insert the battery, observing the correct polarity.
6. Operating Instructions
Once installed and configured, operate your ceiling fan and light using the remote control.
6.1. Remote Button Functions
- Power Button ( ): Turns the fan and light on/off.
- Fan Speed Buttons ( ): Adjusts fan speed (Low, Medium, High).
- Light Button ( ): Short press to turn light on/off. Long press to activate dimming function (for dimmable bulbs).
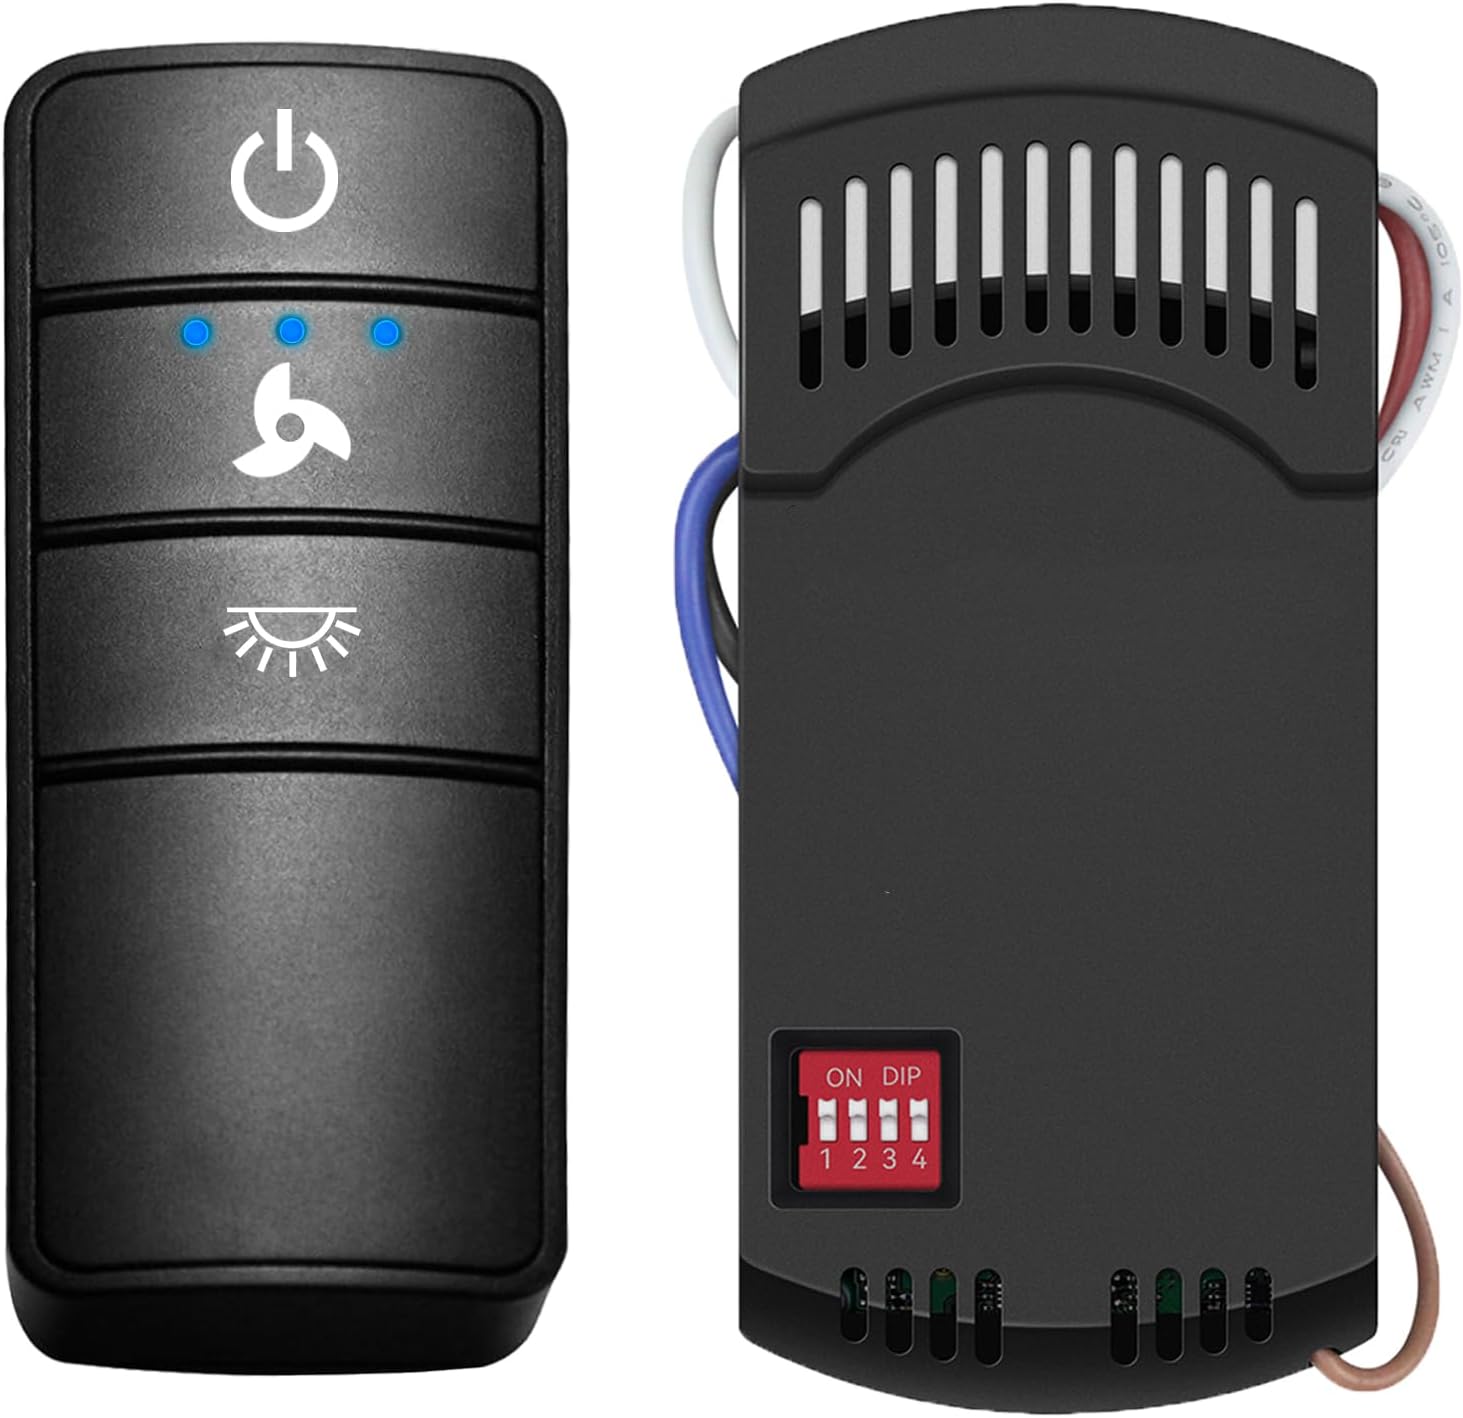
Image: The remote control with its distinct buttons for power, fan speed, and light.
6.2. Light Dimmer Setting
For dimmable bulbs, ensure the 'D/0' switch on the remote is set to 'D'. Press and hold the 'Light' button to adjust brightness. If using non-dimmable bulbs, set the switch to '0' to avoid flickering.
6.3. Delayed Light Off Setting
This feature allows the light to remain on for 30 seconds after activation before automatically turning off, providing illumination as you leave the room.
Video: Official product video demonstrating the use of the Universal Ceiling Fan Remote.
7. Compatibility
This universal remote kit is designed for broad compatibility with various ceiling fan and lighting types.
7.1. Fan Compatibility
- Compatible with most 110V 3-speed AC ceiling fans.
- Works with popular brands such as Hampton Bay, Home Decorators Collection, Harbor Breeze, Hunter, and Honeywell.
- Applicable to most pull-down fans.
- Not recommended for use with wall-mounted fans, exhaust-type fans, standing fans, or DC ceiling fans with 5 or more wind speeds.
7.2. Light Bulb Compatibility
- The dimming function is compatible with ceiling fan bulbs that support dimming (e.g., Dimmable LED, Dimmable CFL, Halogen, Incandescent).
- For bulbs that are not dimmable, only the switch (on/off) function is supported.
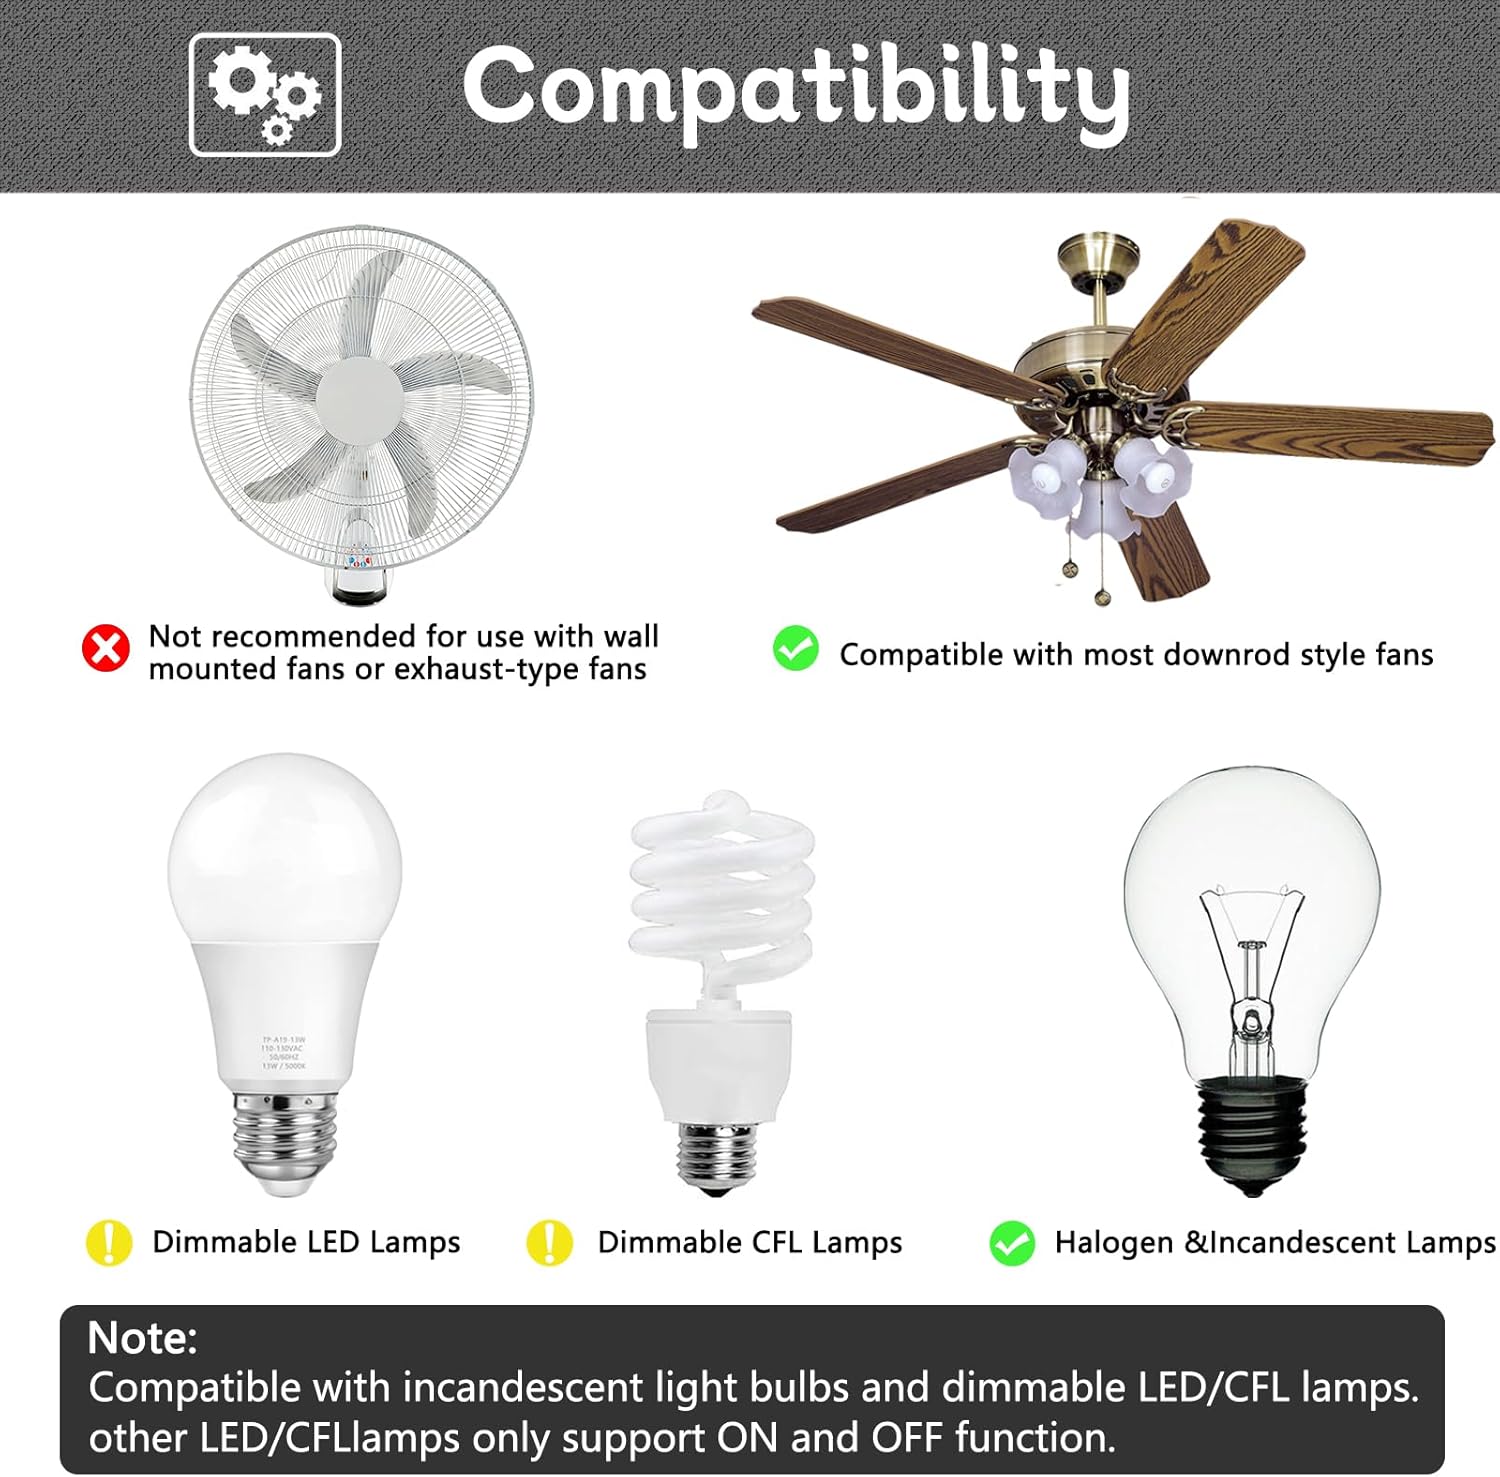
Image: Visual guide to compatible fan and light bulb types.
8. Maintenance
To ensure the longevity and optimal performance of your FEKOTS Universal Ceiling Fan Remote Control Kit, follow these simple maintenance guidelines:
- Cleaning: Wipe the remote control and receiver with a soft, dry cloth. Do not use abrasive cleaners or solvents.
- Battery Replacement: Replace the 12V battery in the remote control when its range decreases or it stops responding. Dispose of old batteries responsibly.
- Storage: If storing the remote for an extended period, remove the battery to prevent leakage.
- Environmental Conditions: Avoid exposing the remote and receiver to extreme temperatures, high humidity, or direct sunlight.
9. Troubleshooting
If you encounter issues with your remote control kit, please refer to the following common problems and solutions:
| Problem | Possible Cause | Solution |
|---|---|---|
| Remote not controlling fan/light | DIP switches do not match; Dead battery in remote; Power to fan is off; Receiver not properly installed. | Ensure DIP switches on remote and receiver are identical; Replace remote battery; Check circuit breaker; Re-check receiver wiring and installation. |
| Light flickers or does not dim | Non-dimmable bulb used with dimming function enabled; Incorrect 'D/0' switch setting. | Ensure you are using dimmable bulbs; Set the 'D/0' switch on the remote to '0' for non-dimmable bulbs. |
| Fan operates but light does not | Light bulb is burnt out; Loose wire connection to light; Incorrect wiring. | Replace light bulb; Check light wire connections; Verify wiring against installation instructions. |
| Fan does not operate at all | No power to fan; Loose wire connections; Motor issue. | Check circuit breaker; Verify all wire connections are secure; If problem persists, consult a qualified electrician. |
10. Warranty and Support
FEKOTS stands behind the quality of its products. For warranty information or technical support, please refer to the product packaging or contact FEKOTS customer service directly. Keep your purchase receipt as proof of purchase.