1. Introduction
This manual provides instructions for the installation, operation, and maintenance of your Nilight LED Motorcycle Tail Light (Model TL-404). This product is designed to enhance rear visibility and safety for compatible Harley Davidson motorcycles.
Key features include:
- High Intensity LED Chips: Equipped with 60 high-intensity LED chips for bright illumination and a lifespan exceeding 50,000 hours, significantly increasing rear visibility.
- Multi-functional Design: Integrates running light, brake light, left/right turn signal, and license plate light functions into a single unit.
- Plug and Play Installation: Designed for straightforward installation with a plug-style turn signal wire, eliminating the need for hardwiring.

Image 1.1: Nilight LED Motorcycle Tail Light (Model TL-404)
2. Safety Information
Please read and understand all safety instructions before installing or operating the product. Failure to follow these instructions may result in property damage, injury, or death.
- Always disconnect the motorcycle's battery before performing any electrical work.
- Ensure all connections are secure and properly insulated to prevent short circuits.
- Verify that the tail light functions correctly (running, brake, turn signals, license plate) after installation before riding.
- Consult a qualified motorcycle technician if you are unsure about any installation steps.
- Do not modify the product. Unauthorized modifications may compromise safety and void the warranty.
3. Package Contents
Verify that all items are present in the package:
- 1 x Smoked Housing LED Tail Light
- 1 x Gasket
4. Product Specifications
| Feature | Detail |
|---|---|
| Brand | Nilight |
| Model Number | TL-404 |
| Color | Smoked Lens |
| Specific Uses | Brake Lights, Running Lights, Turn Signals, License Plate Light |
| Vehicle Service Type | Motorcycle |
| Special Feature | Waterproof |
| Auto Part Position | Rear |
| Lens Material | Plastic |
| UPC | 840323904988 |
| Item Weight | 7.7 ounces |
| Package Dimensions | 5.39 x 4.72 x 2.56 inches |
5. Compatibility
This Nilight LED Tail Light (Model TL-404) is compatible with various Harley Davidson models. Please verify your motorcycle's specific model and year for fitment.
- Harley Sportster 883
- Harley Sportster 1200
- Harley Dyna models
- Harley Tour Glides
- Harley Road Glides
- Harley Road Kings
- All 1991-2010 FLST Models (excluding 1991-2000 FLSTF, 2005-2010 FLSTN, 1997-2003 FLSTS, 2005-2007 FLSTSC, 2010 FLSTSE)
- All 2002-2010 FXST Models (excluding 2002-2007 FXSTD, 2007-2009 FXSTSSE, 2008-2010 FXCW/C)
- 1991-2010 Electra Glides (excluding 2005 FLHTCSE, 2009 FLHT Standard)
6. Installation (Plug and Play)
The Nilight LED Tail Light is designed for a simple plug-and-play installation. Follow these steps:
- Prepare for Installation: Ensure the motorcycle is turned off and the battery is disconnected. Carefully remove the existing tail light assembly.
- Apply Gasket: Paste the provided waterproof gasket onto the back of the new Nilight LED tail light. Ensure it is properly aligned to create a seal.
- Connect Wiring: Locate the corresponding wiring harness on your motorcycle. Insert the three plugs from the new tail light into the correct positions on the motorcycle's harness. The wiring is designed for direct connection.
- Secure Tail Light: Position the new tail light assembly into place and tighten it with the factory screws. Ensure it is firmly mounted.
- Test Functionality: Reconnect the motorcycle's battery. Turn on the ignition and test all functions: running light, brake light, left turn signal, right turn signal, and license plate light.
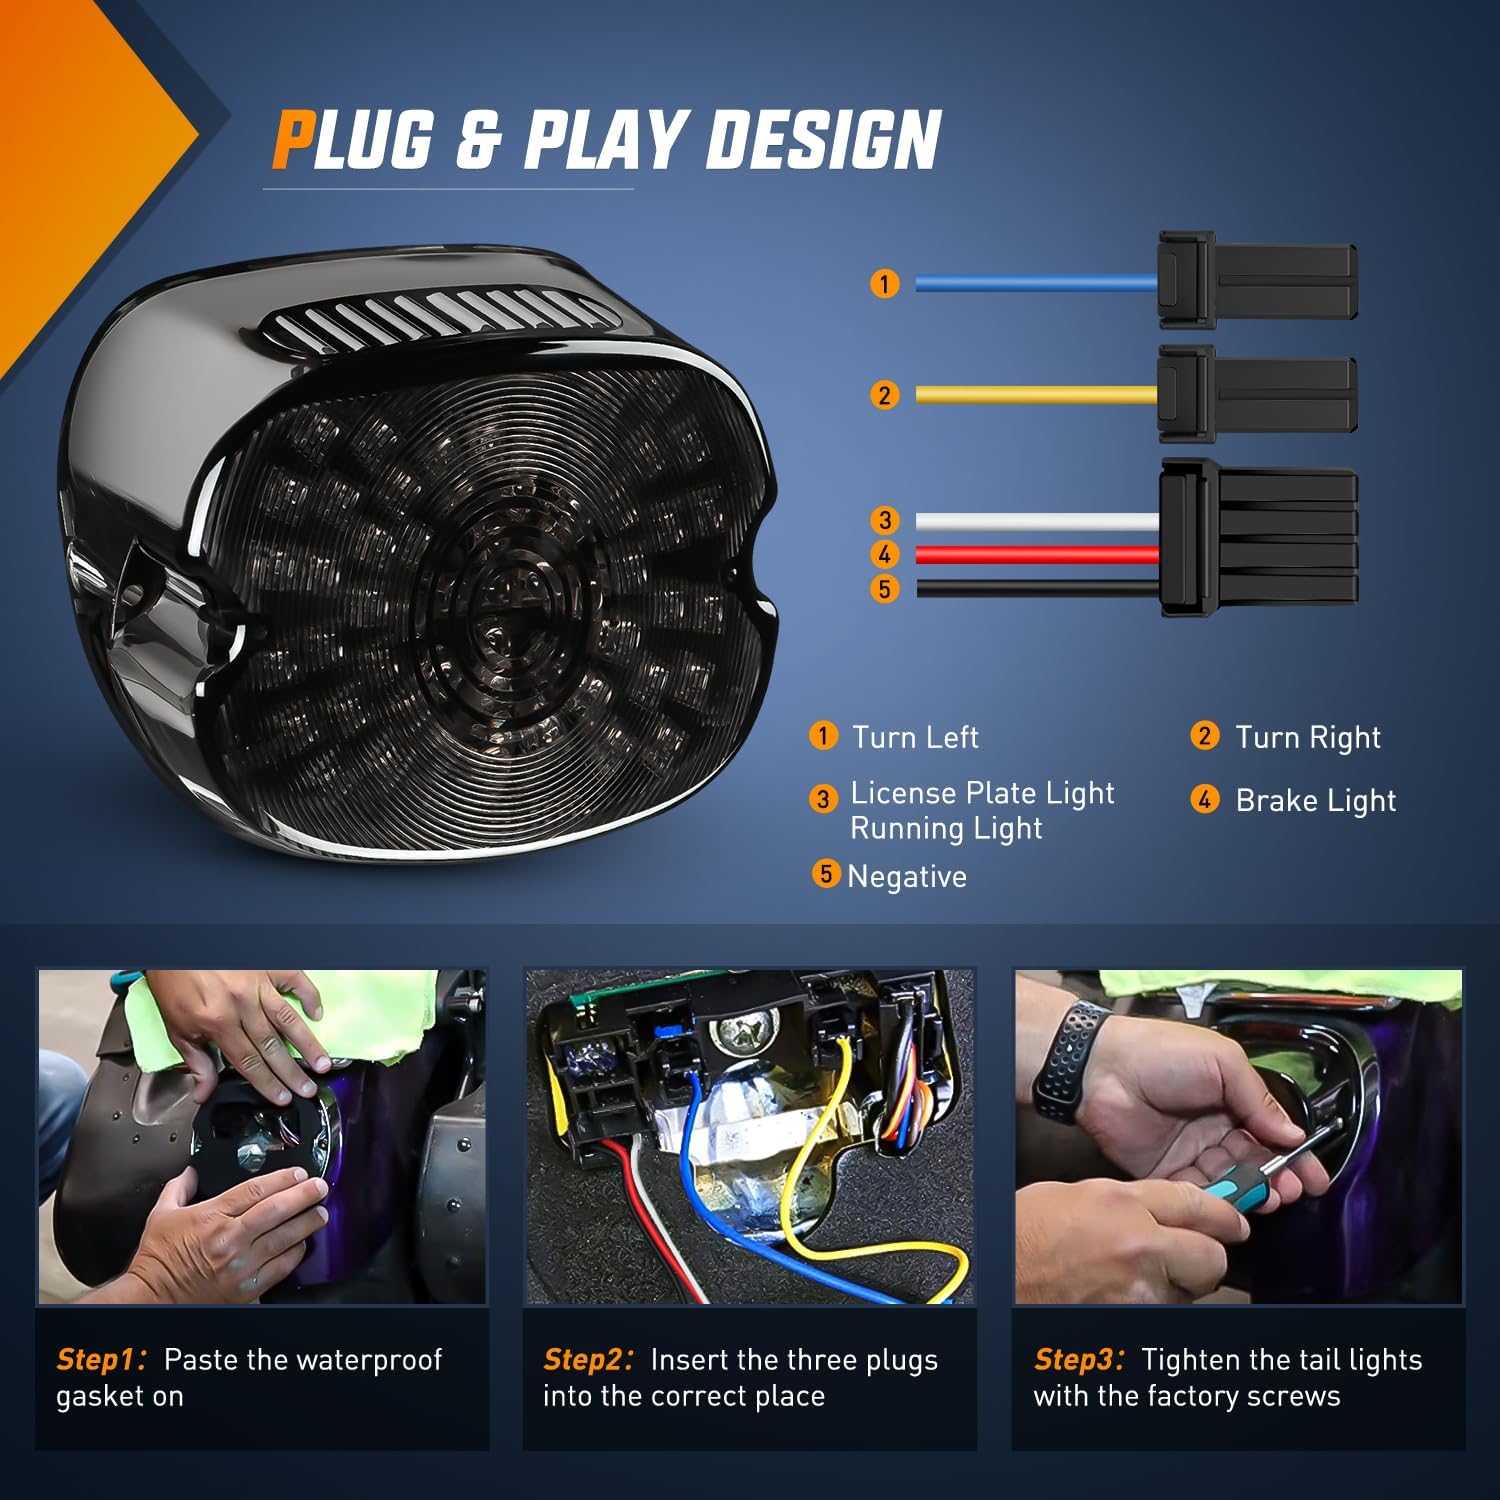
Image 6.1: Plug & Play Wiring Diagram

Image 6.2: Installation Steps Overview
7. Operation
The Nilight LED Tail Light provides multiple lighting functions for safe motorcycle operation:
- Running Light: Illuminates when the motorcycle's lights are on, providing constant rear visibility.
- Brake Light: Activates with increased brightness when the brakes are applied, signaling deceleration to following vehicles.
- Turn Signals: Flashes amber lights to indicate left or right turns.
- License Plate Light: Provides illumination for the rear license plate, ensuring it is visible as required by law.

Image 7.1: Multiple Lighting Modes

Image 7.2: Visibility Comparison (LED vs. Incandescent)
8. Maintenance
The Nilight LED Tail Light is designed for durability and minimal maintenance. Its waterproof construction protects internal components from environmental elements.
- Cleaning: Clean the lens periodically with a soft cloth and mild soap solution to ensure maximum light output. Avoid abrasive cleaners.
- Inspection: Regularly inspect the tail light for any signs of damage, loose connections, or wear.
- Waterproof Feature: The unit features a full waterproof glue-sealed circuit board and a perfect fit gasket to prevent water ingress. Ensure the gasket remains intact during any re-installation.

Image 8.1: Waterproof Design Details
9. Troubleshooting
If you experience issues with your Nilight LED Tail Light, refer to the following common troubleshooting steps:
| Problem | Possible Cause | Solution |
|---|---|---|
| Light does not illuminate | Loose wiring connection Blown fuse Incorrect wiring | Check all plug connections for tightness. Inspect the motorcycle's fuse box and replace any blown fuses. Verify wiring matches the diagram in Section 6. |
| One function (e.g., brake light) does not work | Specific wire connection issue Faulty switch | Check the specific wire for that function (refer to Image 6.1). Test the motorcycle's brake or turn signal switch. |
| Lights flicker or are dim | Poor electrical ground Low voltage | Ensure the negative (ground) connection is secure and free of corrosion. Check the motorcycle's battery and charging system. |
If these steps do not resolve the issue, please contact Nilight customer support.
10. Warranty & Support
Nilight products are manufactured to high-quality standards. For warranty information, product support, or technical assistance, please refer to the official Nilight website or contact their customer service directly. Keep your purchase receipt as proof of purchase.
For further assistance, visit the Nilight Store on Amazon.


