1. Introduction
Thank you for choosing the YuqiaoTime 0370 WiFi Weather Station. This device provides comprehensive weather monitoring, including temperature, humidity, wind speed, wind direction, rainfall, UV index, and light intensity. It connects to your home WiFi network to upload data to online weather services like Weathercloud, allowing you to access your local weather information from anywhere. Please read this manual carefully before installation and operation to ensure optimal performance and longevity of your weather station.
2. Product Features
- 7-in-1 Integrated Outdoor Sensor: Measures wind speed, wind direction, rainfall, UV index, light intensity, outdoor temperature, and outdoor humidity.
- Indoor Console Display: Large 7.3-inch LED display shows indoor/outdoor temperature and humidity, wind data, rainfall, UV, light, barometric pressure, moon phase, and weather forecast.
- WiFi Connectivity: Uploads data to Weathercloud for remote access and historical data tracking.
- Remote Thermo-Hygrometer: Additional sensor for monitoring temperature and humidity in a separate location.
- Alarm Functions: Features temperature alarms, alarm clock, and snooze function.
- Min/Max Value Memory: Records highest and lowest readings for various parameters.
- Wireless Transmission: Outdoor sensor transmits data up to 300 feet to the main console.
3. Package Contents
Please check the package contents to ensure all items are present:
- Main Console Display Unit
- 7-in-1 Integrated Outdoor Sensor
- Remote Thermo-Hygrometer
- Mounting Pole and Hardware (U-bolts, nuts, screws)
- Power Adapter for Main Console
- User Manual
- Small Screwdriver (for battery compartment)
4. Setup Instructions
4.1. Outdoor Sensor Assembly and Battery Installation
Before powering on the main console, install batteries in the outdoor sensor unit.
- Locate the battery compartment on the underside of the 7-in-1 outdoor sensor.
- Using the provided screwdriver, unscrew the cover of the battery compartment.
- Insert 3 x AA batteries (not included) into the compartment, ensuring correct polarity (+/-).
- Replace the battery compartment cover and secure it with the screw.
- The outdoor sensor will now power on and begin transmitting data.
Video: This video demonstrates the battery installation process for the outdoor sensor and how to attach it to the mounting pole. It also shows the mounting of the sensor to a railing.
4.2. Remote Thermo-Hygrometer Battery Installation
The remote thermo-hygrometer requires 2 x 1.5V AAA batteries (included).
- Open the battery compartment on the back of the remote sensor.
- Insert the batteries, observing correct polarity.
- Close the battery compartment.

Image: The remote thermo-hygrometer displays temperature and relative humidity. It is battery-powered (2x1.5V AAA, not included) and supports up to 8 channels, allowing for monitoring of multiple locations.
4.3. Main Console Power Up
Connect the provided power adapter to the main console and plug it into a wall outlet. The console will power on and begin searching for the outdoor sensor and remote thermo-hygrometer data.
4.4. Mounting the Outdoor Sensor
Choose an open location for the outdoor sensor, free from obstructions that could affect wind, rain, or sunlight readings. The sensor can be mounted on a pole, fence, or wall using the included hardware.
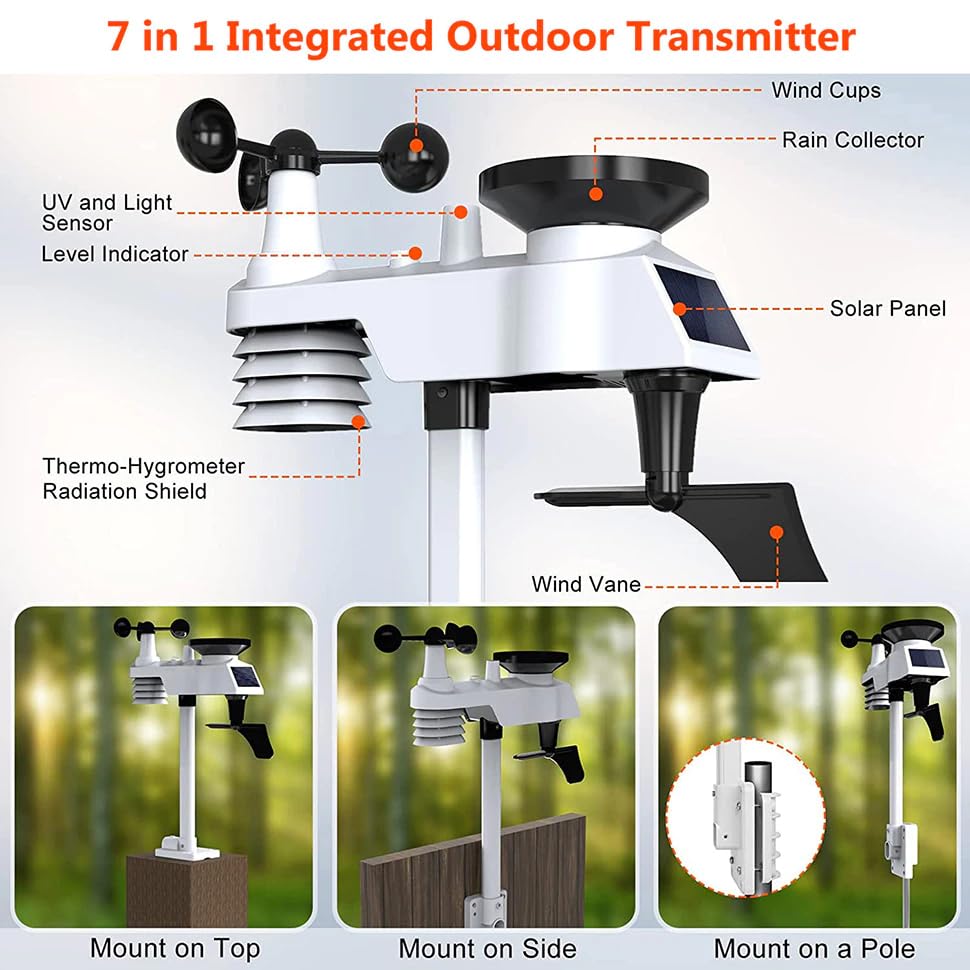
Image: This image illustrates the various components of the outdoor sensor unit. It includes sensors for wind speed (wind cups), wind direction (wind vane), rainfall (rain collector), UV and light intensity, temperature and humidity (thermo-hygrometer radiation shield), and is powered by a solar panel.
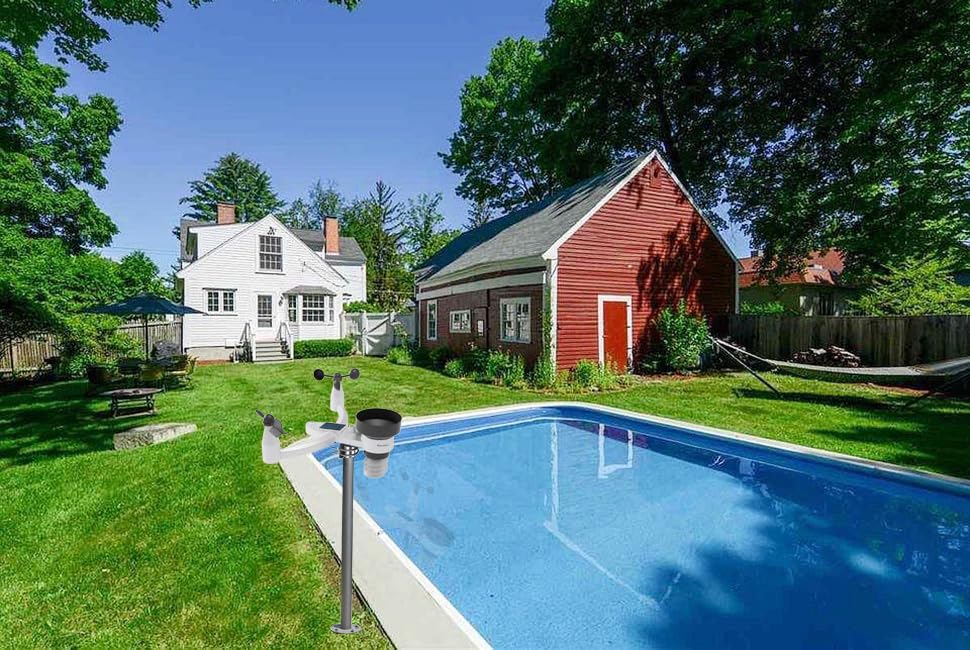
Image: The weather station is designed for outdoor installation to accurately measure environmental conditions. Ensure it is placed in an open area, away from obstructions that might affect wind, rain, or sunlight readings.
4.5. WiFi Connection
To connect the console to WiFi and upload data to Weathercloud:
- Ensure the console is powered on.
- Press and hold the Min/Max button until the WiFi icon on the display starts flashing. This indicates the console is in pairing mode.
- Follow the instructions in the dedicated app (refer to the quick start guide for app download) to connect the weather station to your home WiFi network and register it with Weathercloud.
5. Operating Instructions
5.1. Display Overview
The 7.3-inch LED display provides a comprehensive overview of current and historical weather data.
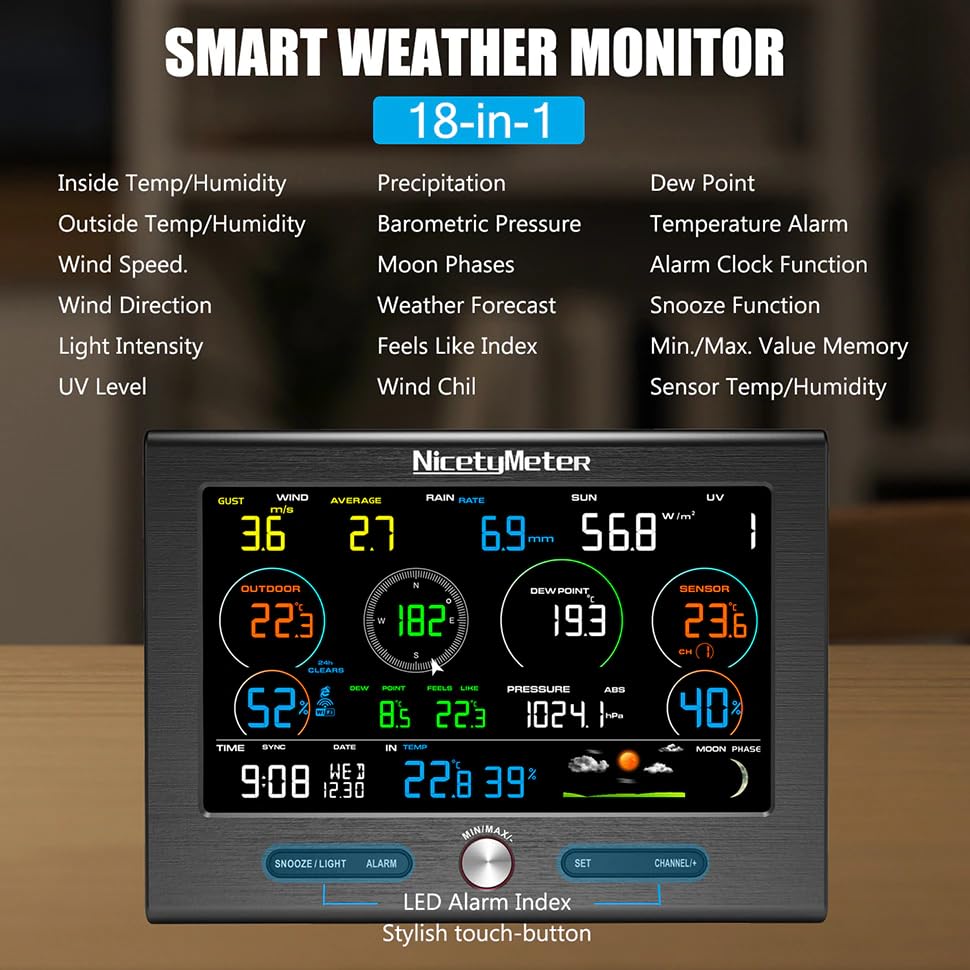
Image: The console provides comprehensive weather monitoring with 18 different parameters, including indoor and outdoor temperature and humidity, wind speed and direction, light intensity, UV level, precipitation, barometric pressure, moon phases, and a weather forecast. It also features an alarm clock, snooze function, and records minimum/maximum values.
- Top Row: Gust wind speed, average wind speed, daily rainfall, daily sun radiation, UV index.
- Middle Section: Outdoor temperature, wind direction, CO2 (if applicable), indoor temperature, dew point, feels like temperature, barometric pressure, humidity.
- Bottom Row: Time, date, moon phase, weather forecast icons.
5.2. Button Functions
- SNOOZE/LIGHT: Press to activate snooze for alarms or adjust backlight brightness.
- ALARM: Press to view or set alarms.
- MIN/MAX: Rotate to scroll through minimum/maximum recorded values. Press to confirm selection.
- SET: Press to enter settings mode for time, date, units, etc.
- CHANNEL+: Press to switch between different remote sensor channels (if multiple are connected).
5.3. Weathercloud Integration
Once connected to WiFi, your weather station will automatically upload data to Weathercloud. You can access your data by logging into your Weathercloud account via their website or mobile application. This allows for real-time monitoring, historical data analysis, and sharing of your weather information.
6. Maintenance
6.1. Cleaning
Regularly clean the outdoor sensor to ensure accurate readings. Use a soft, damp cloth to wipe down the housing. Ensure the rain collector funnel is clear of debris (leaves, insects). Do not use abrasive cleaners or solvents.
6.2. Battery Replacement
Replace batteries in the outdoor sensor and remote thermo-hygrometer annually or when the low battery indicator appears on the console. Use fresh, high-quality batteries for best performance.
6.3. Sensor Calibration
While the sensors are factory-calibrated, some parameters like rainfall can be adjusted if you notice discrepancies. Refer to the advanced settings in the console menu or the companion app for calibration options.
7. Troubleshooting
- No Outdoor Data: Check if the outdoor sensor batteries are installed correctly and are not depleted. Ensure the sensor is within range of the main console.
- WiFi Connection Issues: Verify your WiFi network is 2.4GHz. Ensure the console is within range of your router. Re-enter WiFi setup mode and follow the app instructions carefully.
- Inaccurate Readings: Ensure the outdoor sensor is mounted in an open area, away from heat sources, direct sunlight (for temperature/humidity), or obstructions for wind/rain. Clean the rain collector and wind sensors.
- Console Display Blank: Check the power adapter connection to the console and the wall outlet.
8. Specifications
| Parameter | Value |
|---|---|
| Model Number | YQ-WS-0370 |
| Outdoor Temperature Range | -40°C to +60°C |
| Indoor Temperature Range | 0°C to +60°C |
| Humidity Range (In/Out) | 10% to 99% |
| UV Index | 1 to 15+ |
| Light Meter | 0 to 200k lux |
| Rainfall | 0 to 9999mm |
| Wind Direction | 0 - 360° |
| Wind Speed | 0 to 50 m/s |
| Pressure | 300 - 1100 hpa |
| Connectivity Technology | Wi-Fi |
| Power Source (Outdoor Sensor) | Battery Powered (3 x AA, not included) |
| Power Source (Remote Sensor) | Battery Powered (2 x LR41, included) |
| Display Type | LCD |
| Product Dimensions | 13.78 x 9.84 x 5.91 inches |
| Item Weight | 2.2 pounds |
9. Safety Information
- Do not expose the main console to extreme temperatures, direct sunlight, or moisture.
- Ensure the outdoor sensor is securely mounted to prevent it from falling in strong winds.
- Keep batteries out of reach of children. Dispose of used batteries responsibly.
- Do not attempt to disassemble or repair the device yourself. Contact customer support for assistance.
10. Warranty and Support
Your YuqiaoTime 0370 WiFi Weather Station comes with a standard manufacturer's warranty. Please refer to the warranty card included in your package for specific terms and conditions. For technical support, troubleshooting assistance, or warranty claims, please contact YuqiaoTime customer service through the retailer where you purchased the product or visit the official YuqiaoTime website.