1. Introduction
This manual provides detailed instructions for the installation, operation, and maintenance of your HUIZHITENGDA 12000W Wind Solar Hybrid Charge Controller. This device is designed to efficiently manage power from both wind turbines and solar panels, ensuring optimal charging for your battery system. Please read this manual thoroughly before installation and use to ensure safe and correct operation.
2. Product Features
- Hybrid Power Management: Specifically designed for hybrid wind-solar street lighting and security monitoring systems.
- Battery Compatibility: Workable for Sealed (GEL, Lead-Acid), Ternary Lithium, and Lithium Iron Phosphate batteries.
- Advanced Charging: Features booster MPPT for wind generation at low wind speeds and PWM charging for solar to reduce self-consumption.
- User-Friendly Interface: Large LCD screen and four-key operation for easy parameter setting and monitoring.
- Adjustable Output Modes: Discharge part working mode can be set in light control mode and time control model (3 adjustable modes).
- Comprehensive Protection: Includes solar reversed charging protection, battery open circuit protection, battery anti-reverse connection protection, over current and over voltage auto brake protection, and overload protection.
- Efficient Cooling: Utilizes aluminum profiles for heat dissipation and self-cooling.

Figure 2.1: The HUIZHITENGDA 12000W Wind Solar Hybrid Charge Controller, shown with included wiring and an unloading device.

Figure 2.2: Contents of the product package, including the controller, unloading device, and necessary wiring.
3. Setup and Installation
Proper installation is crucial for the safe and efficient operation of your hybrid charge controller. Follow these steps carefully.
3.1 Wiring Diagram Overview
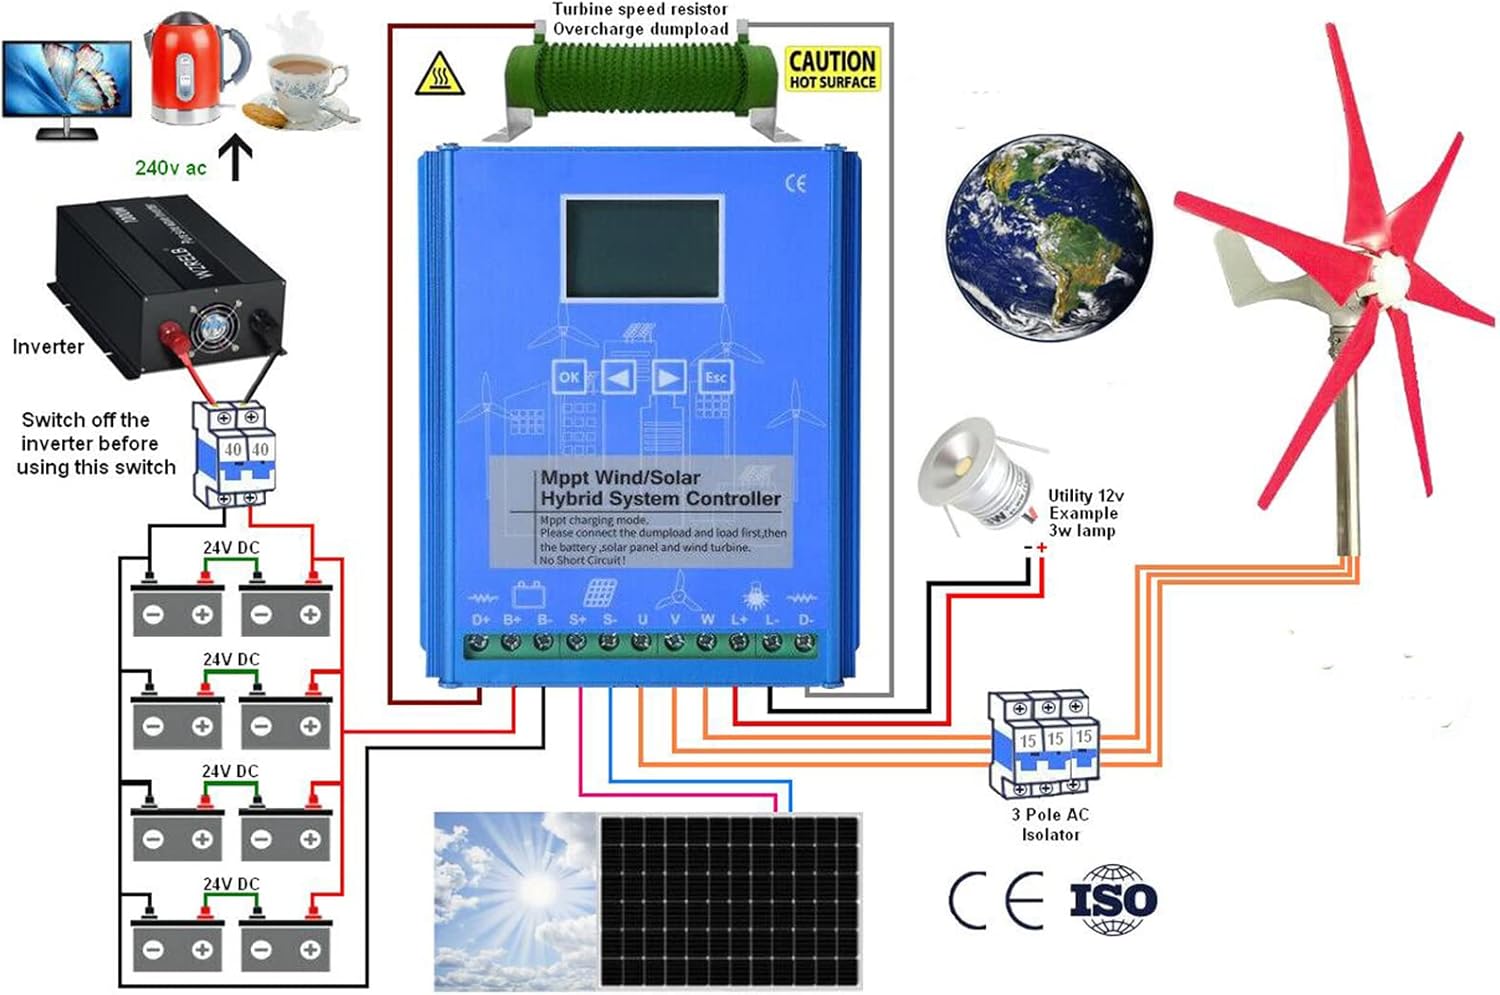
Figure 3.1: Comprehensive wiring diagram illustrating connections for batteries, solar panels, wind turbine, and load.
3.2 Connection Steps
- Connect Batteries: Always connect the battery bank to the controller first. Ensure correct polarity (positive to positive, negative to negative).
- Connect Solar Panel: Connect the solar panel array to the designated solar input terminals on the controller. Observe correct polarity.
- Connect Wind Turbine: Connect the wind driven generator to the controller. Refer to Figure 3.2 for specific connection points.
- Connect Load: Connect your DC load (e.g., 12V lamp) to the load output terminals.
- Inverter Connection (if applicable): If using an inverter, ensure it is switched off before making any connections to the system.
3.3 Connecting the Wind Driven Generator

Figure 3.2: Specific connection points for the wind driven generator on the controller.
Important Safety Warnings:
- WARNING: Wind turbines may generate high voltage. Exercise extreme caution when connecting them to prevent electric shock.
- RECOMMENDATION: It is recommended to connect the wind driven generator in no wind or light wind conditions to minimize risk.
- ACTIVATION: High-speed wind turbines should only be connected after the controller has been activated and is operational.
4. Operating Instructions
Once installed, the controller will begin managing your hybrid power system. The LCD display provides real-time information and allows for parameter adjustments.
4.1 LCD Display Information
The LCD screen displays critical system parameters, including:
- System Voltage
- Percentage of Battery Power
- Current (Wind and Solar)
- Working Mode of Load

Figure 4.1: Internal view of the controller highlighting the high-performance chip and LCD display.
4.2 Setting Output Working Mode
The controller supports adjustable output working modes for the load. Use the four control keys (OK, Up, Down, Esc) to navigate the menu and select your desired mode. The available modes typically include:
- Light-control On / Light-control Off
- Time Control Mode
- Other adjustable modes (refer to on-screen menu for specifics)
Detailed instructions for navigating the menu and setting parameters are available on the device's LCD interface.
5. Maintenance
The HUIZHITENGDA hybrid charge controller is designed for durability and minimal maintenance. However, periodic checks can ensure optimal performance and longevity.
- Cooling System: The controller uses aluminum profiles for heat dissipation and self-cooling. Ensure that the vents and surrounding area are free from dust, debris, or obstructions to allow for proper airflow.
- Environmental Conditions: Operate the controller within its specified working temperature range of -25℃ to +80℃ and humidity range of 0-90% (non-condensing).
- Connection Checks: Periodically inspect all wiring connections for tightness and corrosion. Loose connections can lead to power loss or overheating.
- Battery Health: Monitor your battery bank's health as per the battery manufacturer's recommendations.
6. Troubleshooting
The controller is equipped with multiple protection functions to safeguard your system. If an issue arises, the LCD display may show error codes or indicators. Refer to the on-screen messages for specific guidance.
6.1 Common Protection Functions and Actions
- Short-circuit Protection: If a short circuit is detected in the load or system, the controller will automatically cut off output. Identify and resolve the short circuit, then restart the system.
- Reverse Protection: Protects against incorrect polarity connections for solar panels or batteries. Ensure all connections are made with correct polarity.
- Over-charge Protection: Prevents batteries from being overcharged. The controller will reduce or stop charging when the battery reaches its full capacity. This is normal operation.
- Over-discharge Protection: Prevents batteries from being excessively discharged, which can damage them. The controller will disconnect the load if battery voltage drops too low. Recharge batteries.
- Over Current and Over Voltage Auto Brake Protection: For wind turbine input, this protects against excessive current or voltage by engaging an automatic brake. Check wind turbine conditions and connections.
- Battery Anti-reverse Connection Protection: Prevents damage if batteries are connected with reverse polarity. Double-check battery connections.
- Battery Open Circuit Protection: Detects if the battery is disconnected. Ensure secure battery connections.
- Overload Protection: If the connected load exceeds the controller's capacity, the output will be cut off. Reduce the load or ensure it is within the controller's specifications.
If problems persist after checking these points, contact customer support.
7. Specifications
| Feature | Specification |
|---|---|
| Model | Sports (12V Variant) |
| Supported Battery Types | Lead acid, Ternary lithium, Lithium iron phosphate |
| Output Working Mode | Light-control on/off (3 modes adjustable) |
| Display Type | LCD (Voltage, Battery %, Current, Load mode) |
| Protection Types | Solar Reversed Charging, Battery open circuit, Battery anti-reverse connection, Over current/voltage auto brake, Overload |
| Cooling Mode | Aluminum profiles Heat dissipation and self-cooling |
| Working Temperature | -25℃ ~ +80℃ |
| Working Humidity | 0 ~ 90% (non-condensing) |
| Net Weight | 2.1 kg |
| Controller Dimensions (L×W×H) | 167mm × 145.5mm × 61.8mm |

Figure 7.1: Technical dimensions of the controller.
8. Warranty and Support
For warranty information, please refer to the product documentation provided at the time of purchase or contact the seller directly. The manufacturer of this product is HUIZHITENGDA.
For technical support or inquiries, please contact your point of purchase or the HUIZHITENGDA customer service department.