Wengart WG902
Wengart WG902 Digital Programmable Thermostat User Manual
Model: WG902
1. Introduction
The Wengart WG902 Digital Programmable Thermostat is designed to provide precise and constant indoor temperature control for various heating systems, including floor heating and boiler systems. It enhances living comfort by allowing users to set planned temperature controls through its programmable mode. This thermostat is suitable for both residential and commercial environments, optimizing temperature settings based on user needs and environmental characteristics.
This manual provides detailed instructions for the safe installation, effective operation, and proper maintenance of your WG902 thermostat.

2. Key Features
- Versatile Heating Control: Suitable for water and hot water floor heating systems, as well as controlling electric actuators. Includes a potential-free switch for boiler integration.
- Programmable Modes: Offers both manual and weekly programmable modes to adapt heating schedules to your lifestyle, promoting comfort and energy efficiency.
- Advanced Functions: Features child safety lock, antifreeze protection, temperature compensation, adjustable temperature difference, connection delay time, maximum set temperature adjustment, and factory reset options.
- User-Friendly Interface: Equipped with a circular LCD screen and a backlight that illuminates upon touch, ensuring clear visibility of current settings even in low light.
- Power-Off Memory: Retains all settings even after power loss, eliminating the need for re-configuration.
- Easy Installation: Designed for straightforward installation and operation.

3. Product Components
The Wengart WG902 Thermostat package includes the following items:
- 1 x Wengart WG902 Digital Programmable Thermostat
- 2 x Mounting Screws
- 1 x User Manual (this document)
4. Product Overview and Display Elements
Familiarize yourself with the thermostat's display and control buttons for effective operation.

- Period 1 to Period 6: Indicators for different programmable time periods.
- Timing Switch: Indicates scheduled on/off times.
- Set Temperature: Displays the desired temperature setting.
- Manual Mode: Indicator for manual operation.
- Child Lock: Indicates when the child lock function is active.
- Frost Protection: Indicates active frost protection.
- Room Temperature: Displays the current ambient room temperature.
- External Temperature Sensor: Indicates if an external sensor is connected and active.
- Programming Mode: Indicates when the thermostat is in programming mode.
- Departure Pattern: Indicates a specific mode for when occupants are away.
Control Buttons:
- Power Button (U): Turns the thermostat on or off.
- Mode Button (M): Switches between manual and programmable modes.
- Clock/Settings Button (Clock icon): Used to set time, date, and access advanced settings.
- Up Button (▲): Increases temperature, navigates menus, or adjusts values.
- Down Button (▼): Decreases temperature, navigates menus, or adjusts values.
5. Specifications
| Parameter | Value |
|---|---|
| Power Supply | AC 95~240 V, 50/60 Hz |
| Power Consumption | 1.5 W |
| Current Load | 20 A (Max) |
| Setting Temperature Range | 5-70 ℃ (Adjustable to 20-70 ℃) |
| Switching Difference | Adjustable 0.5 to 5 ℃ (Factory setting ± 1 ℃) |
| Ambient Temperature Range | -5 ~ 50 ℃ |
| Ambient Temperature Display Accuracy | ± 0.5 ℃ |
| Temperature Control Accuracy | ± 0.5 ℃ |
| Measurement Range | 1 to 70 ℃ |
| Internal Sensor | NTC 10 K at 25 ℃ |
| Protection Housing | IP20 |
| Housing Material | Flame-retardant PC |
| Wiring Terminal Capacity | Max 2 x 1.5 mm² or 1 x 2.5 mm² wire |
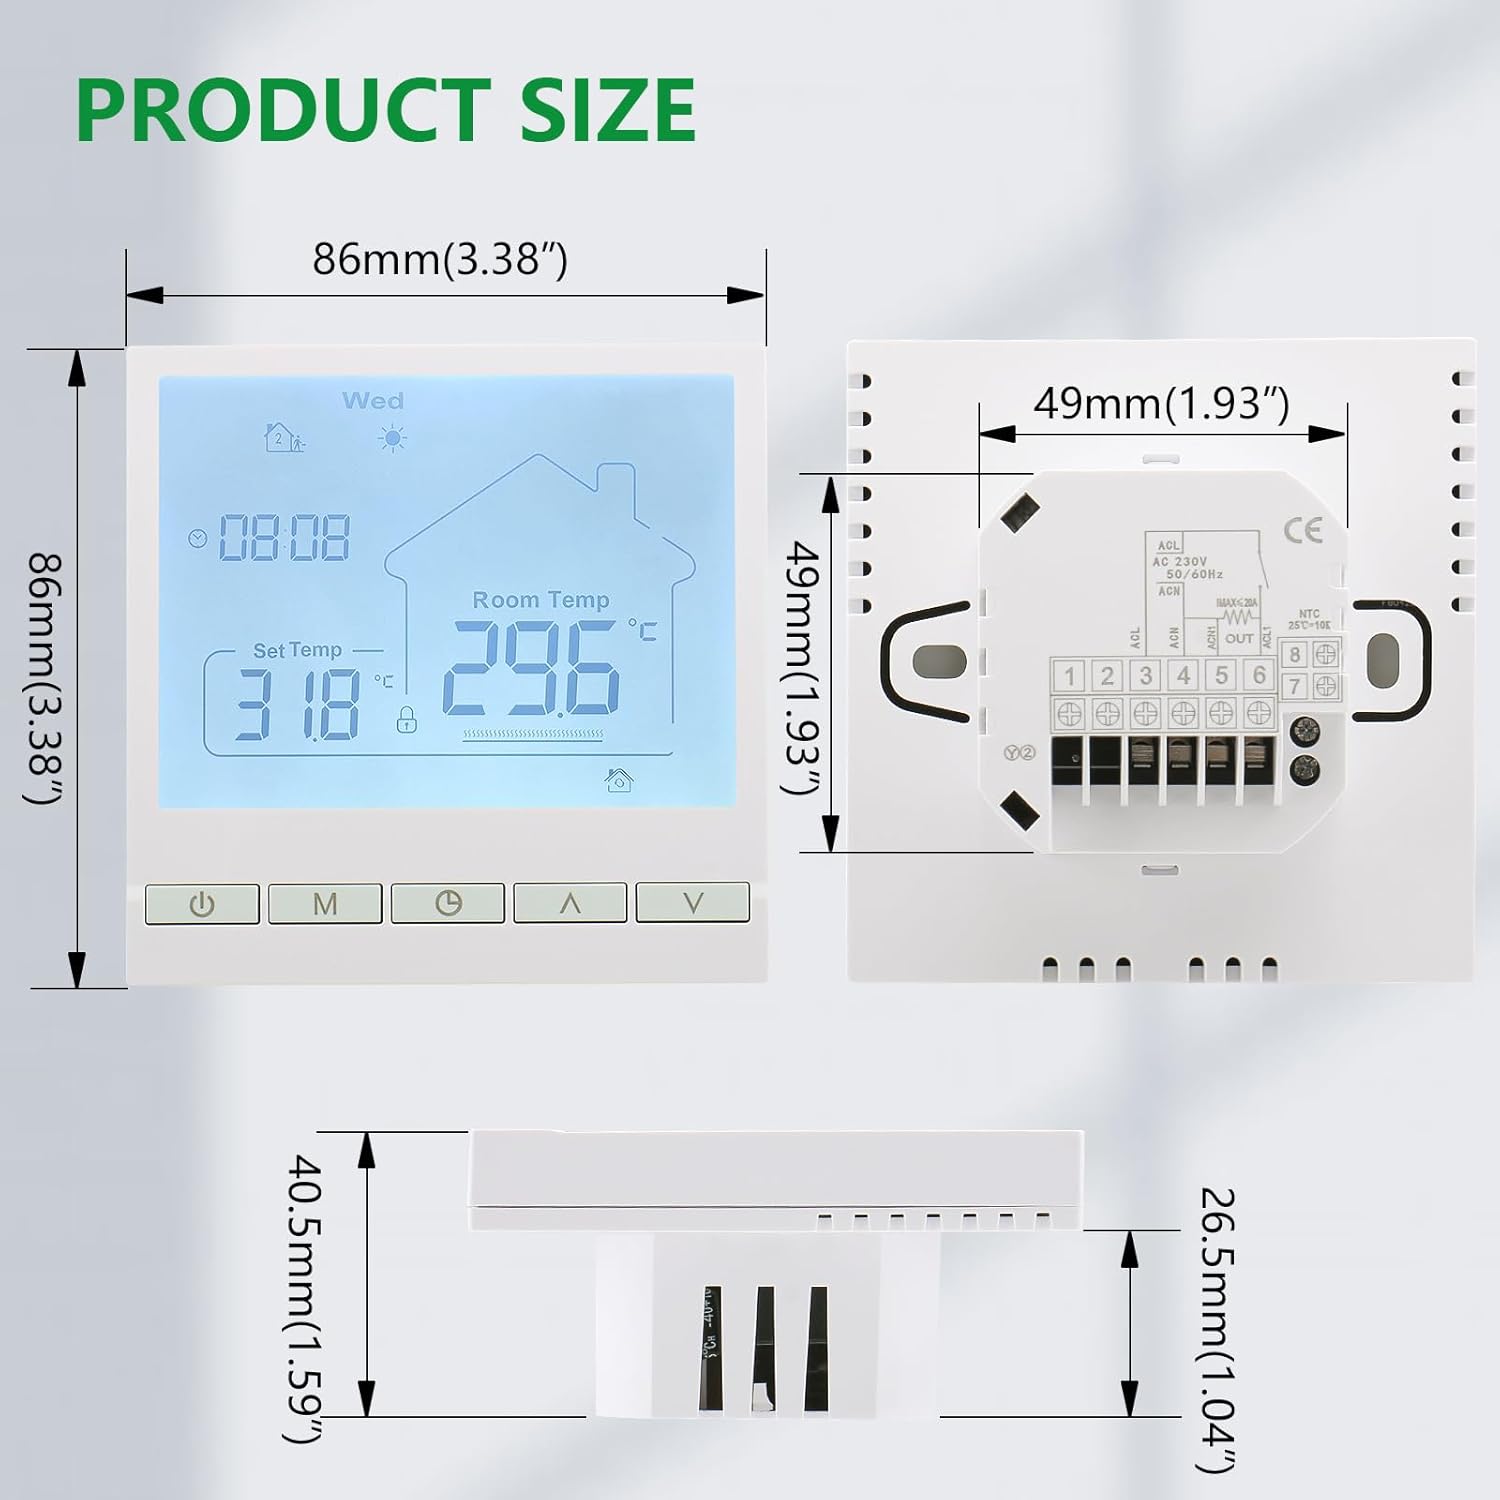
| Dimensions (L x W x H) | 86 x 86 x 13.7 mm (3.38 x 3.38 x 0.54 inches) |
| Installation Hole Distance | 60 mm |
| Weight | 234 g |
| Color | White |
| Connectivity | Wi-Fi |
6. Installation
6.1 Safety Precautions
- Installation must be performed by a qualified electrician.
- Ensure the main power supply is turned OFF before commencing any wiring work to prevent electric shock.
- Follow all local electrical codes and regulations.
- Do not install the thermostat in areas with excessive vibration, direct sunlight, or extreme temperature fluctuations.
6.2 Mounting
- Choose an appropriate location on an interior wall, away from drafts, heat sources, or direct sunlight, at a height of approximately 1.2 to 1.5 meters (4 to 5 feet) from the floor.
- Carefully separate the front panel of the thermostat from its backplate.
- Mark the drilling points on the wall using the backplate as a template. The installation hole distance is 60 mm.
- Drill holes and insert wall plugs if necessary.
- Secure the backplate to the wall using the provided screws.
6.3 Wiring Diagram
Refer to the wiring diagram below for correct electrical connections. Ensure all connections are secure and properly insulated.

- Terminals 1 & 2: Connect to AC 230V power supply (L and N).
- Terminals 3 & 4: Connect to the heating system (e.g., heating wire for floor heating, or boiler control input).
- Terminals 7 & 8: Connect to an optional external NTC 10K temperature sensor (if used for floor temperature limit or remote sensing).
- Ensure wire capacity does not exceed 2 x 1.5 mm² or 1 x 2.5 mm² per terminal.
After wiring, carefully attach the front panel of the thermostat to the backplate.
7. Operating Instructions
7.1 Power On/Off
Press the Power button (U) to turn the thermostat on or off.
7.2 Setting Time and Day
- With the thermostat on, press and hold the Clock/Settings button for 3 seconds. The hour display will flash.
- Use the Up (▲) or Down (▼) buttons to adjust the hour.
- Press the Clock/Settings button again to move to minute adjustment, then day adjustment.
- Repeat step 2 to set minutes and day.
- Press the Power button (U) or wait 10 seconds for the settings to be saved automatically.
7.3 Manual Mode
In Manual Mode, the thermostat maintains a constant temperature set by the user.
- Press the Mode button (M) to switch to Manual Mode (indicated by the "Manual" icon on the display).
- Use the Up (▲) or Down (▼) buttons to adjust the desired temperature. The thermostat will maintain this temperature.
7.4 Programmable Mode (Weekly Schedule)
The programmable mode allows you to set different temperatures for various time periods throughout the week.
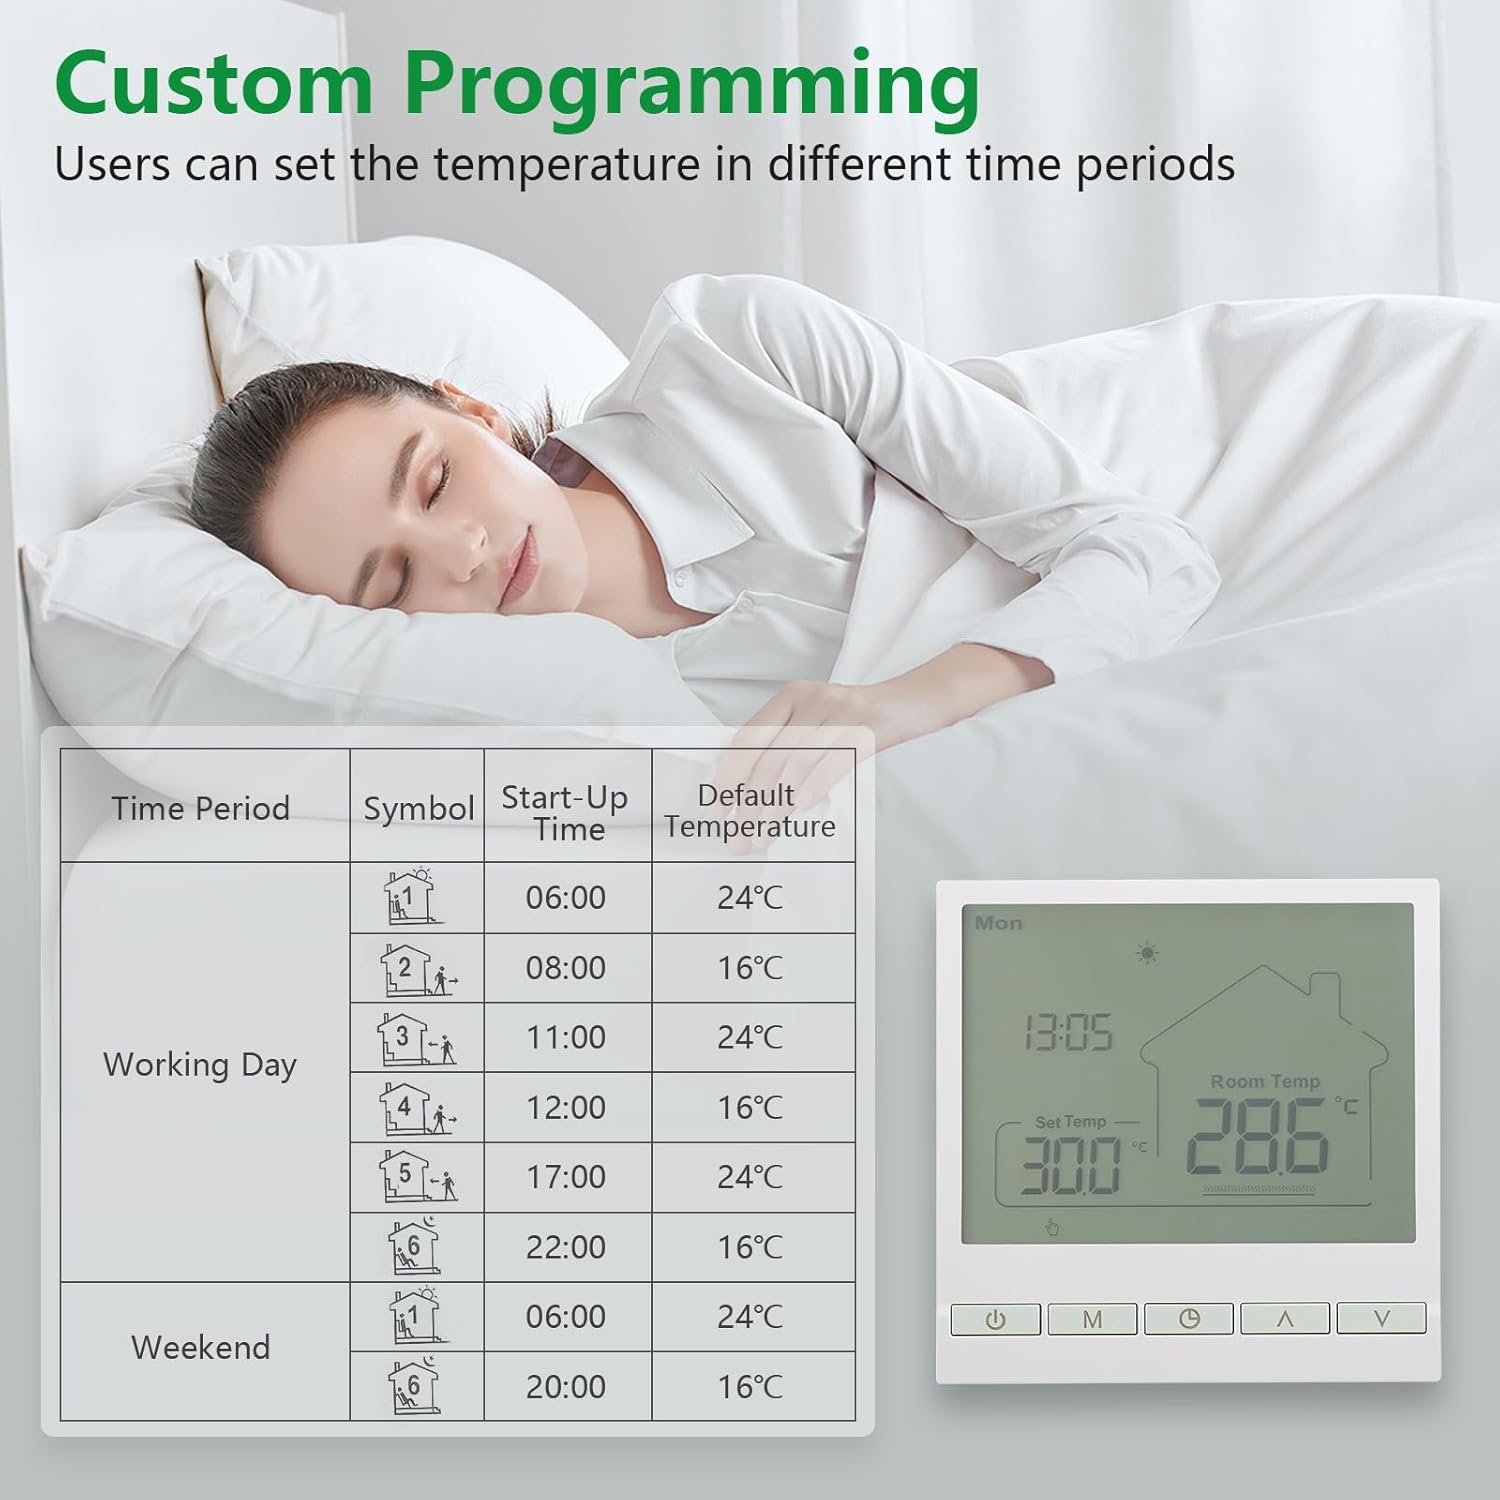
- Press the Mode button (M) to switch to Programmable Mode (indicated by the "Programming Mode" icon).
- Press and hold the Clock/Settings button for 3 seconds to enter programming settings. The first period's time will flash.
- Use Up (▲) or Down (▼) to adjust the start time for the current period.
- Press the Clock/Settings button to move to the temperature setting for that period. Adjust with Up (▲) or Down (▼).
- Repeat for all 6 periods for weekdays (Monday-Friday) and then for weekend periods (Saturday-Sunday).
- Press the Power button (U) or wait 10 seconds to save and exit programming.
7.5 Child Lock Function
The child lock prevents unauthorized changes to the thermostat settings.

- To activate the child lock, press and hold the Up (▲) and Down (▼) buttons simultaneously for 3 seconds. A lock icon will appear on the display.
- To deactivate, repeat the process. The lock icon will disappear.
7.6 Advanced Settings
The thermostat offers several advanced settings for customization. Consult the full manual for detailed instructions on accessing and adjusting these parameters:
- Temperature Compensation
- Adjustable Temperature Difference (Hysteresis)
- Connection Delay Time
- Maximum Set Temperature Limit
- Factory Reset
- Sensor Selection (Internal, External, or Both)
8. Maintenance
- Cleaning: Wipe the thermostat's surface with a soft, dry cloth. Do not use abrasive cleaners or solvents.
- Inspection: Periodically check for any loose connections or visible damage. If any issues are found, consult a qualified technician.
- Battery: This thermostat is mains-powered and does not require battery replacement for operation. The power-off memory function is internal.
9. Troubleshooting
| Problem | Possible Cause | Solution |
|---|---|---|
| Thermostat not powering on. | No power supply; incorrect wiring. | Check main power switch. Verify wiring connections as per Section 6.3. |
| Heating system not responding. | Incorrect wiring; thermostat in off mode; set temperature too low; child lock active. | Ensure thermostat is on. Check wiring. Increase set temperature above room temperature. Deactivate child lock. |
| Temperature display is inaccurate. | Sensor issue; thermostat location. | Ensure thermostat is not near heat sources or drafts. Check external sensor connection if used. Adjust temperature compensation in advanced settings. |
| Cannot change settings. | Child lock is active. | Deactivate child lock by pressing and holding Up and Down buttons for 3 seconds. |
| Programmable schedule not working. | Thermostat not in programmable mode; incorrect schedule settings. | Ensure thermostat is in programmable mode (M button). Review and correct schedule settings as per Section 7.4. |
If the problem persists after attempting these solutions, please contact customer support.
10. Warranty and Support
Wengart products are manufactured to high-quality standards. For warranty information, technical support, or service inquiries, please refer to the contact information provided with your purchase or visit the official Wengart website.
Please retain your proof of purchase for warranty claims.
Ask a question about this manual
Ask about setup, troubleshooting, compatibility, parts, safety, or missing instructions. Manuals+ will review the question and use this page’s manual context to help answer it.