HAOYAO Weather Station
HAOYAO Wireless Weather Station
User Manual
Product Overview
The HAOYAO Wireless Weather Station is designed to provide comprehensive weather information for your home or office. It features a large color LCD touchscreen display and comes with three wireless outdoor sensors, allowing you to monitor temperature and humidity in multiple locations.
Key features include 24-hour weather forecasting, indoor/outdoor temperature and humidity display, atmospheric pressure readings, comfort level indication, time and alarm functions, and a snooze feature.
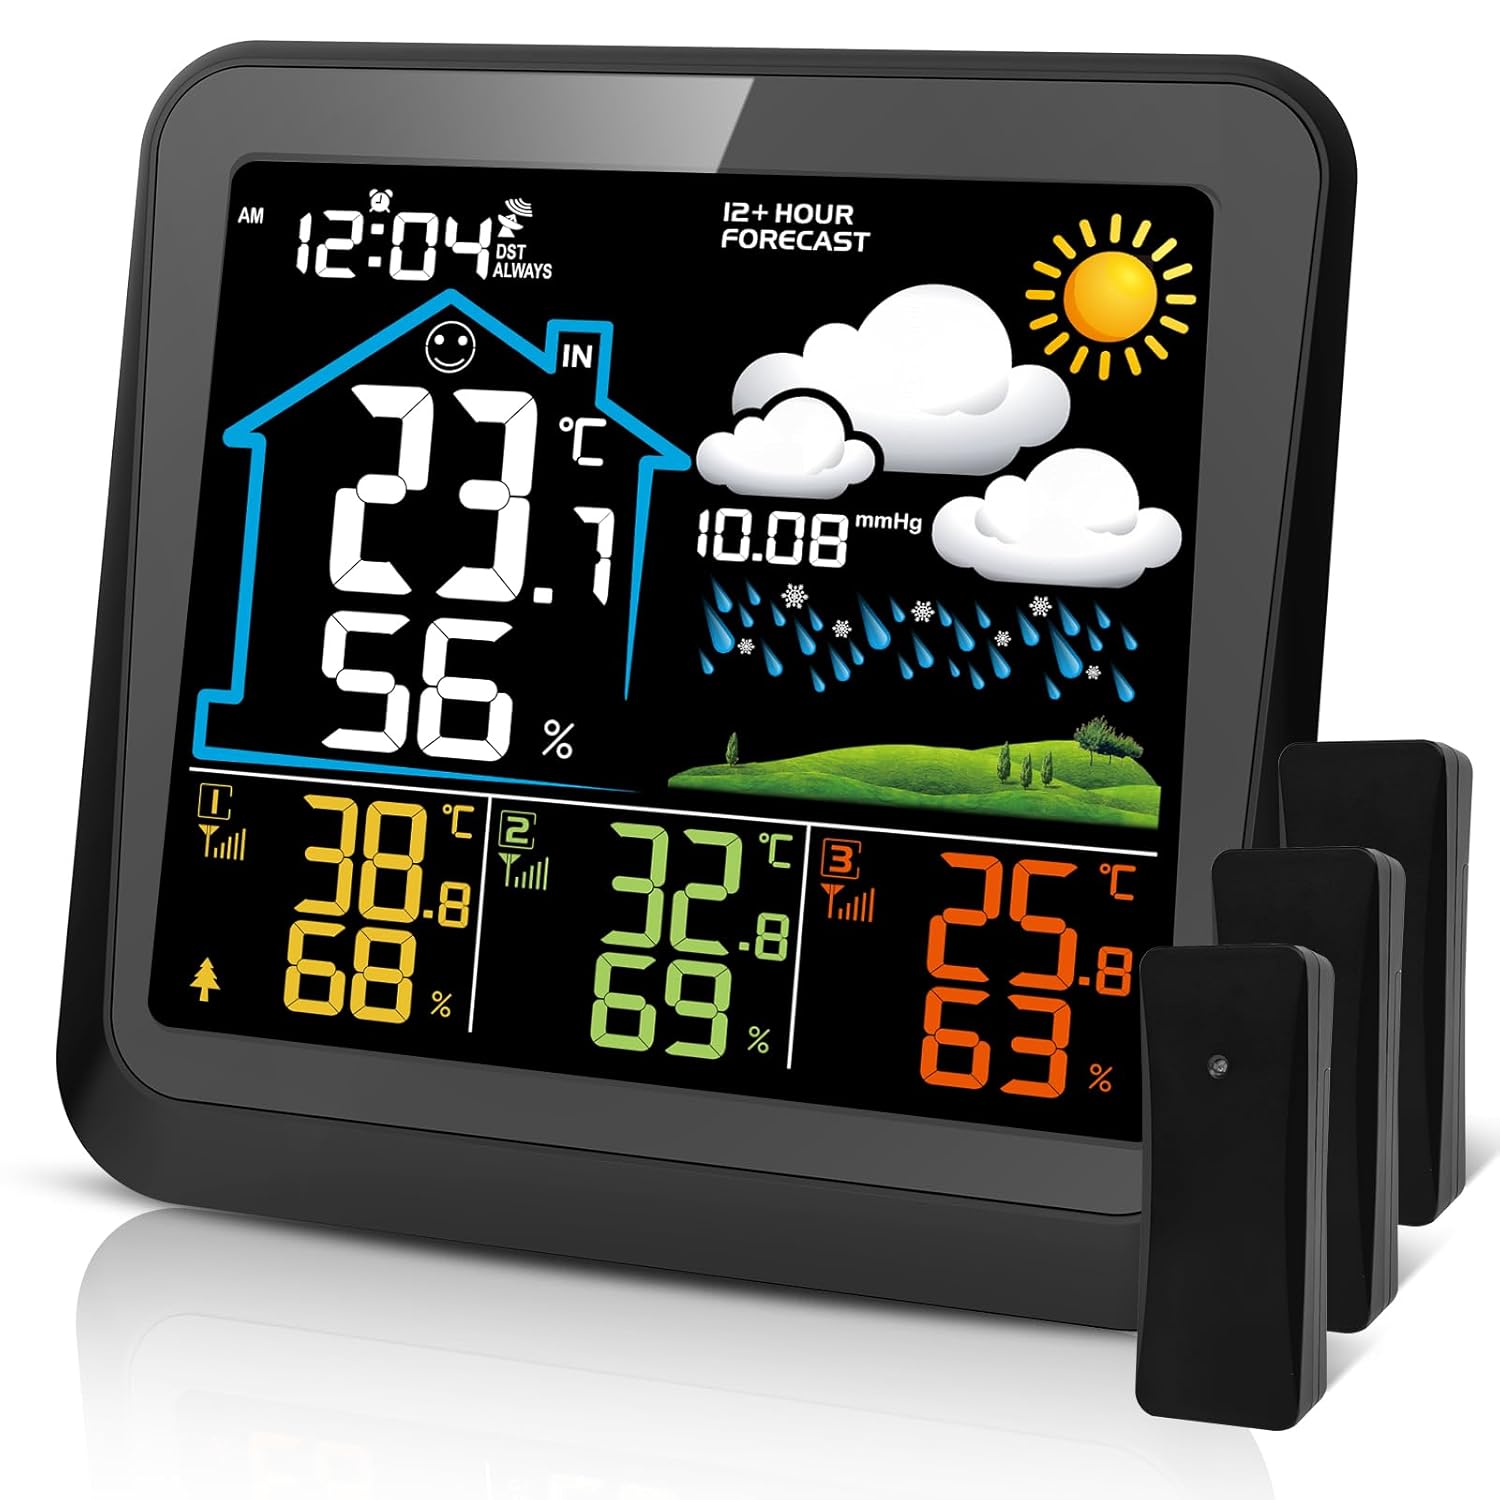
Image: HAOYAO Wireless Weather Station main unit with its vibrant color display showing indoor and outdoor readings, alongside three compact outdoor sensors.
Package Contents
Please check the package contents to ensure all items are present:
- 1 x HAOYAO Weather Station Main Unit
- 3 x Wireless Remote Sensors
- 2 x Spirit Stands (located in the battery compartment)
- 1 x USB Cable
- 1 x User Manual (English, German, French, Italian, Spanish)
Product Components
Familiarize yourself with the main unit's components:

Image: Rear view of the HAOYAO Weather Station main unit, highlighting various buttons and ports with corresponding numbers for identification.
- Table Stand Hole
- Battery Cover
- Max/Min Reading Button
- Resetting and Sensor Scanning Button
- Data/Time Setting Button
- Wall Hook
- Snooze/Light Display Button
- Display in °C or °F Button
- Display in 12 or 24 Hour Button
- Alarm Setting Button
- DC 5V Power Input Socket
Setup Guide
1. Powering the Devices

Image: Diagram illustrating the two power modes for the indoor receiver (USB cable or 3x AAA batteries) and the outdoor transmitter (2x AA batteries).
- Main Unit (Indoor Receiver): Can be powered by the included USB cable or 3 x AAA batteries (not included). For continuous backlight, use the USB cable.
- Remote Sensors (Outdoor Transmitter): Each sensor requires 2 x AA batteries (not included).
Installation Steps:
- Insert batteries into the remote sensors first, ensuring correct polarity.
- Power on the main unit using either the USB cable or by inserting AAA batteries.
- The main unit will automatically search for and connect to the remote sensors. This may take a few minutes. Ensure sensors are within range during initial setup.
2. Sensor Placement

Image: Visual representation of how three wireless remote sensors can be placed in different outdoor or indoor locations, transmitting data up to 100m to the main indoor unit.
The wireless remote sensors have a transmission range of up to 100 meters (328 feet) in open air. For optimal performance:
- Place sensors in locations where you wish to monitor temperature and humidity, such as a baby's room, wine cellar, garden, or patio.
- Avoid direct sunlight or rain exposure for outdoor sensors to ensure accurate readings and prolong battery life.
- Ensure there are minimal obstructions (thick walls, metal objects) between the sensors and the main unit.
Operating Instructions
Display Information
The main unit's color display provides a wealth of information at a glance:
- Indoor Temperature & Humidity: Displayed prominently.
- Outdoor Temperature & Humidity: Readings from up to 3 remote sensors are shown.
- Weather Forecast: Icons predict weather for the next 12-24 hours based on atmospheric pressure changes.
- Time & Date: Current time and date.
- Atmospheric Pressure: Current pressure reading.
- Comfort Indicator: A 3-level indicator (DRY, COMFORT, WET) based on indoor humidity.
- Battery Indicators: Shows battery status for both the main unit and sensors.

Image: Examples of weather forecast icons displayed on the unit, including Sunny, Freeze, Cloudy, Partly Cloudy, and Rainy.
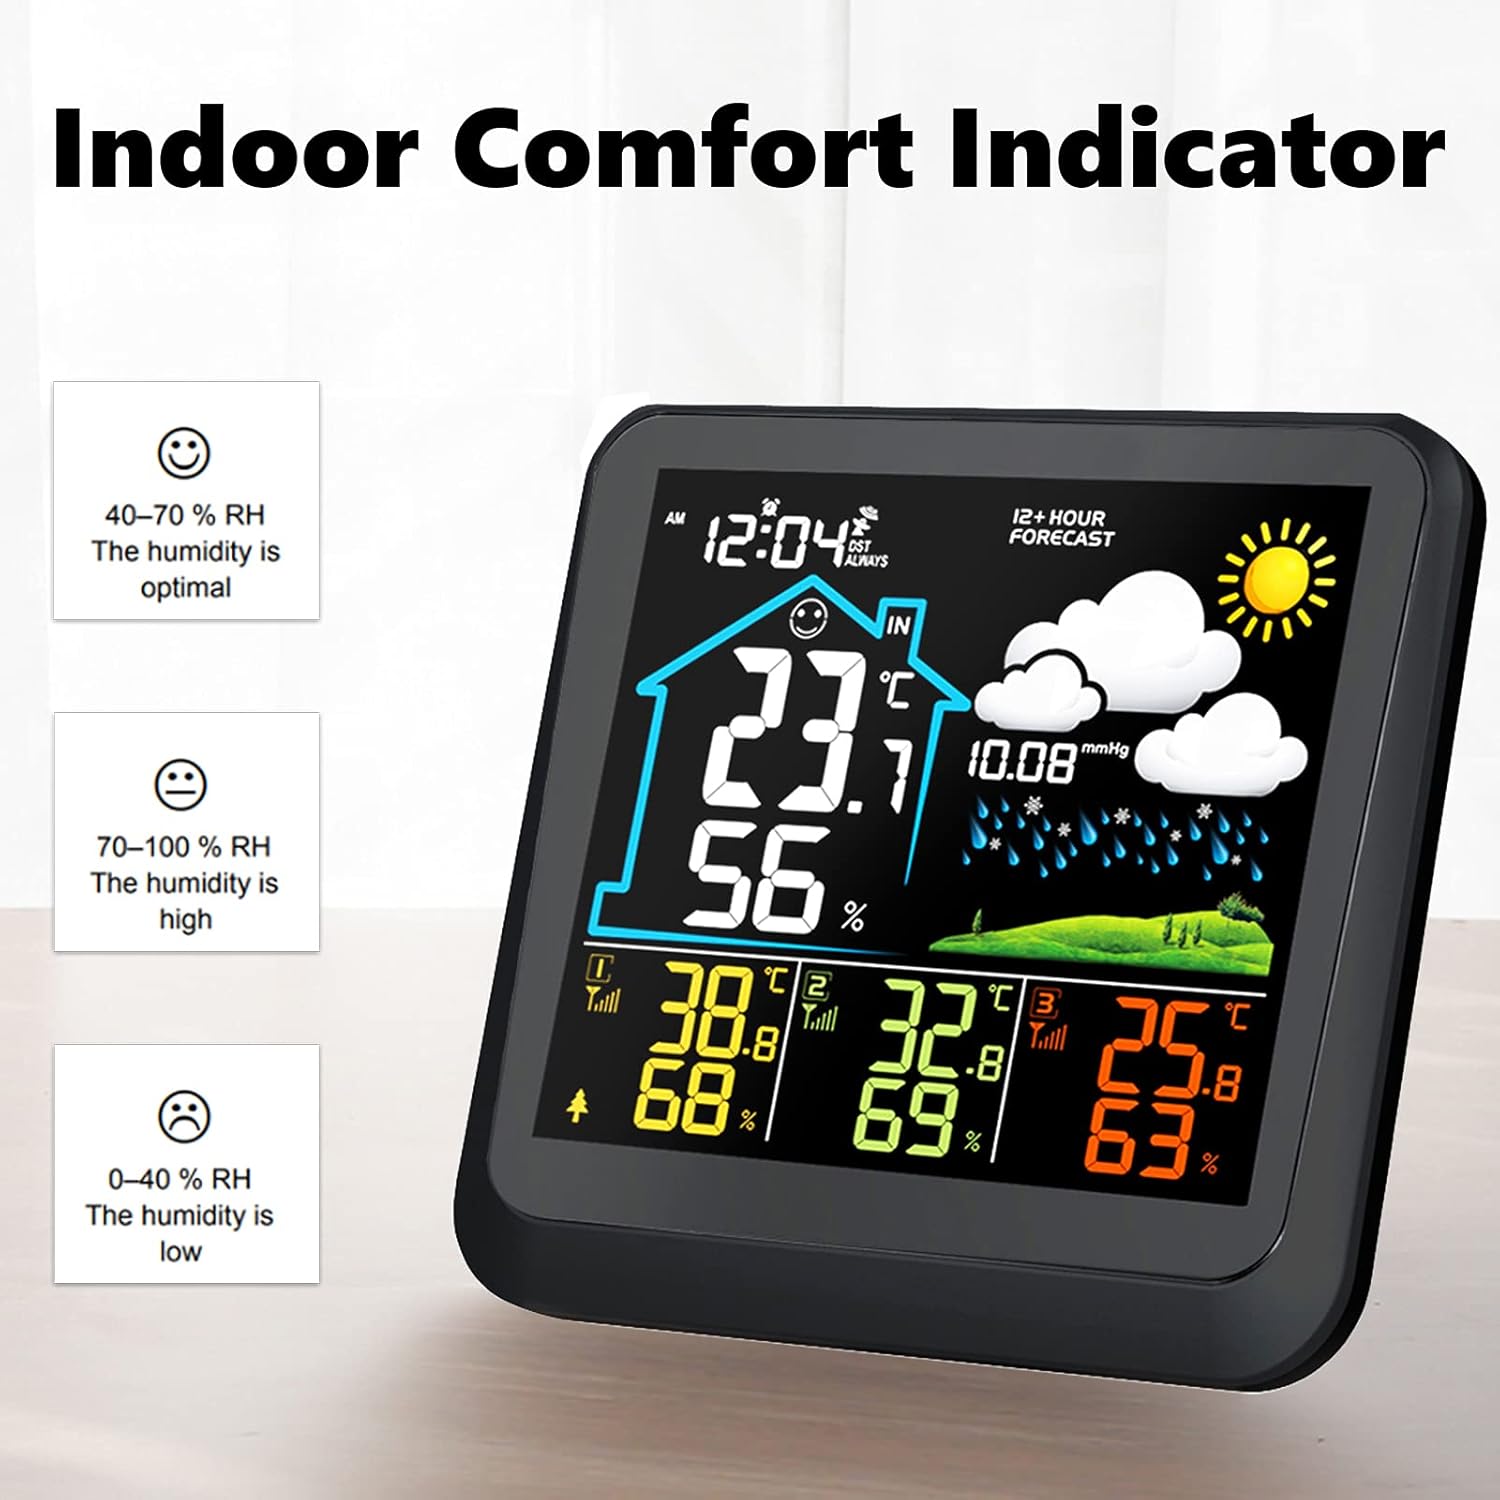
Image: The Indoor Comfort Indicator showing three levels: Dry (0-40% RH), Comfort (40-70% RH), and Wet (70-100% RH).
Button Functions
- Snooze / Light:
- Battery Mode: Press to illuminate the display for 8 seconds.
- USB Mode: Press repeatedly to cycle through low brightness, high brightness, or off.
- SET: Used to enter time/date settings.
- MEM: Displays maximum and minimum temperature/humidity readings.
- °C / °F Button: Toggles between Celsius and Fahrenheit temperature display.
- 12/24 Hour Button: Switches between 12-hour and 24-hour time format.
- ALARM: Used to set the alarm time.
Specifications
| Feature | Detail |
|---|---|
| Indoor Temperature Range | -10 °C to 50 °C (14 °F to 122 °F) ±1 °C |
| Outdoor Temperature Range | -40 °C to 60 °C (-40 °F to 140 °F) ±1 °C |
| Humidity Range | 1% to 99% RH ±5% |
| Atmospheric Pressure Range | 800 to 1000 hPa |
| Wireless Transmission Range | Up to 100 meters (328 feet) in open area |
| Main Unit Power | USB cable (included) or 3 x AAA batteries (not included) |
| Sensor Power | 2 x AA batteries per sensor (not included) |
| Dimensions (Main Unit) | 14.5 cm (H) x 14 cm (W) x 3 cm (D) / 5.6 in (H) x 5.5 in (W) x 1.2 in (D) |
| Dimensions (Sensor) | 10 cm (H) x 3.8 cm (W) x 1.5 cm (D) / 3.9 in (H) x 1.49 in (W) x 0.6 in (D) |
| Material | Plastic |
| Color | Black |

Image: Detailed dimensions of both the main weather station unit and a single remote sensor, indicating their compact and suitable size for various placements.
Troubleshooting
- No Display / Dim Display:
- Ensure batteries are inserted correctly with proper polarity and are not depleted.
- If using USB power, ensure the cable is securely connected and the power source is active.
- In battery mode, the backlight turns off after 8 seconds to save power. For continuous backlight, use USB power.
- Outdoor Sensor Not Connecting / No Readings:
- Check batteries in the remote sensor. Replace if necessary.
- Ensure the sensor is within the 100-meter transmission range of the main unit.
- Minimize obstructions (e.g., thick walls, large metal objects) between the sensor and the main unit.
- Press the "Resetting and Sensor Scanning" button on the main unit to re-initiate sensor search.
- Inaccurate Temperature/Humidity Readings:
- Ensure outdoor sensors are not in direct sunlight or exposed to extreme weather conditions.
- Allow the unit and sensors to stabilize for at least 30 minutes after setup or relocation.
- If the weather station is moved to a new location, the atmospheric pressure forecast may take 12 to 24 hours to adjust and recalculate for accurate predictions.
- Display Shows "LL.L" or "HH.H":
- This indicates that the measured data (temperature or humidity) is outside the device's specified measurement range.
Maintenance
- Cleaning: Wipe the main unit and sensors with a soft, damp cloth. Do not use abrasive cleaners or solvents.
- Battery Replacement: Replace batteries in both the main unit and sensors when the low battery indicator appears on the display. Dispose of old batteries responsibly.
- Storage: If storing the device for an extended period, remove all batteries to prevent leakage.
Warranty and Support
For any questions, technical support, or warranty inquiries, please contact HAOYAO customer service through the retailer where you purchased the product or refer to the contact information provided in your product packaging.
Please retain your proof of purchase for warranty purposes.