WENGART WG538
Wengart WG538 Digital Thermostat User Manual
Model: WG538 | Brand: WENGART
1. Introduction
This manual provides comprehensive instructions for the installation, operation, and maintenance of the Wengart WG538 Digital Thermostat. This thermostat is designed for controlling underfloor heating and hot water heating systems, ensuring optimal indoor temperature control and energy efficiency.
The WG538 features a color display, weekly programming capabilities, and various advanced functions to meet diverse heating needs in residential and commercial environments.

Image 1.1: Front view of the Wengart WG538 Digital Thermostat, showing the display and touch buttons.
2. Key Features
- Precise Temperature Control: Maintains desired indoor temperature with high accuracy.
- Weekly Programmable: Allows customization of heating schedules for different days and times, optimizing comfort and energy savings.
- Manual and Program Modes: Offers flexibility to switch between manual temperature setting and pre-programmed schedules.
- LCD Color Display: Clear and intuitive circular LCD display with backlight for easy readability, even in low light.
- Child Lock Function: Prevents unauthorized changes to settings.
- Anti-freeze Protection: Protects pipes from freezing in unoccupied spaces.
- Temperature Compensation: Adjusts sensor readings for improved accuracy.
- Power-off Memory: Retains all settings in case of power interruption.
- Easy Installation: Designed for straightforward setup.

Image 2.1: Visual representation of the main functions and features of the thermostat.
3. Technical Specifications
| Parameter | Value |
|---|---|
| Power Supply Voltage | AC 95 ~ 240 V, 50/60 Hz |
| Power Consumption | 1.5 W |
| Setting Temperature Range | 5 ~ 70 ℃ (adjustable to 20-70 ℃) |
| Switching Differential | 0.5 ~ 5 ℃ adjustable (factory setting ± 1 ℃) |
| Ambient Temperature | -5 ~ 50 ℃ |
| Ambient Temperature Display Accuracy | ± 0.5 ℃ |
| Temperature Control Accuracy | ± 0.5 ℃ |
| Measured Range | 1 ~ 70 ℃ |
| Internal Sensor | NTC 10 K at 25 ℃ |
| Maximum Resistive Load | 3 A |
| Protection Housing | IP20 |
| Housing Material | Anti-flammable PC |
| Wiring Terminal | Max 2*1.5mm² or 1*2.5mm² wire |
| Dimensions (L x W x H) | 86 x 86 x 13.7 mm |
| Installation Hole Distance | 60 mm |
| Weight | 234 g |

Image 3.1: Product dimensions and physical overview.
4. Installation
WARNING: Electrical installation should only be performed by a qualified electrician. Disconnect power before installation to prevent electric shock.
4.1 Package Contents
- 1 x Wengart WG538 Thermostat
- 2 x Mounting Screws
- 1 x User Manual (this document)
4.2 Wiring Diagram
Follow the wiring diagram carefully to connect the thermostat to your heating system. Ensure all connections are secure and comply with local electrical codes.
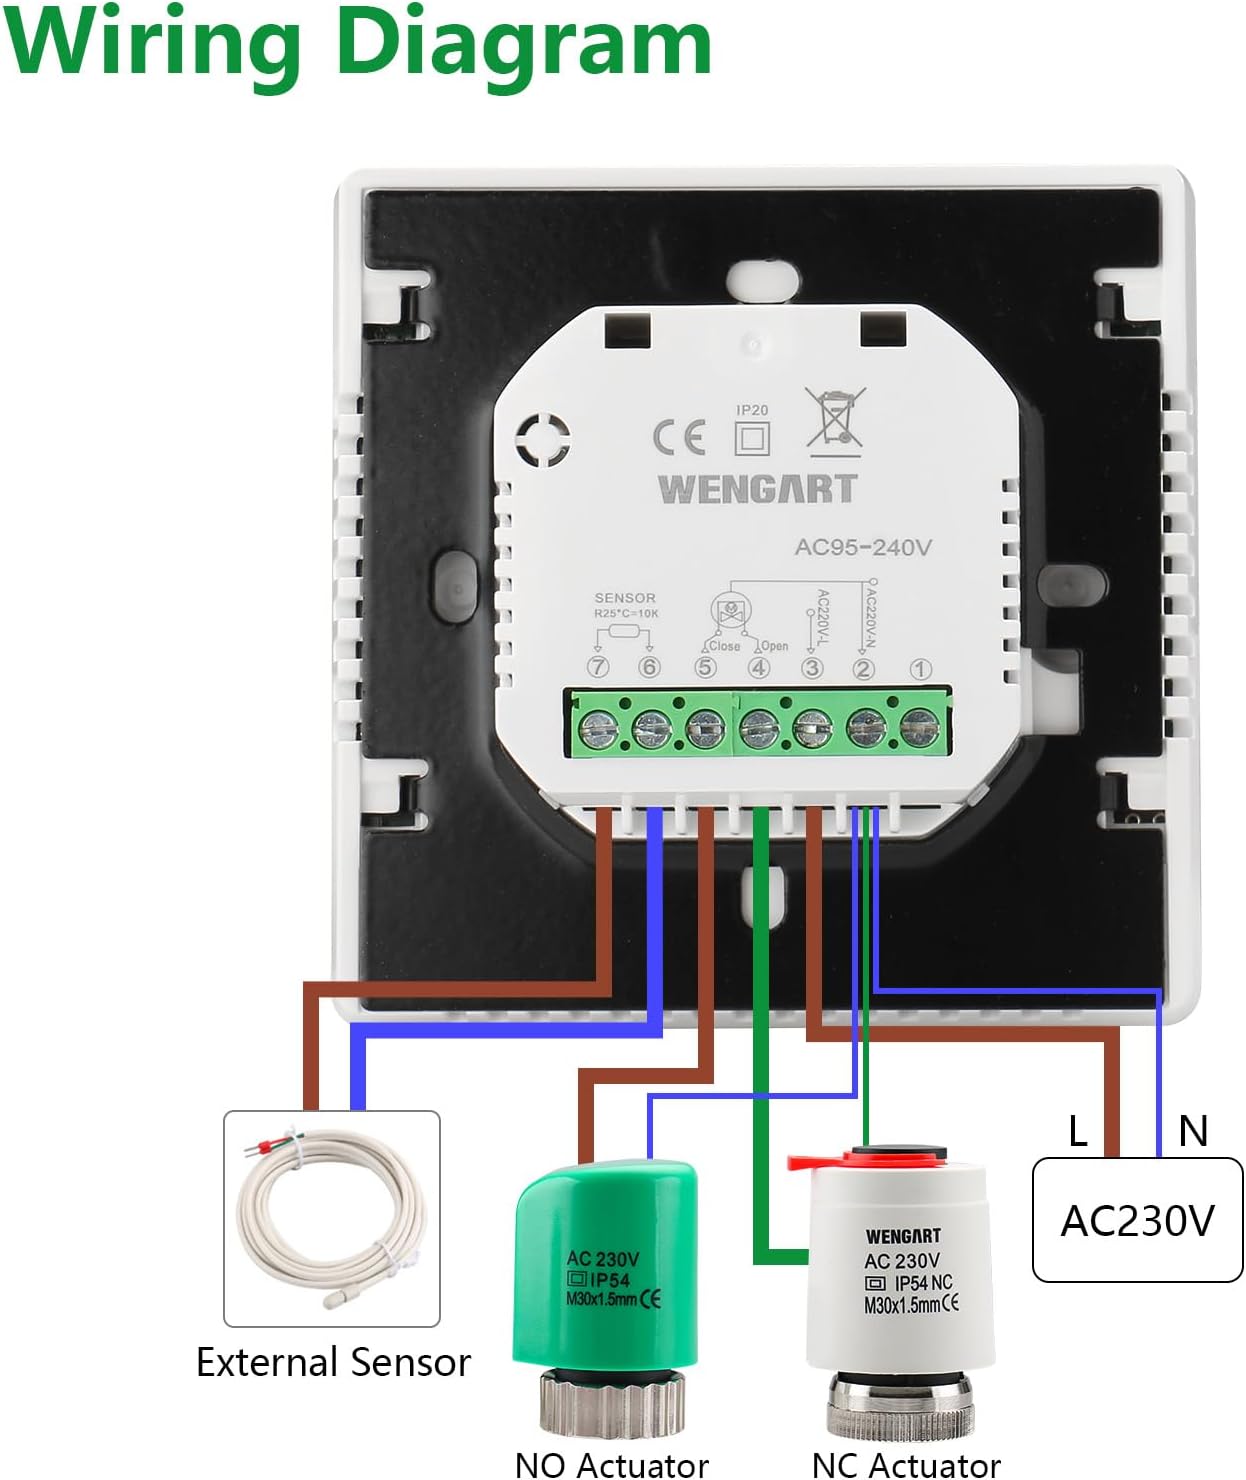
Image 4.1: Detailed wiring diagram for connecting the thermostat to the power supply, external sensor, and heating actuators.
- Power Connection: Connect the Live (L) and Neutral (N) wires from your AC230V power supply to the corresponding terminals on the thermostat.
- Actuator Connection: Connect your heating system's Normally Open (NO) or Normally Closed (NC) actuator to the designated terminals. The thermostat controls the opening and closing of these actuators.
- External Sensor (Optional): If using an external floor temperature sensor, connect it to terminals 7 and 8. The internal sensor (NTC 10K) is used by default if no external sensor is connected.
4.3 Mounting
- Ensure power is disconnected.
- Separate the front panel of the thermostat from the backplate.
- Mount the backplate to a standard electrical wall box using the provided screws. The installation hole distance is 60mm.
- Connect the wiring as per the diagram in Section 4.2.
- Carefully reattach the front panel to the backplate, ensuring it clicks securely into place.
- Restore power to the thermostat.
5. Operation
5.1 Display Overview
The thermostat features an intuitive LCD display. Familiarize yourself with the indicators:
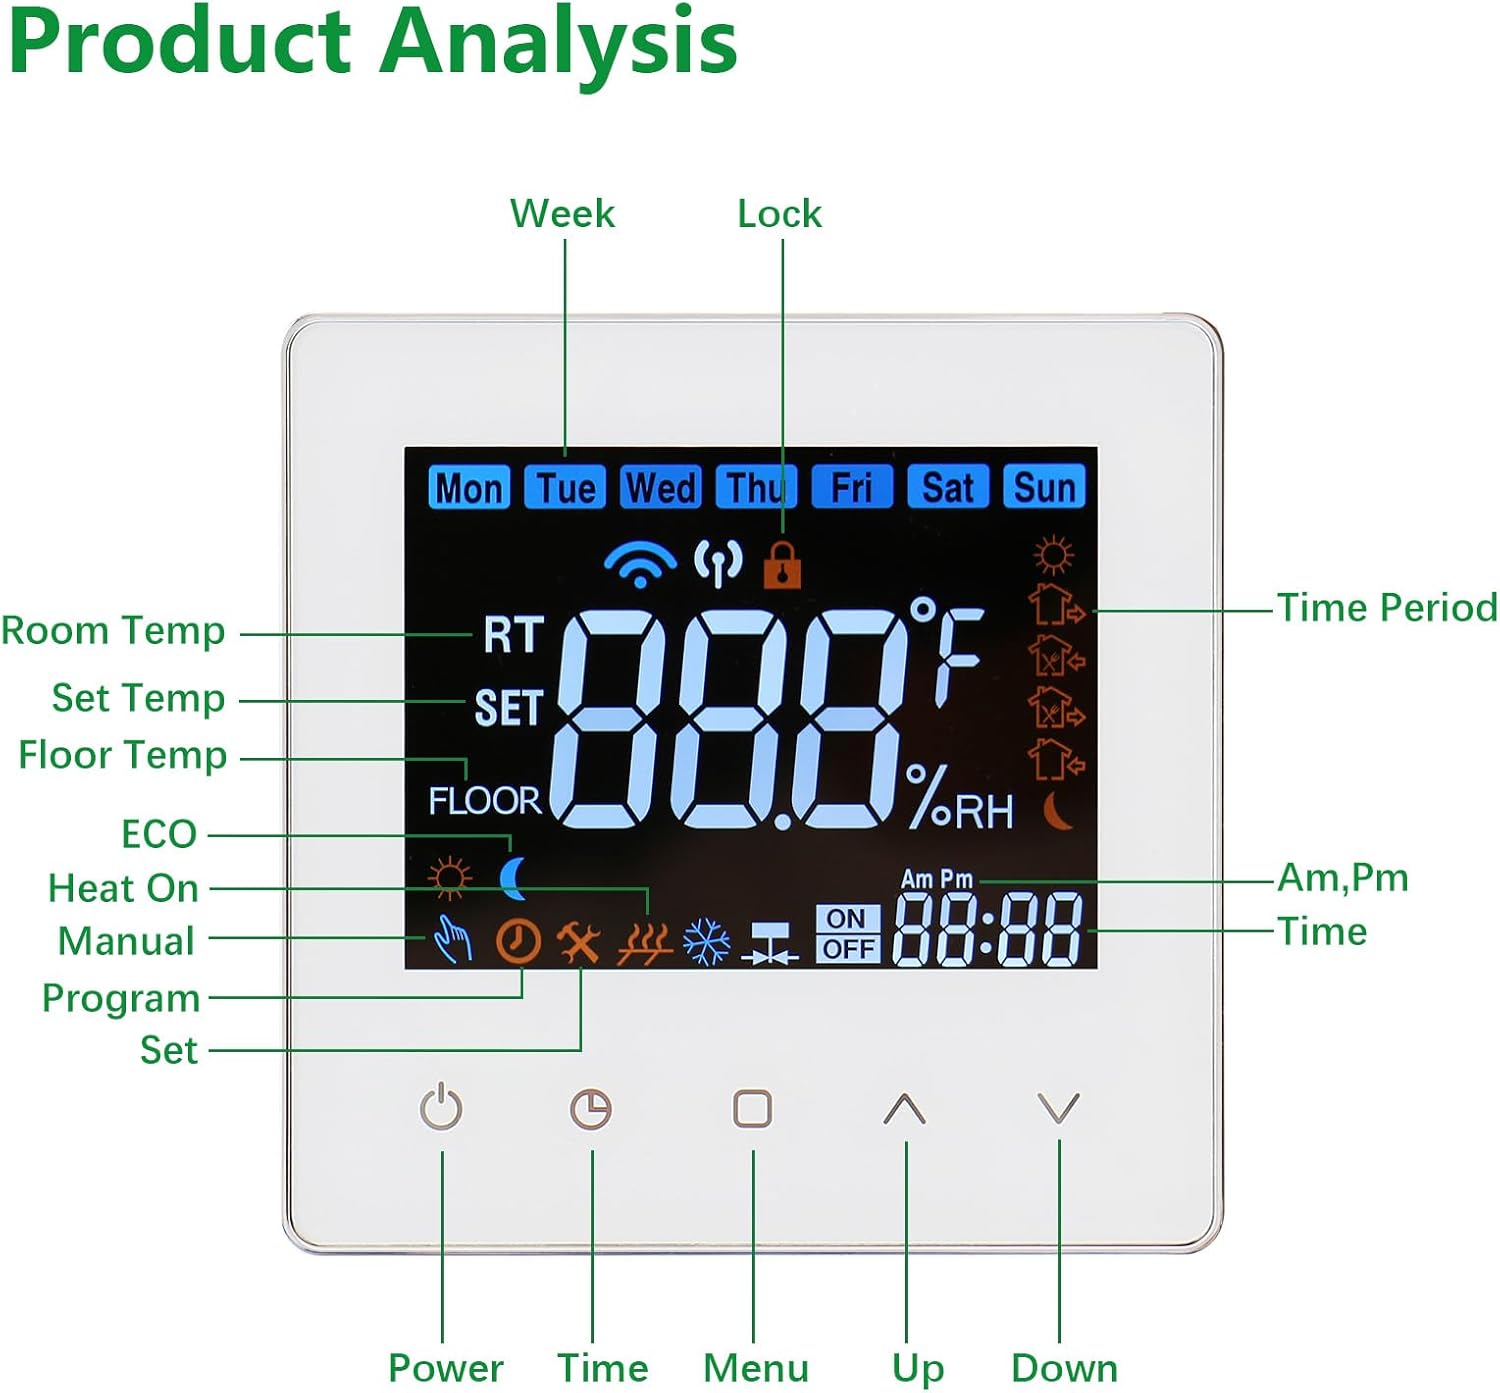
Image 5.1: Breakdown of the thermostat display elements and their meanings.
- Week: Indicates the current day of the week (Mon-Sun).
- Lock: Indicates if the child lock function is active.
- RT (Room Temp): Displays the current room temperature.
- SET (Set Temp): Displays the target temperature.
- FLOOR (Floor Temp): Displays the floor temperature if an external sensor is used.
- ECO: Eco mode indicator.
- Heat On: Indicates when the heating system is active.
- Manual: Indicates manual operating mode.
- Program: Indicates programmable operating mode.
- Time Period: Shows the active time period in programmable mode.
- Time: Current time.
- Buttons: Power, Time, Menu, Up, Down.
5.2 Basic Controls
- Power Button (⏻): Press to turn the thermostat ON or OFF.
- Up (⌃) / Down (⌄) Buttons: Adjust the target temperature in manual mode or navigate settings in program mode.
- Time Button (⏱): Used to set the current time and day.
- Menu Button (□): Access advanced settings and programming options.
5.3 Setting Time and Day
- Press the Time button.
- Use the Up and Down buttons to adjust the hour, then press Time again to confirm.
- Repeat for minutes and day of the week.
5.4 Operating Modes
The thermostat supports two main operating modes:
- Manual Mode: The thermostat maintains a constant temperature set by the user. To set, press Up or Down to adjust the target temperature. The thermostat will display "Manual".
- Programmable Mode: The thermostat follows a pre-set weekly schedule. To activate, press the Menu button until "Program" is displayed.
5.5 Weekly Programming
The thermostat allows for 6 time periods per day for both working days and weekends. This enables precise temperature control according to your lifestyle.

Image 5.2: Example of a custom programming schedule with 6 time periods.
- Press the Menu button repeatedly until you enter the programming interface (usually indicated by flashing time/temperature for a period).
- Use the Up and Down buttons to adjust the start time and target temperature for each period (Period 1 to Period 6).
- Press Menu to move to the next setting.
- Repeat for working days (Mon-Fri) and then for weekends (Sat-Sun).
- Once all periods are set, press the Power button or wait for a few seconds for the settings to be saved and the thermostat to return to normal operation.
5.6 Child Lock Function
To prevent accidental changes to settings, activate the child lock:

Image 5.3: The child lock feature helps prevent unintended adjustments.
- To activate: Press and hold the Up and Down buttons simultaneously for 3-5 seconds. A lock icon will appear on the display.
- To deactivate: Press and hold the Up and Down buttons simultaneously for 3-5 seconds. The lock icon will disappear.
6. Maintenance
- Cleaning: Wipe the thermostat's surface with a soft, dry cloth. Do not use abrasive cleaners or solvents.
- Avoid Obstructions: Ensure no objects block the thermostat's vents, as this can affect temperature sensing accuracy.
- Regular Checks: Periodically check that the thermostat is functioning correctly and that the display is clear.
- Power-off Memory: The thermostat retains settings during power outages, so no battery replacement is typically needed for memory retention.
7. Troubleshooting
| Problem | Possible Cause | Solution |
|---|---|---|
| Thermostat not turning on. | No power supply; incorrect wiring. | Check power connection to the thermostat. Verify wiring according to Section 4.2. |
| Heating not activating. | Target temperature not met; thermostat in OFF mode; wiring issue to actuator. | Ensure target temperature is higher than current room temperature. Check if the thermostat is ON. Verify actuator wiring. |
| Temperature reading inaccurate. | Thermostat placed near heat source/draft; sensor fault. | Relocate thermostat away from direct heat or cold sources. If problem persists, contact support. |
| Child lock cannot be deactivated. | Incorrect button press duration. | Ensure you press and hold the Up and Down buttons simultaneously for 3-5 seconds. |
| Programming not saving. | Settings not confirmed correctly. | Follow the programming steps in Section 5.5 carefully, ensuring each setting is confirmed. |
8. Warranty Information
Wengart products are manufactured to high-quality standards. For specific warranty terms and conditions, please refer to the documentation provided with your purchase or contact Wengart customer support. Keep your proof of purchase for warranty claims.
9. Customer Support
If you encounter any issues not covered in this manual or require further assistance, please contact Wengart customer support through your retailer or the official Wengart website. Please have your model number (WG538) and purchase details ready when contacting support.
Ask a question about this manual
Ask about setup, troubleshooting, compatibility, parts, safety, or missing instructions. Manuals+ will review the question and use this page’s manual context to help answer it.